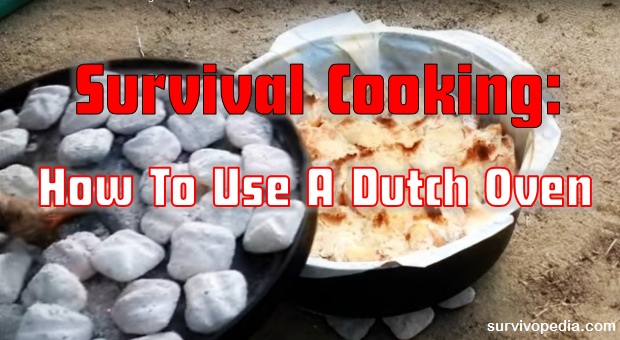
Pioneers no doubt had to make some rough choices about what to take and what to leave behind when they made the voyage west. One thing that they didn’t even consider leaving behind, though, was their Dutch oven.
This marvelous piece of cookware is so versatile that it warranted a spot in the precious little space inside a covered wagon.
When you think about camping, you probably don’t think about making bread, biscuits, or cookies – other than s’mores of course! That’s because you’re not familiar with how a Dutch oven works.
In short, it’s magic.
A Dutch oven actually consists of two pieces: a pot and a lid. The lid seals over the pot when needs must, and serves as a skillet, too. You can use a Dutch oven on a stove or in an oven just like you’d use any other pan or skillet, but it’s so much more useful than that.
First, cast iron cookware in general is just fabulous to cook on. Other cookware, such as those made from aluminum or coated in Teflon, can be toxic to us over time. Teflon starts to flake off into your food after a few months or maybe a year. Then you run the risk of getting cancer. Aluminum has been associated with Alzheimer’s disease.
Cast iron, on the other hand, has been associated with family treasures that are passed down from generation to generation.
Cookware made from cast iron can quite literally last hundreds of years – I have a skillet that’s nearly 150 years old and it’s seriously the best skillet I own. I have a square one that I bought 25 years ago, and I won’t make cornbread in anything else. I use it at home on the stove, in the oven, and on the grill. I take it camping and use it over an open fire.
So, I’m not just preaching it from the handbook, I’m drinking my own Kool-Aid. Cast iron rules.
Now that you know how I feel about the material, I want to get on to the exact piece of cast iron cookware that we’re discussing today: the Dutch oven.
Simply surviving isn’t good enough if you’re to stay happy and healthy in the long run. You need good food, companionship, and hope. A Dutch oven can’t do much about who you eat with, but it can be used to cook luxury foods that keep morale up. Cornbread, biscuits, cake, hot rolls, and desserts such as cobbler are all possible as long as you have the ingredients, a fire, and a Dutch oven.
Video first seen on Cooking With Cast Iron.
You don’t need electricity or gas, nor do you need an actual oven because a Dutch oven IS an oven. If you know the basics of cooking with one and have the ingredients, you can make anything that you want.
So, without further ado, let’s talk about how to cook with a Dutch oven.
Aluminum or Cast Iron Dutch Oven
I know, I’ve just expounded on the benefits of using cast iron, and even knocked aluminum cookware a bit. I personally don’t like to cook in it because studies have shown that the aluminum does leach into food, especially if the food is extremely basic (baking powder), or extremely acidic (tomato juice, vinegar, or fruit juices).
Studies show that anodized aluminum doesn’t pose this risk, so if you opt to go with an aluminum Dutch oven, make sure that it’s anodized. There are some benefits to cooking with an aluminum Dutch oven, primarily the weight. A cast-iron Dutch oven weighs about 7 pounds as opposed to the 18 pounds or so that you’ll be toting if you’re carrying a cast iron one.
Aluminum also doesn’t require seasoning like cast iron does, nor will it rust if you don’t care for it after you wash it. Many even come with a non-stick surface, but cast iron will become non-stick if you season it correctly.
Aluminum heats faster, but that’s not necessarily a good thing because the heat fluctuates in it, and aluminum will melt if it gets hot enough. Still, aluminum may be better for baking bread or making sauces and gravies than cast iron.
Cast iron holds heat evenly and for longer periods of time. It will actually keep cooking your foods for quite a while even if your coals cool down so you don’t need as much fuel to cook with it. The lid is heavy enough that it seals and steams your food so that it doesn’t dry out. This is why I said above that aluminum may be better for baking bread.
So, there are the differences. If you have to carry it, aluminum may be worth the downfalls to you. If you don’t, I’d say that cast iron wins hands down. I’m sure that there are those that disagree.
Types of Dutch Ovens
If you’re standing in the pot aisle at the store trying to figure out what the heck you need, or researching online before you go buy one, it can be confusing.
First, know that a camp oven and an outdoor oven are the same thing. These will usually have feet and a handle that you can use to hang the pot over the fire. The lid will also be flat and have a lip that seals the oven so that coals can’t get into it. You can use the lid as a skillet, too.
Kitchen pots and bean pots are also two names for the same sort of pot. They won’t have feet. Bean pots aren’t just for beans so don’t let the name fool you. It’s actually a cooking method that was common back in colonial days. These pots will have a flat bottom and a domed lid that may have spikes for basting inside of it. The steam rises, then drips off the spikes down onto the food.
Don’t be afraid to buy a used Dutch oven. As a matter of fact, I got mine from a yard sale for $5. Just be aware of what you’re buying.
- First, don’t buy it if it has riveted tabs. You want the oven to be cast together, not riveted.
- Look for inconsistencies in the thickness. That will lead to inconsistent heating and cooking
- Don’t be scared away by a little rust. As long as it’s just surface rust, it will clean right up with steel wool.
- Make sure that the bottom is level. It shouldn’t rock.
- Make sure the lid fits well – not too loose, and not too tight, and it doesn’t rock.
- Check for chips and cracks as well as imperfections in the casting.
- If you’re buying a camp oven, make sure that the wire handle is sturdy.
Seasoning your Dutch Oven
Cast iron takes a bit of time to reach that non-stick state. This is called seasoning. Basically, the iron needs to absorb fat so that it develops a patina that keeps the iron from absorbing your food, causing it to stick. Seasoning also prevents the iron from rusting and makes cleanup much easier.
New ovens (or any cast iron) come with a protective coating from the manufacturer. The same is true with aluminum but all you need to do in that case is wash the aluminum with hot soap and water to remove the coating.
Cast iron takes a bit more work on the front end, but it will be well worth it in the end because you’ll have a piece that will be good for the rest of your life, and your children’s lives for that matter.
Before you season your skillet, wash it well. Some people use soap, others don’t. I use soap when I get a new one, or a used one that isn’t seasoned or has rust. I’m not like most people though, who only use hot water and steel wool.
Once you have your Dutch oven clean, preheat your oven to 350 degrees F. You may want to turn off the smoke alarm, just in case.
- Put the Dutch oven and the lid in the oven long enough that it’s so hot that it’s almost too hot to handle, then remove them.
- Dribble a bit of olive oil, solid shortening, or vegetable oil. Don’t use butter, margarine, or cooking spray.
- Use a paper towel to smear the oil over the entire surface of the pot and lid, inside and out.
- Put the pot and lid back in the oven bake them for an hour. You should probably put a cookie sheet on the rack under them in case they drip. No need to burn the house down while you’re doing this.
- Turn off the oven and let the pot and lid cool completely, then repeat the process.
- Wipe down, and you’re done!
Video first seen on JRKFamilyOutdoors.
Of course, the more you use your oven, the more seasoned it will become. Every time you use it, you need to clean it, then heat it to get the water out of it and wipe it down with a thin layer of oil again; just a tiny amount on a paper towel while the pan is cooling.
Avoid cooking super acidic or high-sugar foods the first few times you use your oven because these will break down your seasoning before it has time to harden.
Using a Dutch Oven in Coals
You may not know it, but the ashes under the fire are actually usually hotter than the fire itself. The ashes are compact and hold in heat. This makes for an excellent cooking environment. If you think about it, that’s exactly what happens in your oven at home, right?
Maybe you’ve cooked ears of corn or potatoes wrapped in foil in the coals of your fire, but it’s pretty tough to bake a piece of apple pie like that? Well that’s where your Dutch oven comes in. Different foods cook better depending upon how the Dutch oven is situated in the coals, and you can cook entire meals in it, too. Casseroles, desserts, stews: they’re all within your reach.
First, you need to decide if you’re cooking IN the Dutch oven, or WITH it. You can either cook your food directly in the oven or you can put the food in another container, such as a pie plate, and cook in on a trivet or rack inside of the oven. This is usually done to keep the food from burning, or to make cleaning your oven easier.
If you’re cooking a dessert and your oven is still relatively new, you may want to use this method so that the sugar and acids in the fruit don’t eat away your seasoning.
If you’re using your oven for frying, or boiling, all of the heat should come from the bottom. In other words, place the oven on top of the coals or a grill rack (or hang it over the fire).
If you’re stewing or simmering, the majority of the heat should come from the bottom. Place the pot in the ashes with most of it buried, but put some of the coals on top, about 4:1 bottom to top.
If you’re roasting food, heat should come from the top and bottom equally. Place coals under and on top.
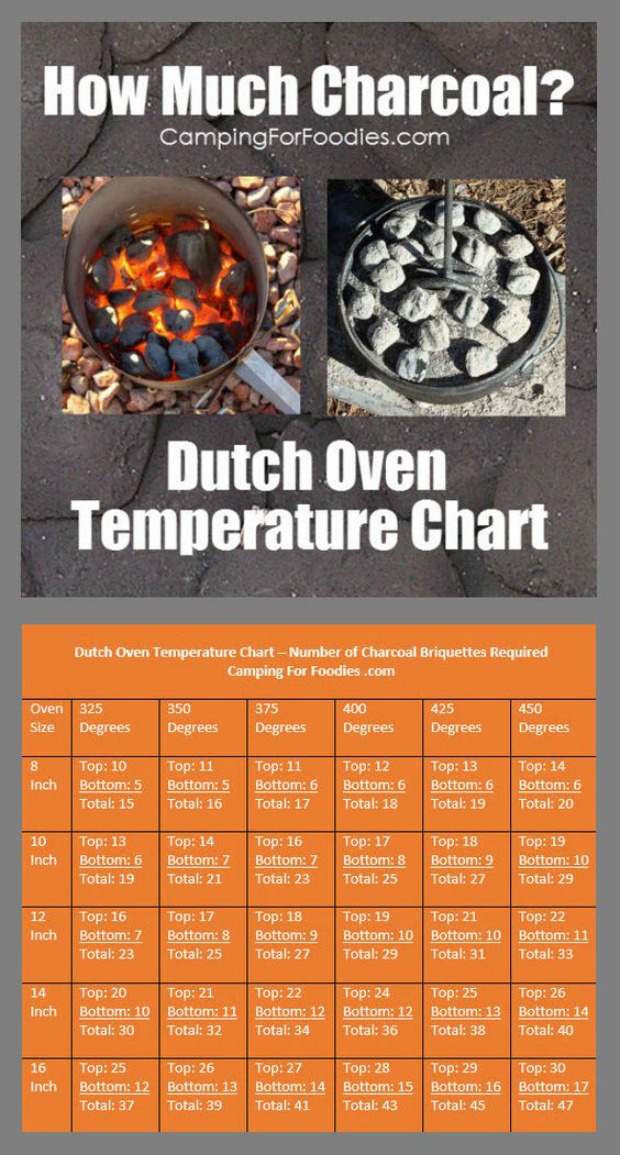
If you’re baking, most of the heat should come from the top. The ratio should be 1 part on bottom and 3 parts on top.
If you’re wondering about specific foods, typically soups and stews should be cooked with most of the heat on the bottom (2/3 or so on the bottom, and 1/3 of the coals on top. Meats, veggies, and cobblers should have equal heat distribution, and cakes, biscuits, bread and cookies should have 2/3 of the coals on top and 1/3 on the bottom.
Bread and biscuits help you get a lot more mileage out of a meal and are comfort foods. They’re also the trail version of fast foods. You can cook extra and if you get hungry along the trail, you can pull out a roll or a biscuit and eat it on the run. Neither of these would be possible in large quantity without a Dutch oven.
You can make biscuits inside of the oven, or right on the lid – just butter or oil both sides so that they brown equally.
Bread or rolls are best if you let the final proof take place inside the oven, then bake them immediately. Some old recipes call for coating the inside of the oven with flour before you put your bread in to rise/cook. The flour will burn but your bread will be fine.
If you’d rather not use the flour, just oil the inside of the oven and the top of the lid, then let your bread proof. Put your oven in the coals, with 2/3 of them on top. When there are 5 or 6 minutes left for the bread to cook, take of the lid and butter the top of the bread. Put the lid back on and let it finish cooking. Bread is done when you peck on the top and it sounds hollow.
There are different ways to cook with your Dutch oven, but these are the basics. You can pick up a good Dutch oven for as little as $35 or so, and that’s for a Lodge, which is American-made and arguably the best brand of cast iron skillets out there.
There are, of course, gourmet chefs coming out with their own lines of cast iron cookware too, and some of them are even pre-seasoned, but you’re likely going to pay quite a bit more for them. It’s up to you, though. There are definite advantages to buying a pre-seasoned piece, but I’m old-school and take a certain pleasure in doing things for myself.
Learn how to make your own food based on survival ancient recipes from our forefathers. Click the banner below and uncover more survival secrets, and stay close for a great offer that will boost your survival cooking!
This article has been written by Theresa Crouse for Survivopedia.
1 total views, 1 views today
from Survivopedia
Don't forget to visit the store and pick up some gear at The COR Outfitters. How prepared are you for emergencies?
#SurvivalFirestarter #SurvivalBugOutBackpack #PrepperSurvivalPack #SHTFGear #SHTFBag


No comments:
Post a Comment