We spend about a third of our lives sleeping, so there is a good chance that you will awake to some sort of emergency at some point, if you haven’t already.
There you are, sound asleep until you are jolted awake by a bump in the night, a deafening siren, the rumbling of an earthquake or the shouts of a loved one. How prepared are you?
The purpose of the gear you have bedside should be to get you oriented and situationally aware and then get you to a safe room (often the master bedroom closet). This will delay attackers and provides hard cover as well as structural support against disaster to keep you safe and give you time to communicate and ready an appropriate response whatever emergency you are facing.
Situational Awareness
As you start awake, the first order of business is whether this is like a thousand other times you have awakened and gone back to sleep or whether this time is different.
Since you may be making that determination in a state of sleep drunkenness, it is to your benefit to make use of tools that can improve your situational awareness.
1. Worn Equipment
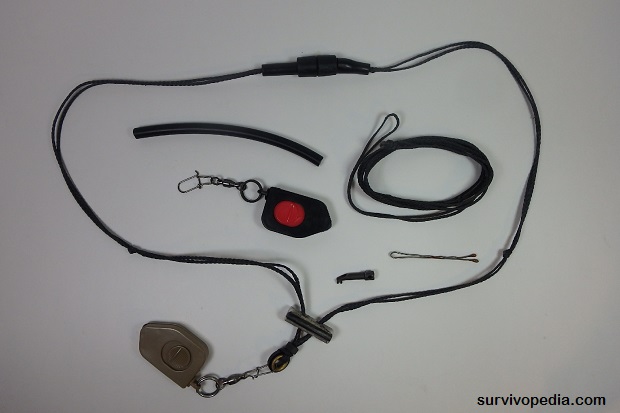
I make a habit of wearing an ordinary-looking necklace that has a small LED on it and some restraint escape tools inside it. This way I can always find my way in the dark, start a fire and have a shot at escape should I be unlawfully detained, even if I am hauled out of bed in the middle of the night in my underwear or otherwise caught at a disadvantage.
I started wearing it because I travel to places where the kidnapping of US citizens is a significant threat, but I found it so useful to always have an LED handy that I just kept wearing it. I vary its configuration depending on where I am and what I am doing.
The Survival Necklace
You can purchase a basic necklace pre-tied from Oscar Delta or contact them and ask if they’ll build you a custom model that meets your needs and level of training, which may require that you email them from a DOD or Department email, depending on what you want, since they are in the UK.
I suggest that you learn to tie and build your own so you can customize it as your environment and needs change and because survival is the king of all DIY pursuits. If you need help, just ask.
I’ll list the contents of mine as it is today, but I change it as needed and tie new ones as old ones get worn out in life or used in training.
- Technora 200 Friction Saw – Cut zip ties, flex cuffs, rope.
- Zirferrotech Zircon Ceramic Microstriker Bead – Great ferro rod striker and breaks tempered glass (side & rear car windows) with surprisingly little force both due to its extreme hardness. Your car door could be jammed in a crash, you could need to exit the rear of a vehicle when the locks have been disabled or you could need to safely break auto glass to rescue someone else. Non-ferrous.
- Tungsten Carbide Microstriker Bead – Like the wheel on a lighter. Breaks tempered glass.
- Large Fishing Swivel – I could have used any number of snap hooks but wanted mine to be able to pull double duty as fishing gear if needed. I just smooth any sharp edges.
- SO LED – Red or White light models made by CountyComm. Availability is spotty but very inexpensive so buy a bunch if you find them. The slide switch is easy to actuate with one hand. Positive on/off. Simple design. MOLLE/snap clip accessory for bags and gear.
- Silicone Tubing – Fuel line tubing conceals handcuff key and bobby pin.
- Advanced Handcuff Key 3 – Matches the tooth spacing for TOOOL’s ultimate handcuff key. SnakeDr removed some metal from the barrel on this model so it works with the maximum number of high security handcuff models possible and still opens standard handcuffs.
- Bobby Pin – “Reach around” tool for the handcuff key in case you get illegally detained in handcuffs with your fingers away from the keyways. Handcuff shim, lock pick, lock tension tool, sharp bit of metal to work knots or duct tape, etc.
- Ferro/Magnesium Toggle – I use firesteel.com. Availability is hit and miss, but they are the best performing ferro rods I have tested to date and I have tested dozens. The bond between the magnesium and ferro rod is probably as strong as either and this combination gives magnesium to use as tinder which is a big plus in the Rocky Mountains in winter or in 99% humidity in the Brazilian jungle.
2. Light and Footwear
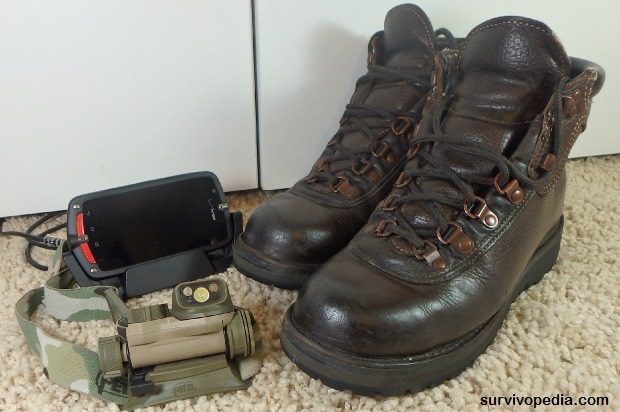
If you are jarred awake by an earthquake or similarly destructive event, your bedroom windows may be all over your bedroom floor, making footwear necessary to prevent injury.
When you wake, your eyes are adjusted to the dark, but you need enough light to orient yourself and grab what you need without making racket.
I prefer an LED with a low red setting work setting to save my night vision while I get my bearings when I wake up in the night. I tried the Streamlight Sidewinder Compact Military IR but it turned out to have a design flaw.
The switch takes a lot of force to turn and is just soldered to the circuit board without any load bearing support to the housing so they end up breaking after a year or so of moderate use.
I replaced it with the Petzl Strix IR, which has been rock solid to date. It has an IR IFF strobe, but lacks a visible strobe. I guess Petzl decided that was outside the scope of use for this type of light.
Dead Simple Trick Brings Any Battery Back To Life (Never Buy Batteries Again)!
3. Cell Phone & Charging Cradle
Your smart phone can be a powerful tool for situational awareness, but the problem is that mobile voice service is often the first thing to stop working in a major emergency, so be sure to choose emergency notification services that notify you via text messaging.
If you haven’t yet, check out the National Weather Service page if you are in the USA or the equivalent in other countries and choose SMS notification services that are the best fit for the risks you face based on your location, climate, employment, etc.
Most of the notification services are free, but you can always pay for more features. Get the FEMA app if you are in the US (I haven’t had any black helicopters come for me yet) and any other notification services that apply to you.
Just keep in mind that these notification services are third party and are no substitute for All Hazards Weather Radio. The technology necessary to run the cellular phone network makes it inherently fragile. Because the All Hazards Weather Radio system is much simpler, it is much less fragile.
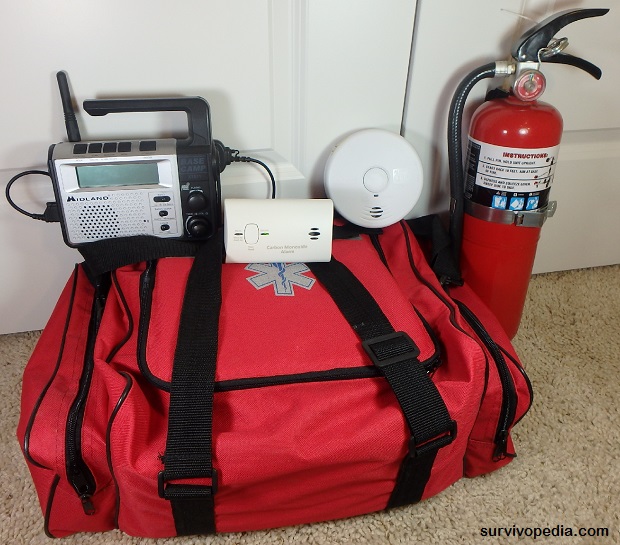
4. Public Alert Certified All Hazards Radio
Every survivalist should have one of these radios!
They can notify you of severe weather alerts, large scale disasters alerts such as earthquakes or any event warranting notification of the public and has saved my bacon more than once.
Given that most of us spend a third of our lives sleeping, without something to wake us up in an emergency, we very well may sleep right through the first crucial hours of an emergency. In an emergency where it is necessary to bug out to survive, you very well may miss your window.
As I consult with survivalists, I often find that they have spent thousands of dollars on 4-wheel drive vehicles and bug out bags and made elaborate preparations to bug out, but don’t have a $30-$60 Public Alert Certified radio that close a chink in their armor that leaves them exposed 33% of the time.
It’s good to have that warning the other 67% of the time that you are not sleeping as well.
There are two types of All Hazards Weather Radio:
- NOAA Certified
- NOAA Public Alert Certified.
Here, we are focused on the later. Many radios are NOAA certified, but not Public Alert Certified. They will receive NOAA alerts and can listen to weather radio channels but lack many of the features of Public Alert Certified radios, which are programmable with codes for each county to only receive alerts for the counties you specify.
They are programmable by severity, have a “wake up” feature that allows alerts to turn on the radio, display information important about the threat as a banner in their LED display, and have ports to attach external notification devices such as strobe lights, sirens or pillow shakers to help notify the hearing impaired and talk to other equipment.
To clarify, the words “Public Alert Certified” only appear on the programmable radios with external notification and auto wake up. If possible, you want a radio that is not programmable to your county, type of threat and threat level. Otherwise, your radio will constantly alert you to events that will not affect you.
By telling the radio what you are and are not concerned about (programming it) you can eliminate false alarms.
5. Security System Reporting Mechanisms
If you have a home security system, make sure that you have reporting mechanisms at your bedside. Many older alarm panels will tell you which zone was breached, but this will not be of any help unless you have a panel installed beside your bed so you can see it.
Many newer systems can send notifications and even real-time video to your cell phone, but may need Internet access to do so. Make sure that all alarm sensor and reporting has battery backup all the way from every sensor to the panel to your hub, switch or router to your cell phone.
If your system includes Dakota Alert MURS sensors, you will want a MURS radio receiver on your nightstand.
History has many survival lessons to teach on the subject of situational awareness sans electrical grid.
In the 1800’s in Utah Territory, there lived a man named Orrin Porter Rockwell.
Depending on who’s account you read, Porter Rockwell was an outlaw, a lawman, a bodyguard, a tracker and a scout in the Nauvoo Legion that waged a guerrilla campaign of harassment, robbing and burning supply trains, and preventing resupply of the US Army in the Utah War.
Porter was as famous as famous a gunfighter as Wyatt Earp, Doc Holladay, Bat Masterson or Tom Horn in his time and killed more men than all of them combined.
Between the friends and family of those he killed, upstart gunfighters looking to make a name, the men he jailed and those he fought against in the Utah War and other skirmishes, he certainly had to watch his back.
His employment had him on the trail tracking outlaws and guiding parties West to California during the gold rush which had him returning to the Salt Lake Valley alone and sometimes sleeping off a night of drinking on the trail, so Porter developed a strategy to give him some warning.
You might expect a man like Porter to have a large ferocious dog, but as many miles as he made horseback in a day would have killed most domestic breeds. Instead, he chose a little white dog that could ride with him horseback, behind his saddle.
He trained the dog to lick his face to wake him instead of barking when someone approached his camp. Porter’s portable biological alarm system helped him to die of old age instead of a bullet and is easily duplicated today and even easier if you don’t travel on horseback.
6. Smoke, Flammable Gas and Carbon Monoxide Detectors
It is easy to plan for the spectacular but improbable (based on history) threats and neglect threats that cause a lot of death and suffering. Make sure you have detectors throughout your home and in your bedroom.
Action
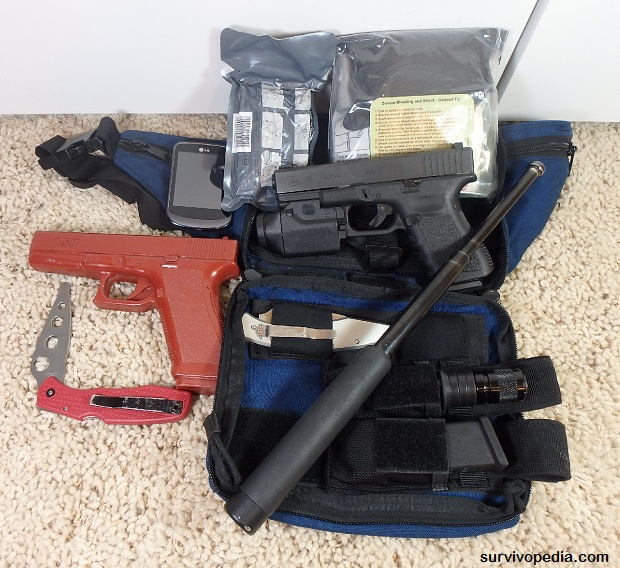
So, you are now awake at bedside with your headlamp and footwear, have identified a threat or possible threat and it’s time to act. For most threats, you will sound an alarm (if necessary, to alert other members of the household) strap on your home defense waist pack and make for your safe room.
7. Home Defense Pouch
A standard preparation that I recommend is to seek professional self-defense, firearms and legal training and then put together His & Hers’ home defense waist packs as-long-as it is legal for you and your spouse to carry concealed weapons in your home.
If you carry openly, a belt can serve the same purpose. The idea behind this approach is that you can grab a single piece of gear, buckle it on and have the basic tools of self-defense at your disposal. I recommend keeping this in a hidden and locked safe that can be accessed quickly and in the dark.
I am not alone amongst firearms instructors in recommending this approach. Should you come out on top in defending your life, a second battle begins, one that will determine your liberty.
Consider your jurisdiction, the laws and how officers, prosecutors and judges may apply them. Depending on their dispositions, you may have a better chance of not going prison if you use ordinary-looking equipment and firearms than if you sleep with full battle rattle at the side of your bed.
The main purpose of the home defense pouch is to give you the tools you need to fight your way to the cover of a safe room.
8. Home Defense Waist Pack
- Centerfire Pistol with tritium sights – You need to be able to see your sights. You can keep a sidearm in the waist pack or place your sidearm in the waist pack when you take it off at the end of the day.
- Spare Magazine or Speed Loader
- Tactical Flashlight – You need to clearly identify intent, ability and opportunity and see what is behind your attacker.
- Knife – Will never experience a stoppage and won’t run out of ammunition until you stop swinging.
- Less-lethal Option – Lethal force is not always the best solution.
- Compact GSW Kit – Any time you strap on a firearm you should also strap on a trauma kit.
- Cell Phone – You are not going to want to have to go looking for a cell phone if you need to use this waist pack.
9. Turnout Bag
You may have seen firefighters using turnout bags to get ready quickly without forgetting anything. Under the stress of a life and death emergency, we are more likely than normal to forget things.
Checklists and turnout bags help mitigate this risk. It is important for survivalists to include checklists in turnout bags because we need to include ID, passports and other items that we can often only have one copy of. I keep these items in an EDC valet and check them off as I turnout.
The turnout bag concept lends itself handily to the Modular Survival Kit Model as turnout bags and specific ensembles can be layered on top of turnout gear as needed based on threat, mission, environment, climate, mode of transport and other relevant factors. You can read more about turnout bags and checklists here.
Common Types of Turnout Bags and Ensembles
- Covert (Everyday) TOB – Normal “gray” concealed carry clothing in earth tones.
- Overt TOB – Minuteman bag with overt camouflage.
- First Responder – If you work or volunteer as a first responder (or plan to) you will need a dedicated turnout bag for that.
- CBRN (Chemical, Biological, Radiological, Nuclear) Ensemble – These threats require specific personal protective equipment and training.
- Extreme Cold Weather Ensemble, Covert
- Extreme Cold Weather, Overt
Safe Room
A safe room provides a protected area to shelter in place or to get ready out of your turnout bag before grabbing your bug out bag and proceeding to an assembly area in the event that your home becomes unsafe.
Many families decide to locate safe rooms in master bedroom closets or adjacent to them. Locating it at ground level or above gives heavier-than-air gases someplace else to go, but requires more shielding to protect against radiation if it is planned to also serve as a fallout shelter.
Safe Room Features
- Turnout Bags
- Hard Cover – Protection against small arms. If you lack the funds, you can measure between studs and pour steel-reinforced concrete panels to install between them.
- Structural Reinforcement – Protection against earthquakes, hurricanes, tornadoes.
- Reinforced Locking Steel Door – To slow down aggressors.
- Alarm Panel
- Monitor – For cameras so you can monitor the situation outside. Lacking money for this for my first safe room, I installed a framed one-way mirror which worked well and didn’t require power.
- Long Guns with Lights – Don’t forget spare ammunition and a PC way to carry. Carrying it in a satchel instead of a plate carrier may avoid the appearance that you were hoping to need it.
- Fire Extinguishers
- Escape & Utility Shutoff Tools – The rubble you escape from may not resemble the home you live in today. Windows and doors may jamb or be blocked.
- First Aid & Trauma Kit – Include gear based on your family medical needs and risks such as Epi-pens, inhalers, insulin or Naloxone which can save lives.
- Concealed Emergency Exit
- Water & Food
- Blankets & Pillows
- Portable Toilet
- Bug Out Bags
- Materials to Flag Your Home – Flagging your own home can save time and may keep Search and Rescue personnel from breaking into your home to search it if you decide to evacuate. I will write an article describing how to do this.
Training
Independent of what preparations you decide to implement, training will help iron out the kinks.
Start the drill in bed, dressed as you normally sleep. Don’t cheat and think you have it down because small details matter here and differentiate your precise situation, equipment and body from everyone else’s.
Note the time and kill the lights. Choose a few different emergency scenarios based on the types of emergencies you believe to be most probable. Run through the most probable. Note the time when you finish.
Debrief afterwards nothing what worked smoothly and effectively and was less effective than you would like and make changes. Running the most probable scenarios in sets of three times each will give the best return on your skill training.
When you are comfortable with the drill, work it in as the first step in a timed bug out drill. There is no substitute for experience, but stressed, timed training is about as close as you can get without responding to real emergencies.
This article was written by Cache Valley Prepper for Survivopedia.
References:
http://www.weather.gov/subscribe
https://en.wikipedia.org/wiki/Porter_Rockwell
1 total views, 1 views today
from Survivopedia
Don't forget to visit the store and pick up some gear at The COR Outfitters. How prepared are you for emergencies?
#SurvivalFirestarter #SurvivalBugOutBackpack #PrepperSurvivalPack #SHTFGear #SHTFBag



No comments:
Post a Comment