Even if you just want to learn how to break down your meat so that you can buy it in bulk and butcher it yourself, this is the article for you.
Thinking about it, the term “butchered it” is typically meant as a derogatory remark, as in, “She absolutely butchered my hair” or “He butchered that song when he sang it.” It implies that it was hacked up when in fact, butchering is pretty close to an art. As a matter of fact, if you don’t do it right, you really run the risk of … err … butchering a good cut of meat. Yeah, I don’t blame you – I’d groan, too.
Butchering a cow was a skill most pioneers grew up with as an essential part of an independent life.
Forget About Mad Cow
Before we move forward, let’s clear something up. You’ve no doubt been warned about eating various parts of the cow. You’ve probably been told that you’ll catch Mad Cow Disease. Scientifically known as BSE, or bovine spongiform encephalopathy, Mad Cow has only been found in one cow – a dairy cow – ever in the US. And it’s not entirely clear that Creutzfeldt Jakob, BSE’s human variant (153 cases, ever) is caused by eating infected animal protein.
In other words, your odds of catching Mad Cow is exactly nil, and the odds of catching the human variant is, well, nil.
What You’ll Need
If you’re going to do this, do it right. You need a crazy sharp knife, non-serrated. I actually have a few different sizes so that I can make long strokes when I need to, but can use almost surgical precision when it counts. You also need a hacksaw (no, I’m not kidding) and a meat cleaver. Though that’s a tool that you may want to use judiciously.
And most importantly – space and containers, then refrigeration or freezer. A cow is big, even when it’s quartered, and you’re going to have a lot of meat.
Finally, use safety equipment including goggles and safety gloves (metal mesh).
Butchering Tips
Remove any membranes from the meat. It will be sort of a bluish sheen stretched over the meat, but you want it off. It’s tough and it gives the meat a stronger flavor
Watch your fingers! You’re going to be cutting blind in some instances so use your head unless you want to lose your fingers. If your knife is sharp enough to cut through cow flesh, it’s definitely sharp enough to cut through yours!
Clean your meat as you go. This is just a personal preference for me, but I’m the rare southern girl who can’t stand the texture of fat. Tendon doesn’t bother me, but it’s tough and unpalatable. So as you clean your meat, trim it before you store it. That way when you pull it out to use it, it’s ready.
Fat and connective tissue (marbling) is what cooks down and makes your steak tender and flavorful, so don’t ruin it by taking the lean route and trimming all of the fat off.
And speaking of the fat, if you’re going to make tallow (and why wouldn’t you?), you need to keep the chunks of fat, then render them down.
Parts of the Cow
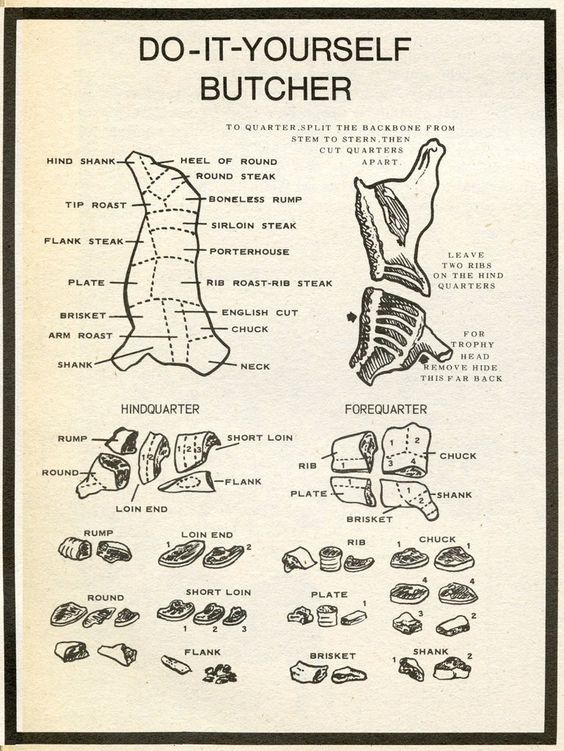
Now the first thing that we need to discuss is the parts of the cow. Obviously, there are some folks that enjoy tongue and brain, so that’s in the head. The tongue is removed by simply cutting it out of the mouth and the brains are removed by cracking open the skull.
- Hind quarters: The rear quarters are where you the rump roast, the round roast, and the shank
- Front quarters: This is where your chuck roasts. The neck meat is typically used for stew meat or to make hamburger because it has a lot of fat in it. Also, the breast is there, and that means BRISKET!
- Belly: Flank steak and skirt steak. These cuts are typically tougher than other cuts and are therefore either sliced thin to use in dishes such as fajitas, or are used as stew meat and cooked low and slow for tenderness. You can also marinate them for tenderness.
- Ribs/Back: Now we’re getting to the good stuff, at least if you’re steak and ribs kinda person. The ribs, short loin, sirloin, and tenderloin are on the back. You can get a variety of cuts from these sections. The rib section has the baby backs and St. Louis style ribs, or you can do boneless ribs. This is also where you’re going to get your steaks from.
Now, let’s break it down a bit further. The ribs are also where you get the ribeye steak, the rib steak, the rib roast and the ribeye roast, depending on how you cut it. As the names imply, the rib roast can be cut into rib steaks, and the same goes for ribeye roast.
The Difference between a Porterhouse and a Filet Mignon
Moving further toward the south end of the cow, you’ll find the short loin section, right behind the ribs. This is where the majority of steaks come from. Top loin, T-Bone, Porterhouse, tenderloin roast and filet mignon, which is just the tenderloin roast cut into steaks.
Now, you may not know this, but all of these steaks are inter-related since they all come from the short loin. Technically, they’re all T-bones, in that they have a T shape to it, with two different cuts of steak – one on either side of the bone. A Porterhouse is cut from the rear end of the loin and is bigger. On one side is a tenderloin, or filet mignon, and on the other is a New York Strip. A standard T-bone is cut closer to the front, is smaller, and contains a smaller portion of tenderloin.
And behind the short loin is the sirloin, which is still a decent cut of meat. As a matter of fact, if it’s cut and cooked right, it’s nearly as tender as the loin. That makes sense considering the tenderloin runs right along the bottom of the sirloin and short loin, coming to a point right behind the ribs.
So, how does all of this information help you? It gives you an idea of what things are going to look like when you get in there. Now you’re ready to start cutting, because there’s no time like the present.
Getting Started
The first thing that you need to decide after the cow is skinned is whether you’re going to age it or not. If so, you need to do it before the roasts are cut into steaks. Many people do it with a steak that they buy from the store and this may be the easiest way for you, too, unless you have somewhere to hang the whole carcass.
The purpose of aging is to break down connective tissue so that the meat is more tender, and to allow the flavors to mellow and develop. Unaged beef will have a metallic, bloody taste to it, but aged beef will have those deep, mellow flavors that are the signatures of a good steak. There are two methods – wet aging and dry aging.
Wet aging is a relatively new process and is done by vacuum-sealing the steak. It’s faster and there is no waste, but you may not be getting the exact flavor that you want. Many people love wet-aged steaks, though. As a matter of fact, you know how it seems that a steak just doesn’t taste the same when you cook it at home? That’s because most store steaks are wet-aged, whereas good steakhouses used dry-aged meat.
The bad part about dry-aging is that you need special, temperature-sensitive meat lockers to do it, and even if you do have them, you’ll lose some meat. Still, I think the flavor is worth it. And you can dry it at home – but that’s an entirely different article!
The only way to truly know your meat is truly safe, is to slaughter it yourself so take the next step to food independence.
Click the banner below for more!
If you have any questions or would like to add anything, please do so in the comments section below. There’s nothing better than talking beef!
This article has been written by Theresa Crouse for Survivopedia.
from Survivopedia
Don't forget to visit the store and pick up some gear at The COR Outfitters. How prepared are you for emergencies?
#SurvivalFirestarter #SurvivalBugOutBackpack #PrepperSurvivalPack #SHTFGear #SHTFBag


No comments:
Post a Comment