Saturday, May 20, 2017

13 Tips for Using Oatmeal from Your Food Stores

Written by R. Ann Parris on The Prepper Journal.

Editor’s Note: This article was generously contributed by R. Ann Parris. If you have information for Preppers that you would like to share and possibly win a $300 Amazon Gift Card to purchase your own prepping supplies, enter today.


Oatmeal – Jazzing Up the Ubiquitous Prepper Cereal

Being inexpensive, rolled oats can help us save money now, and it’s a good one to stock up on for the same reasons – cheap, filling and full of endurance-granting slow-release energy. I’m not a big fan of “just” oatmeal as a hot cereal. It’s just … well, boring. Too, I anticipate plenty enough spoon-and-bowl meals from beans and rice, boiled wheat or barley, or soups in a crisis, whether it’s a personal crisis or a widespread disaster. I’d rather avoid more as much as possible. The humble rolled oats tub actually helps me there in a big way.

Using mostly things that are also already in my storage or that are easy and inexpensive to obtain, I can churn out desserts, snacks, sides, dinners and breakfasts that are interesting and varied, and don’t really taste like oatmeal. Oatmeal also has a lot of soothing and absorption properties that gives it some handy topical uses.

Using Oatmeal to Extend Meats & Meals

Mix in flakes of oatmeal and-or lentils and ground beans to extend things like meatloaf, meatballs and the hamburger in stews. Oats also make a fabulous replacement for breadcrumbs that would be used as binding or for coating meats.

Add it into Stovetop or homemade bread dressing or stuffing to increase the healthy fibers and calories, and the feelings of satiety from meals.

Grind coarsely or finely and add to flours for bannock, breads, muffins, and biscuits. Zucchini bread, carrot cake and other sweets can take as much as a quarter of the flour in oats without a significant change in texture or flavor. Pancakes, pie crusts, dumplings, cookies and cobblers can all have part of the flour replaced, especially with oats processed to a fine powder.

Fifty-fifty mixes or greater will be far more noticeable and may require additional liquids, but it also increases the heartiness of foods, helps us feel fuller and keep that satisfaction longer over stripped bleached flours especially, gives us healthier, natural arcs of energy, and lowers the glycemic index of foods while helping stomachs process.

Ground oatmeal can also be used to thicken soups, stews and gravy, just like ground beans or lentils that are too old to soak up water efficiently.

Easy Non-Cereal Recipes

Oatmeal has a lot of applications for cooking, without resorting to a bowl of hot cereal. Most of them can be done with a Dutch oven, campfire, rocket stove, or a solar oven or Wonderbag cooker if we don’t have access to our stoves and ovens.

Ash cakes can be made out of pretty much any flour. Using some salt, milk, egg or fats will improve flavor, but the bare-bones way of doing it is to mix just a little water at a time with flour or meal – or in this case, oats – until we can form a patty, then flopping it onto a cooler section of ash. Rolled oats will do best if they’re ground to a flour or if they’re allowed to soak a bit first. As a plain, just-salted version, they make a bread we can have with soups or meats. A little sugar or fruits, and we’re getting closer to a cookie. Alternatively, we can top them with honey or jams, fruits, sweetened cream, or something like a chili or bean medley.

Baked Oatmeal Muffins – A basic recipe with add-in’s for interest and variety is here https://brendid.com/healthy-oatmeal-muffins-no-flour-no-sugar-no-oil/ along with additional links. You can also find dozens of recipes as simple or complicated as you like, with and without other flours and oils, with just about any search. They turn oats into a fast, easy finger food that’s readily portable.

No-Bake Cookies are a staple in some lives. With just a few ingredients and few utensils dirtied, we can use up our oats to satisfy cravings for a fork or finger food as well as a sweet treat. Given the speed with which they disappear as either drop clusters or sliced squares at BSA and adult gatherings these days, during a disaster they’ll be a for-sure hit.

Oatmeal bars can be found as Amish Baked Oatmeal or other standard baked oatmeal, such as this one http://www.tasteofhome.com/recipes/baked-oatmeal. Oatmeal can also be turned into homemade granola bars. They’re out there in the internet world as soft chewy bars or crunchy options. All of them are adaptable to the fruits, nuts and seeds we have on hand or prefer. There are also homemade granola bars that make use of cereals that store well such as Rice Krispies, Cheerios, or Chex, which can increase the variety even more.

Crunchy granola clusters like this one that has healthier ingredients and a few extra steps and this one that uses lower-cost and easy-to-source ingredients with fewer steps in the process have a lot of versatility. There’s a lot to be said for the ability to turn out a nice snacking portion while using up inexpensive oats, today and later. And, if you’re giddy for it, making mini clusters to throw in as a homemade cold cereal can help provide a different breakfast meal even with a spoon.

Fruit crisps – A basic oatmeal crisp recipe such as this one has a lot of versatility, both now and during a personal crisis or a widespread disaster. We can use it with any pie filling we have, or regular canned fruits we strain or thicken the syrups. We can also use it to make stuffed apples, pears or peaches. It can go over cubed, mashed or pureed pumpkin or sweet potatoes as well, or can be used as a topper for a baked sweet potato. Oatmeal crisp is pretty versatile and forgiving, so we can add a quarter to a half extra oats to our recipe if we want a somewhat heartier and healthier version, or just to help us use up a few more of our rolled oats.

Cookies, Pizzas & Pie Crusts – Cookies are pretty cool as they are. Made thick and gooey, they can be a pretty hearty dessert by topping with dried or canned fruit or pie filling, with or without heavy or whipped cream. We can spread them out in a pie pan to make a quickie crust, use a crisp recipe for a pie crust, or we can bake them as a big, wide cookie to then slice up as a dessert pizza topped with cream cheese, frosting or glaze and then whatever fruit, nuts or morsels floats our boat.

Southern Oatmeal Cake – There are numerous versions of oatmeal cakes, although they’re pretty similar. It’s not the prettiest dish in the lineup, but it’s gooey happiness that can satisfy our sweet tooth without enormous expense. For an easier version that’s more storage friendly or to create some variety, we can alternate the topping with tubs of German chocolate cake frosting, reduced sweetened condensed milk, or just honey if coconut isn’t available. It’s also pretty darn nummy just with some heavy cream, whole milk, whipped cream, or clotted cream on top.

Fried Oatmeal is like fried grits. It starts with the cereal we all know, then it gets packed in a glass or a lined bowl, chilled so it sets up, and later, gets turned out and sliced, then fried in grease, butter or oil. The amount or depth of oil in the pan can change the texture some. The size of the slice both in thickness and width-by-height can affect whether it’s a plate meal like pancakes or if it can be picked up like happy French toast fingers for a non-spoon meal. As with pancakes, waffles and French toast, the topping options become endless – fried “dippy” eggs, sweetened syrups or fruits, chocolate or strawberry milk syrup, cinnamon sugar, and sausage bits and honey are favorites in our house. Chopped nuts can be included in the cereal or added on top for a little bit more texture yet.

For additional ideas about using oatmeal, do a search for savory recipes. Even when it’s served as a bowl of hot cereal, inclusions like grated radish, sprouts, fish, and tomatoes and peppers can increase the variety we’re seeing with our rolled oats and help prevent fatigue from them.

Oats Outside the Kitchen

We can really feel our oats sometimes. Probably most of us have already seen or use – possibly regularly – a product that makes use of some of oats’ best qualities. Just as oatmeal is a pretty soothing and mild option for breakfast, it has a lot of uses externally, too.

Oats can be added to bathwater or used as a paste to relieve:

It can also be added to soaps for its soothing qualities, or turned into an exfoliating scrub.

Combined with baking soda, we can use ground oatmeal flour as a dry shampoo, scrubbing it in with our fingers, then brushing it out. The two absorb oils and relieve any itching, which can be an excellent low-weight and inexpensive option during sweaty garden seasons should water be in limited supply.

That dry shampoo can also safely be used on cats and dogs, to save money on no-rinse shampoos, to avoid stressing a pet with a shower bath, to treat flea or grass allergies, or to avoid getting them wet in cold weather.

Satchels & Sachets

When we don’t really want to turn a bath into an oatmeal pot to scrub, or don’t have a tub available, we can make little balls of rolled oats, with or without additives like baking soda or herbs and oils to gain relief from skin irritations. We can use them in showers, baths, creeks, or just dampened and dabbed on affected areas.

Those, too, can be used on our pets to treat hot spots, bites, and irritated skin.

Satchels of rolled oats can also be used to:

  • Absorb odors in shoes, closets, bags, coolers
  • Absorb moisture from containers before sealing, or sealed with important items

Heat relieves some of the discomfort from cramps, headaches and muscle pains. Pouches can also be filled with warmed dry oatmeal to create in-the-glove or pocket hand-warmers.

Using Up Oats

Oats are a major part of prepper food storage kits because they’re inexpensive. They store well, last well past supermarket best-by dates, have a lot of health benefits for the gut and cardiovascular system, and the fiber and whole grains of rolled oats help us feel full for longer as well as provide slow-release energy that can keep us moving through long days of work or travel.

Happily, they’re also pretty versatile, and with a little creativity we can use them to stretch our budgets now as well as increase our food storage.

There are probably fifty million more recipes out there for making oats without a steaming bowl and spoon, from breads to desserts. There are probably another dozen helpful ways to use it up outside the kitchen. These are just a few of my favorites, due to the ease or the effectiveness of them. Feel free to tag on your additional favorite non-cereal-bowl recipes and uses outside the kitchen.

The post 13 Tips for Using Oatmeal from Your Food Stores appeared first on The Prepper Journal.


from The Prepper Journal
Don't forget to visit the store and pick up some gear at The COR Outfitters. How prepared are you for emergencies?
#SurvivalFirestarter #SurvivalBugOutBackpack #PrepperSurvivalPack #SHTFGear #SHTFBag

Prep Blog Review: What Are You Preparing For?

Maybe you are new to prepping, or you have already started preparing but you are overwhelmed by the amount of information you find online. I am asking you and you one simple question that should at the basis of all your survival plans: what are you preparing for?

Are you preparing for a war, for a societal breakdown, for a blackout, for a pandemic or for retirement? Just because you have started building a stockpile or growing your food it doesn’t mean you are going to survive any disaster.

With this thing in mind, for this week’s Prep Blog Review I’ve gathered four articles on this topic to help you prioritize your prepping. Tell us in the comment section below what are you prepping for.

1. Prepping Priorities – What Should You Be Prepping For?

Too many question marks on striped paper

“When we jump on preparedness sites, sometimes we’re immediately struck by the enormous loads of things to buy, do, and learn. We immediately start hearing about WROL, battle rifles, ammo counts in the thousands, pressure canners, INCH/BOB bags and locations, pace count, and primitive skills. World- and nation-altering events such as nuclear war, internet-ending viruses, Nibiru, Agenda 21 and NWO, and the like pop up.

They all have their places, but sometimes things get missed and it can make for a very overwhelming introduction. It can make it hard to prioritize where to spend our time and financial budgets even for those with experience and years of exposure to the prepared mindset.

To make it a little easier to prioritize, we can work in stages. We can look at what is most likely to occur in the near future and our lifetimes, and use that information to help us decide where to focus our time, efforts and resources.”

Read more on The Prepper Journal.

2. Prepping for a US Mainland Conflict

“Aside from everyone nuking each other into mutually assured obsolescence, the World War 3 worst-case scenario for Americans would be if the conflict reached the American mainland. An invasion. A massive assault.

The ideas seem unlikely, considering that the last time there was a  full-on war on the American mainland was during the American Civil War.

Previous to that, there were some foreign invasions but our land has been protected from battles against other countries almost two centuries.”

Read more on The Organic Prepper.

3. 10 Ways to Get Survival Supplies When You Have No Money

“Prepping for a disaster can be expensive. While fully-stocked private bunkers and steel safes full of weapons and supplies are great for the wealthy, low-income people need to be able to survive when the SHTF, too.

Thankfully, prepping for tough times doesn’t have to cost a fortune.

If you are looking for a way to get survival supplies on the cheap, check out these strategies.”

Read more on Urban Survival Site.

4. What Will It Take To Survive The Coming Pandemic

“This past winter, the flu epidemic in Central Tennessee made the news across the country. I got phone calls from family in Florida about how we were doing. Our local school system closed for several days. The truth is that we avoided the flu this year.

Everyone that we knew who did get the flu was able to get Tamiflu and got well after a week or so. It was more of an inconvenience than an emergency. But it did give us a reason to think about when action would be necessary.”

Read more on The Survivalist Blog.

This article has been written by Drew Stratton for Survivopedia.


from Survivopedia
Don't forget to visit the store and pick up some gear at The COR Outfitters. How prepared are you for emergencies?
#SurvivalFirestarter #SurvivalBugOutBackpack #PrepperSurvivalPack #SHTFGear #SHTFBag

Friday, May 19, 2017

A Prepper Looks Back – 10 Years of Prepping Lessons

Written by Pat Henry on The Prepper Journal.

Cliché alert!!! – Someone once said (don’t really care enough to google who) that “You should only look back to see how far you have come”. A lot of what we do in the world of prepping is a comparison and contrast. We look at what the guy writing the blog has and turn to look at our own survival preps and judge some of our worthiness/readiness on how we add up. It’s a different take on keeping up with the Joneses but I think most of us still look to others as a yardstick to see how we measure up.

I know that I certainly looked at the stated supplies of others when I first began to get into prepping and maybe that is a natural trait of us humans – some extension of our social or survival instincts. Imagine a caveman walking around and he sees his buddy walking around with a new saber tooth tiger pelt wrapped around his hairy butt and thinks to himself, ‘hey, I could use one of those’. Then somebody thought of putting Molle pouches on that pelt to hold the caveman’s fire making stones and Boom, the survival market was born.

And maybe there is nothing wrong with comparing yourself to other people, at least as long as you don’t feel inferior if you don’t have what someone has or covet what they have in order to take it from them. I personally see gear I would like to have all the time and have since I started prepping, but I don’t compare myself to other preppers as much anymore. I don’t feel like I have anything to prove when I discuss my personal preps. Maybe it’s because I know you can never win that game.

Lessons from a Prepper

I thought of this topic today, like I do so many other topics in a completely random fashion. Sometimes I have to ponder several hours or days for an idea. Other times, like today, they just pop into my head walking down the hallway. I thought that maybe it might be of some value to share some prepping lessons that I have learned in my personal preparedness journey that hits 10 years old this year. It is my hope that some of these lessons will resonate with you and give you comfort, ease any disquiet you have or maybe a laugh. If all else fails, you can look at how silly I am and feel better about yourself. Caveman!

The world is not ending tomorrow

Preppers and survivalists (small S) come to this site and the subject of Preparedness/Self-Reliance for a lot of reasons, but I will propose that most reasons for prepping have Fear at their root. Don’t get me wrong, I don’t consider fear a bad thing at all. We are given the gift of fear so that we will be cautious when we need to. We have a sense of danger that warns us and I have relied quite successfully on this many times in our life. I prepare because I don’t want bad things to happen to my family. Now, that doesn’t mean I walk around scared but it did prompt me to action. You should take whatever motivation you have and act on it, but relax more often that you are uptight. I lived with the near certain expectation of doomsday, economic collapse or government tyranny for the first few years and guess what? We are still here. Don’t get so wrapped around the axle that you alienate family or make bad decisions. Chances are you have plenty of time to get ready.

Unless it does

But, now that I have said that – it’s easy to fall into Analysis Paralysis. For those who don’t know what that means, it is taking too long to make a decision or take decisive action. You have to poop or get off the pot. I know some preppers who have made extremely lengthy and detailed spreadsheets with tabs broken down in all the categories of their prepping supplies – hundreds of rows long. They have calculated the difference from one item to the next in price (shipping included) over 4 vendors. What’s worse is they keep this spreadsheet updated frequently but never purchase any of those prepping supplies. They know what they need to start with, but can’t seem to pull the trigger. The prepper that has nothing but a really great plan won’t be much better off than the person who is caught completely by surprise in a disaster. I recommend starting small, but obtain the basics you need to weather bad events and build as you can. You don’t have to purchase 3 years of freeze-dried food on day one, but don’t sit there and wait for that awesome survival knife to drop another 55 cents. You need to ensure you have the basics.

‘Two is One’ is a clever saying to get you to spend more money

And since we are talking about purchasing prepper supplies – you have all heard this one before: Two is One and One is None. That just means if you only have one of something, let’s say a headlamp, and that goes out or is lost, you have nothing to fall back on. Logic says, that makes sense, right? Redundancy is another word we love to throw out there which means essentially the same thing and I am not saying you don’t need redundancy, or even more than one headlamp. What I am saying is that you shouldn’t apply this to your bug out gear. I have a YouTuber that I really like who shall remain anonymous, but his bug out bag weighs 65 pounds!!! Why? Well, for one thing he has A LOT of redundancy in there. Many knives, saws, clothes, methods of food preparation, etc. Use your judgment on this.

Your Bug Out Bag does not have magical properties

And speaking of Bug Out Bags, they are not a get out of disaster free card. A bug out bag in a best case scenario just gives you options. Simply having a bug out bag doesn’t mean you get to live and everyone who doesn’t have one dies. I fully expect many preppers to have their bug out bags taken off their lifeless bodies because they got cocky, or just unlucky by some opportunistic soul if the worst happens. Bug Out Bags are a means to an end, not the end all be all. Prepare with them, but take their life-saving properties with a grain of salt. They can only hold so much and real disasters suck no matter what you have on your back.

You will never have enough stuff

I wrote a post a while back titled, Are you Ready for the End of Prepping. It’s basic message was that no matter how much water you have stored, how many pallets of MRE’s, tins of survival seeds or cans of Beanie Weenies you have stocked under your bed – eventually it all runs out. If we really go through a real-deal SHTF incident, your supplies are only going to last so long – so the smart money is on planning now to live without all your food storage, electrical tools, generators and anything else you won’t be able to maintain without the assistance of outside help. Yes, start prepping with the basics you can purchase at the store. Begin with a week, but I don’t think you need to sink a year’s salary into food. Start planning a garden instead or look at taking that money and buying a piece of land far outside of the city.

Prior military service doesn’t necessarily make you better qualified to survive

And this is coming from someone who is ex-Army. Yes, when you enlist in the service you get different types of training and much of this has ties into the world of prepping. Depending on the Service Branch, you learn marksmanship, weapons maintenance, team tactics, first-aid, navigation and how to generally break stuff and blow it up. That doesn’t make you a survival expert and doesn’t make you a natural leader. I know some preppers who like to lean on their past service and we aren’t all created equal. Would you give someone who never saw combat the same authority on ambush tactics for example as someone who did 4 tours of Afghanistan? No. But on the flip side, that soldier that did 4 tours (thank you) might not survive any easier than the single mom who is prepared. Different skill set? Absolutely, but that doesn’t guarantee survival or that they know everything. Now, would I love to have 4 Navy seals in my personal circle of friends if SHTF? Of course, but don’t believe for a second that you can’t survive because you have now “official” training. Personal will is a HUGE factor in survival. If you have that, you are in good shape.

Plan on self-reliance, but don’t turn away help

The Lone Gunman is the image a lot of you think of if some disaster happens. You will walk stoically out to the small clearing overlooking the smoldering ruins that used to be the city you live in, taking in the scenery you will turn and walk into the bush – those fools didn’t know what hit them. It’s a good movie plot, but as a society we survived by banding together. Yes, you can survive on your own for a while, but in order to thrive you will need others and it’s better to learn to start playing nice now. Think about how you can survive with as many people as possible. You will be stronger, more capable and you will have more people to talk to when the internet is gone.

You will never know as much as you should and maybe that’s OK.

If I was independently wealthy and didn’t have a wife or kids, or a dog I could devote myself to learning every day. There are so many subjects I wish I had the time to learn. Maybe it’s an excuse, but with a job and simple responsibilities of mine, free time is a luxury I don’t get much of. But, just because I can’t take Krav Maga classes 5 days a week, compete in a CrossFit marathon, learn Morse code and small engine repair while I practice the finer art of leatherworking and blacksmithing in between classes for my EMT certification – that’s OK. I have a pretty good bit of life ahead of me and I have time to learn as much as I need. I won’t get hung up on what I don’t know because I won’t compare myself to other survival experts.

I have said it before and I’ll say it again. Prepping is a lifestyle, not a destination. You can never be Prepared as if that was a mythical position you could obtain. Can we all be more prepared for a wider array of things? Yes and can that mean the difference between life and death? I think so. But you can’t buy the complete package of Prepping on Amazon. It’s a journey we are all waking and it will take forever to get there.

I’m glad you are with me. Let’s keep looking forward.

The post A Prepper Looks Back – 10 Years of Prepping Lessons appeared first on The Prepper Journal.


from The Prepper Journal
Don't forget to visit the store and pick up some gear at The COR Outfitters. How prepared are you for emergencies?
#SurvivalFirestarter #SurvivalBugOutBackpack #PrepperSurvivalPack #SHTFGear #SHTFBag

The Days Most Fascinating News and Opinion from M.D. Creekmore – May 19, 2017 Edition

Real news daily. M.D. Creekmore, provides a smart summary of the days ten most fascinating news stories…

1. Joe Lieberman emerges as Trump’s top choice for FBI director…

An interesting choice… for those who don’t know Joe Lieberman is a democrat and said that the Connecticut shooting (Sandy Hook) was a “tipping point” and added that “If Obama Can ‘Do Something’ About Guns by Executive Order, ‘God Bless Him’.

Via Fox News Politics.

2. Cyber Attacks Are The Perfect Trigger For A Stock Market Crash…

While I don’t...

Read the whole entry... »


from TheSurvivalistBlog.net RSS Feed
Don't forget to visit the store and pick up some gear at The COR Outfitters. Are you ready for any situation?
#SurvivalFirestarter #SurvivalBugOutBackpack #PrepperSurvivalPack #SHTFGear #SHTFBag

Playing Hide-And-Seek With FEMA? Here’s How To Win

When food shortages come, and you can be sure that they are going to come, FEMA has the authority to take control of all food supplies and distribute them to the needy.

You may be one of the lucky ones who gets overlooked in their search for food, but I doubt that there will be any of us who escape their search for guns.

I’m sure that when that executive order was signed, it was with the intention that they could seize stocks in warehouses, so that they would have food to distribute in the case of an emergency. However, like any law or regulation, if there is a way to misuse the authority, someone will eventually do so.

Since there is no limitation on that executive order, FEMA also has the right to enter your home and my home, stealing our food stockpiles for “distribution” to those in need. In other words, they have the authority for redistribution of wealth.

So the question is, what are you going to do when FEMA shows up at your door to take your guns and food? Better yet, what are you going to do beforehand?

Keep reading to find out the tricks of winning when playing hide and seek with FEMA guys.

Find out more on how to improve your home defense to survive disaster! 

Tricks for Playing Hide-and-Seek with FEMA

The only way you can keep your food and firearms is to make sure that they can’t find them. Any home has a myriad of potential hiding places that will at least suffice for an initial search of your home.

For this, we’re going to depend upon a little bit of psychology. Whoever ends up doing the searching is probably going to have a long list of houses to search. While they may do a thorough job on the first two or three houses they search, the more searches they do, the lazier they will get.

The flip side of that coin is that the more searches they do, the better they will get at doing it. So, while you need to hide things, you need to be sure that they aren’t hidden in places which are common or obvious. So, hiding things under the bed or in the bottom of a dresser drawer are probably out.

There are two basic types of searchers; either they’re searching your home because they’re searching everyone’s home, or they are searching your home because they have a tip that you have something worth seizing. Either way, the searchers are expecting to find something.

Give Them Something to Find

You can play a very effective trick on them by making them think they are smart. Everyone loves to feel like they are smarter than the average bear, so let them think that they are smarter than you. All you have to do to accomplish this is give them something to find. Once they find it, they’ll be convinced of their prowess in defeating you and probably go away happy.

Of course, you don’t want them to get everything, so you need to be careful about how you do this. If it is out in the open, they won’t think they’ve found anything. On the other hand, you don’t want it so well hidden that they end up finding the rest of your stash while looking for it. So, pick a place with that in mind and make it look like a poor concealment job, while everything else is well hidden.

Have enough in this decoy stash to make them think that they’ve found your main stash. They’re not going to go away if they think that you’re pulling the wool over their eyes, so build your decoy stash with enough food to look like it is your main supply. Just make sure that it is inexpensive enough food that losing it doesn’t hurt you that much. Never put anything critical in this stash.

Guns have to be treated differently. You don’t want them to find any of your hidden guns. On the other hand, if they come asking for your guns, they’re probably going to have a pretty good idea of what you have. Even though the law says that the federal government can’t build a database of gun ownership, you can be sure that they have one.

So, when they come asking for your guns, make sure that you have enough guns to give them, so that they think they’ve gotten them all. You can explain away a few guns that are missing by saying you sold them; but you can’t do that with everything.

Of course, if you have guns that are “off the books” because you inherited them or you bought them privately, that’s not going to be a problem. You could always give them the ones that you bought from where you had to fill out the paperwork, and keep the privately purchased ones hidden in your stash, where they don’t know about it.

Be careful about this and think it through well. You need to have your story well planned, so that you know what you are going to say when they show up. You also need to watch out for ammunition. If you tell them you’ve sold your M1911 A1, but still have 500 rounds of .45 ammo, they’re not going to believe you. Everything has to match up with your story.

16 Places to Safely Hide Your Stash

Instead of finding one area to put everything (which is more obvious and easy to find) you’re going to be better off with a few small hiding places. If they do find one of your small hiding places, the rest of them may still manage to escape detection.

The best possible hiding places are those that are totally sealed off, denying anyone access to them: buried in the garden, inside the walls, or hidden rooms. While this means that you won’t have access to them on a regular basis, you will always be able to get to them in case of emergency.

Attics and basements are the first to be searched, but they still offer a plethora of useful hiding spaces disguised as other things:

False Ductwork

If your home is heated by forced-air heating, you can easily add some false ductwork to hide things in. Use the same type of ductwork as the existing and connect it to the ductwork that is already there; however, it doesn’t have to be open to the existing ductwork for air to pass through. Most people don’t know enough about HVAC systems to tell that you’ve added ductwork.

False Drain Pipes

Toilet drains are four inch PVC pipe. Like HVAC ductwork, most people don’t know enough to tell if it is real or fake. You can add additional drain pipes that go from ceiling to floor, without connecting them to the home’s existing plumbing. You will need a flange at both ends to hold it in place.

Above Basement Ceilings

Most people use suspended acoustical ceilings when they finish their basements. If you have this, you can remove the ceiling tiles and attach shelves to the sides of the joists to store things on. With the tiles in place, you can’t tell they are there.

Below Attic Floors

Most people’s attics aren’t finished in any way. If you add a plywood floor to part of your attic, you can store lightweight items under it. Please note that those things will only be supported by drywall, so you don’t want a lot of weight.

Hiding in Plain Sight

The typical attic or basement is at least partially filled with boxes of grandma’s old quilt and baby clothes that you’ll never use. You can store some of your stockpile in these boxes, below the existing items. Just make sure that the boxes that have your stockpile in them are not easy to get to.

Video first seen on HouseholdHacker.

Inside Other Items

If you have unused furniture, kids toys or any other large items in your attic or basement, you can always hide something inside them.

The main living area of your home offers a number of possibilities as well, although things may not be quite as well hidden or as hard to find:

False Heat Registers and Electrical Outlets

It’s easy to add false heat registers and electrical outlets into walls. All you need to do is to cut a hole and mount them with the included screws. Since the inside of the wall is hollow, you have room to store whatever you want. Just be careful to place the outlets and registers in places that look like they belong. Behind furniture works extremely well. 

Under the Stairs

Many two story homes have a closet or other storage space under the stairs. However, this usually doesn’t use all the space, but only the space that is high enough for a closet. You can open up the lower part, fill it with food and put a piece of drywall over it to cover it. This drywall doesn’t even need to be well finished, as it will be hidden.

Inside the Washer and Dryer

Washing machines and dryers have extra space inside the cabinet, which is not taken up by the drum and mechanism. You can use this space to store food, as long as you make sure that it won’t interfere with the movement of the mechanism.

Inside Furniture

Most furniture has some wasted space in it. Dressers will have wasted space at the bottom. Sofas have wasted space under the cushions and in the back. The space in the bottom of a dresser can be accessed by removing the bottom drawer. To access the dead space in a sofa or upholstered chair requires removing the dust cover on the bottom. Likewise, the box springs for a bed has a lot of dead space, which is only covered by a thin dust cover. Remove the cover, build a place to store food and put the cover back on.

Bathroom Cabinets

The drawer front on a bathroom cabinet or kitchen sink cabinet is false, only there for appearances. There isn’t enough room for a drawer there. However, there is a small amount of room between that drawer front and the sink. A small shelf can be installed there to store things.

Above Closet Doors

Most homes have closets with bifold or sliding doors. People rarely look up when they look in those closets. A shelf can be mounted above the door, inside the closet and things stored there. While it plain sight, few searchers will see it.

Under the Floor

A small storage area can be made by peeling up a corner of the carpet and cutting a trap door in the floor. This works best when a piece of furniture, such as an end table, will be sitting over that corner, keeping the carpet in place.

The soffit over kitchen cabinets

Many kitchens have a built-in soffit over the kitchen wall cabinets. This is dead space, built more for decorative purposes than any other reason. A hole can be made in the soffit and it can be filled with food or other items. The hole can be closed by installing a heat register, making it look like the soffit is part of the HVAC system.

The Toe Kick under the Kitchen and Bathroom Base Cabinets

It hides about four inches of dead space, all the way to the back of the cabinet. This can be removed and reinstalled with spring catches.

Eaves

If your home has two stories with dormers, there is a considerable amount of dead space in the eaves. The only problem is installing a hidden access to the eaves. You will also need to floor over the joists, as the only existing floor is the drywall to the ceiling of the rooms below.

Video first seen on JLaservideo.

The Secrets of Burial Vaults for Storage

If you are going to bury anything in your back yard, you need to make sure that it is well sealed to protect it from moisture. Most containers, even plastic bins, don’t offer this type of protection. However, it’s really not all that hard to protect them.

The easiest way to protect things you want to bury underground is to buy a bunch of five gallon buckets with lids. Try to buy the kind that doesn’t have a bung in the lid (opening for pouring out of), as these will seal better. Also check to make sure that the lid has a rubber seal in the groove that snaps onto the bucket. Without this seal, the bucket is not moisture proof. Take heed, not all have this seal. Be sure to use new lids, as they will seal better.

Another way you can make storage vaults is with four inch PVC pipe. You can either glue the caps on the ends or glue a cap on one end, with a screw-on cap on the other. I prefer the glue-on cap, as the screw on ones can be as hard to remove as the glue on ones are. This isn’t the type of container that you’re going to be opening regularly, so you don’t really need that screw-on lid. Just be sure that you have a few saws hidden in different places to get the caps off with.

One nice thing about using PVC pipe to make storage vaults is that you can easily make holes in the ground to hide them with a standard post-hole digger. Burying five gallon buckets requires a bit bigger hole. If you have hard ground, you might have trouble burying them.

Make sure that you clearly define the location of your buried vaults in some secret way that only you will know. Use more than one point of reference, as your favorite tree may die, eliminating it as a point of reference.

As you can see, the list is nearly endless. Use your imagination and seek out all the unused areas of your home. Look at things to compare the usable space inside to the physical space it takes up. For example, when you look at a dresser, you see that the drawers aren’t as wide as the cabinet. That means there is space on either side of the drawers; space that you can use to hide something.

You are the one who’s able to find the best hiding places in your home, you just need to keep in mind the tricks for a good hiding place.

Interested in keeping you and your family safe? Click the banner below for more!

This article has been written by John Gilmore for Survivopedia. 


from Survivopedia
Don't forget to visit the store and pick up some gear at The COR Outfitters. How prepared are you for emergencies?
#SurvivalFirestarter #SurvivalBugOutBackpack #PrepperSurvivalPack #SHTFGear #SHTFBag

Thursday, May 18, 2017

What did you do to prep this week…

Well here we are again, a week late, but that’s life, sometimes things come up as it did last week and I couldn’t post this segment on time. However, looking at the bright side you all should have a lot of preps to talk about this week.

Some of you have asked about an update on my terminally ill father so I’ll get to that before we get started with the post…

He decided to not take the chemo treatments and I agree with his decision. He has stage-four terminal cancer that started in his colon and has spread out to his liver, lungs and kidneys. At that stage chemo is just...

Read the whole entry... »


from TheSurvivalistBlog.net RSS Feed
Don't forget to visit the store and pick up some gear at The COR Outfitters. Are you ready for any situation?
#SurvivalFirestarter #SurvivalBugOutBackpack #PrepperSurvivalPack #SHTFGear #SHTFBag

Prepping With Kids

Written by Guest Contributor on The Prepper Journal.

Editor’s Note: This post is another entry in the Prepper Writing Contest from Diesel Jester. If you have information for Preppers that you would like to share and possibly win a $300 Amazon Gift Card to purchase your own prepping supplies, enter today.


If you’d asked me 16 years ago if I’d be ready for when the SHTF, I would’ve answered yes without any kind of hesitation. After all, I was single, I was a Ground Team Leader in the Air Force Auxiliary unit Civil Air Patrol, I had worked as an Armed Security Agent, was working in the airlines, and had taken a multitude of camping, firearms, first aid, and survival courses. In the chaos of 9/11 I’d been told that I’d handled myself admirably and with a cool and level head by my co-workers and supervisors. I felt prepared.

Then I met my wife-to-be, moved across the country, and settled into suburban life.

As the years passed my emergency gear went by the wayside, my skills waned a bit, and I had to sell my sidearm at one point in order to afford to move to where jobs were available at due to recession. I didn’t think too much about getting back into emergency preparedness because I had work to do, education to finish, and the everyday chores of life to deal with. It wasn’t until the last couple of years ago when my wife and I became parents of two lovely children that we adopted. Once the process was over, my wife said words that I’d never thought that I’d hear from her:

“I want to prepare for the worst.”

At first you could’ve knocked me over with a feather as I never thought she’d want to become a pepper. Then I wanted to shout my elation at the green light to do something that I’ve been wanting to do again for so long. Heck, I got the go-ahead to buy guns again (Hello AR-7 and Ruger 22/45!). As I started delving back into the world of prepping by looking at articles, making lists, buying supplies, I had to stop for a moment because there was something that I hadn’t counted on having back in my Civil Air Patrol days. There was now a new factor to the equation: Prepping with Kids.

My Children are 9 and 2. I’ve found that I had to modify my lists to suit their needs and capabilities along with my own (especially after seeing a tear-jerking video on Facebook last year about a family bugging out over the course of a year between the daughter’s birthdays). This is what I came up with and your own mileage may vary on how your own situation might be similar or different from my own.

Having kids is certainly an adjustment – both to your every day life and your prepping plans.

What is your disaster plan?

This was the big question for us. What was our plan for when the SHTF happens? Were we going to bug out or bug in? As we live in Alaska now, I realize that we have an abundance of resources around us, a decent community that we live in, and we’re pretty isolated. So bugging out will probably only happen in the event that our town is evacuated for whatever reason. So getting BOBs was high on the list and I started getting the 5-Day Packs available at our local stores. Ultimately it’s going to be a bug-in scenario as all of our resources are where we live along with people that we know and can trust.

But what about your children?

While I love my kids, they are going to be a liability that I’ll need to consider in an emergency situation. Thankfully my 9-year-old has a level head and knows how to decently handle themselves when things get bad. They love the outdoors, can carry a basic BOB on their shoulders, and likes helping mom and dad around the house. I have started taking them to the local gun range to teach safety and shooting with my new .22 rifle and handgun that I mentioned above. I’d chosen those as they’d be easy for my kids to learn on, they’re lightweight and easily concealable if we need to go on a long walk, the ammo is interchangeable between the two of them, and they’ll be effective for hunting small game in the area. My 2-year-old, however, is a big concern as they’re still in diapers. My toddler can walk for maybe a mile and has lots of energy but right now a bug out bag weighs as much as they do! Their needs will need to be met in a time-frame that could last from a week to a year or more. Some of the major things of concern are:

  • Diapers
  • Wipes
  • Milk/Formula

One would think “Costco!” at once for the diaper solution but you also have to realize that your kids will be growing. If the SHTF tomorrow, and you just recently bought in bulk, then great! But if it happens a month from now, a year from now, or two years from now, those diapers that you squirreled away might not fit, especially if you have a growing newborn to consider. So while we’re doing potty training with my toddler, I am being mindful of reusable diaper and wipe solutions and taking into consideration shelf stable milk that I’ll be able to store in the meantime. With reusable diapers and wipes also comes the problem of clean clothes so another thing that I’m in the process of looking at is how we’re going to be doing our laundry if the power goes out and stays out (I’m looking real fondly at my kids’ bike chains now and how I can attach it to a washer cylinder).

Bugging Out with a Toddler

They will never make the walk by themselves so make sure you have a way to transport your younger children and take that extra time/weight into consideration.

There’s only two ways out of our town: Boat and Airplane. Three if you count trekking it across wilderness to the next nearest town but I live in a State where everything wants to kill you the moment you walk out your front door in the middle of civilization (yes, I have had black bears on my front doorstep before with nothing but a pane of glass between us). So walking out of here is not really an option unless we get to super desperation stage, and we’re talking SyFy channel level of desperation in which a glacier is advancing at Mach 5 with a Sharknado on top of it while a San Andres Movie level earthquake is hitting the area. I’d throw in zombies but we’re already so jaded up here with them coming off the cruise ships in droves every summer. Realistically, and in all seriousness, if it comes down to a government enforced evacuation it’s going to be by ferry or by airplane. While I highly doubt that we’ll be able to take our vehicle with us even on the ferry, that means we’re going to have to rely what we can carry ourselves.

HELLO? CHILDREN?

I’m getting there. As I mentioned before, one of our BOBs is the same weight as my toddler. So that means that either my wife or I will have to carry them while the other doubles or even triples up on the bags. In this kind of situation I’m looking at getting a frame backpack for kids that my toddler can ride and at the same time I’ll be able to carry a BOB (if anyone knows of a survival BOB/kid carrier, I’d be grateful for a link). In addition to the above items listed for my 2 year old’s BOB to last for five days, I also have to consider entertainment/distractions while we’re in the process of evacuation. For this I recommend buying multiple versions of your child’s favorite toy and/or stuffed animal and putting it in their BOB. That way if you’re leaving in a hurry, you don’t have to waste valuable time wondering where Mister Bear is at when you have one already tucked away and ready to go. One of your child’s favorite blankets might be something to consider for their comfort and peace of mind if you’re in the process of evacuating with them. If your child is anything like my toddler; then they’re going to want something comforting and familiar that reminds them of home while you’re on the move to safety.

I guess that in the end it comes down to the ages of your kids, what they’re capable of, and how much extra you’re going to have to put away in order to see to their basic needs. As time goes on, we go longer (Lord and Lady willing) without an event occurring, and as your children get older, their needs will naturally change until they’re at such an age that they can reasonably handle themselves in the event of a crisis. They’ll also learn from the example that you set for them and from what you teach them as you prep. These are skills that they’ll have with them forever. Teach them skills to survive, teach them how to keep a cool head, and don’t panic yourself. That, and a little common sense and hopefully you’ll come out of any situation reasonably intact.

The post Prepping With Kids appeared first on The Prepper Journal.


from The Prepper Journal
Don't forget to visit the store and pick up some gear at The COR Outfitters. How prepared are you for emergencies?
#SurvivalFirestarter #SurvivalBugOutBackpack #PrepperSurvivalPack #SHTFGear #SHTFBag

The Days Most Fascinating News and Opinion from M.D. Creekmore – May 19, 2017 Edition

Real news daily. M.D. Creekmore, provides a smart summary of the days ten most fascinating news stories…

1. EXPERTS WARN: Another Large-Scale Cyberattack Underway…

Another large-scale, stealthy cyberattack is underway on a scale that could dwarf last week’s assault on computers worldwide. The new attack targets the same NSA exploit “EternalBlue” that is being used as one method for rapidly spreading a ransomware variant called WannaCry across the world. Via Yahoo News.

2. Woman arrested after allegedly offering sexual favors for chicken nuggets…

...

Read the whole entry... »


from TheSurvivalistBlog.net RSS Feed
Don't forget to visit the store and pick up some gear at The COR Outfitters. Are you ready for any situation?
#SurvivalFirestarter #SurvivalBugOutBackpack #PrepperSurvivalPack #SHTFGear #SHTFBag

4 Ways To Help Your Budget Survive Retirement

If you’re anything like me, retirement is just around the corner, sneaking up on you. We’ve tried to put it off and pretend that it isn’t there, and everything is going to be just fine once we retire.
Some of us might even have some idealistic dreams about having time for travel or for our hobbies once we retire, but there’s always something missing from those dreams. That something is the money to fulfill them.

Can we be honest for a moment? Most of us really aren’t at all ready for retirement. We’ve ignored all the advice from the investment and retirement gurus and don’t have the million dollars of savings that we’re supposed to have in order to retire.

We’re lucky if we have a few thousand dollars stashed away for a rainy day. Worse than that, we’re in debt up to our eyeballs, after decades of living on 110% of our income.

Let’s look at some of the ways you can help your budget survive retirement!

The only retirement plan that many of us have is Social Security, which as we all know, isn’t really all that secure. Besides, Social Security doesn’t pay much. If we have any company retirement at all, it’s minimal, because we’ve moved from company to company, throughout our careers, and our retirement account didn’t move with us.

With those sorts of prospects, retirement really doesn’t look all that good. Oh, we’ll have a lot of free time on our hands, but we won’t have the money to do anything with it. In fact, our biggest concern will be making it from one month to the next; not what to do with our spare time.

This is a whole new form of survival, and it’s going to take a whole new sort of strategy to overcome. While it’s really too late to start “saving for retirement” now, regardless of what financial planners might tell us, it’s not too late to make sure we can have a great retirement. We just need to take advantage of the years we have left for retirement, to set us up for life.

Get Out of Debt

The first and single most important thing to do, in order to prepare for a satisfying retirement, is to get out of debt. Most of us are so accustomed to debt, that it’s nothing more than part of the landscape. Yet that debt is sucking the lifeblood out of our finances. Making those monthly payments is controlling what we do and as we retire it will do so even more.

There are a lot of strategies for getting out of debt, so I’m not going to take the time right now to enumerate them. But there are a couple of key things that you should consider doing:

Downsize

Many couples downsize once their kids grow up and move out of the family home. This is a great opportunity to cash in on the equity you have on your home and use it to buy something that you can own free and clear. A smaller house, without a mortgage, will save you in more ways than just the house payment.

Stop Buying New Cars

One of the most insidious parts of the normal family’s debt comes from the idea that we have to have new cars. The saying is, “you either pay it in payments or you pay it in repairs.” But if you maintain a car properly, there’s no way you’re going to pay as much in repairs, as you pay in car payments. Besides, you won’t need that expensive, full-coverage insurance for the car either.

Use Windfalls to Pay Off Debt

Everyone loves getting a cash windfall. It doesn’t matter if it’s winning the lottery or getting an income tax return, we just can’t wait to get our hands on it and spend it. But that money is much better used by paying off debt, so that you don’t have to make all those monthly payments.

My wife and I have used the windfalls we’ve received over the last several years to invest in gold and silver. While we haven’t been able to buy much at once, we have been able to increase our investment. We’re waiting for the day when the price of gold and silver rise enough that we can sell that off and use the proceeds to pay off our mortgage.

Become Self-Sufficient

My wife and I bought our home rather late in life. That means we haven’t been paying on it for the 30+ years we’ve been married, and we’re not close to having it paid off. We knew that when we bought it, just as we knew that buying as big a home as we were buying was going to stretch our finances, especially in retirement.

As I already mentioned, we have a plan for paying off the mortgage. But we also have plans for reducing our monthly costs, so that we can afford to keep living in this home, even in retirement. Those plans include:

Reducing Our Energy Consumption

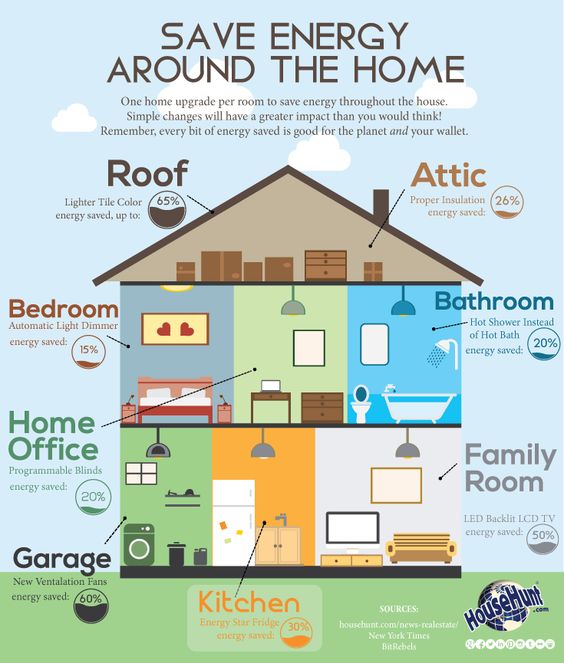
I’ve done a number of projects around the home to reduce our energy consumption. These include reinsulating the attic, adding a plastic film over the windows to make them essentially three-pane windows, zoning out heating and cooling so that we don’t have to heat parts of the home we’re not using, and planting trees and vines to shade our home and reduce the amount of heat generated by the sun. We’ve even changed our roof to a lighter color, so that it wouldn’t absorb as much sunlight.

Solar and Wind Power

I’m actively working to build solar and wind power for my home, so that I can reduce the amount of electricity I’m buying every month. By the time I retire, I expect to be able to produce enough to lower my monthly energy bill by at least $100 a month, if not more. I’m also switching over to solar hot water, which should reduce it even more.

This mechanism is so simple you can put it together by yourself in no time!

Homesteading

While we’re really not turning our home totally into a homestead, we’re working on making it more and more like that. So far, we’ve got a sizeable vegetable garden going, as well as over a dozen fruit trees in our backyard.

As our ability improves, we hope to expand on that. We’re also putting in a chicken pen for eggs, a bee hive and a pond for raising fish. Every bite of food that we can grow ourselves, is one less that we have to buy.

Putting in a Well

I just finished building a well drill, which I hope to use to drill us a well. While our water bill isn’t a major part of our monthly expenses, a sizeable portion of it is used for watering our yard, trees and garden. Just being able to water those, without paying for the water will help us save. Oh, and by the way, I also use greywater capture for watering my trees.

Video first seen on Flyboytr

There are many other ways in which you can reduce your monthly expense by doing things for yourself, rather than paying someone else to do them for you. I have a rather extensive workshop, where I repair my cars, build things we need, and do other things that most people have to pay someone to do. Everything you can do for yourself, is one less thing you have to pay others to do for you.

Redo Your Budget

If you’re going to survive the financial hardship of retirement, you really need to have a handle on what your expenses are going to be. Otherwise, you’re shooting blindly. You might just find that you hit the wrong target.

Now that the kids are out of the house, you should be able to live on a whole lot less than you used to. My wife and I found that our income seemed to go much farther, once the kids moved away. A lot of that is because we didn’t have to pay for things for them. But another part was that as mature adults, we didn’t have that many things we wanted. What we have is what we want. So we’re not constantly spending money on buying more stuff.

At the same time, you might find that you want to spend more of your income on things that you ignored before. My wife and I eat out much more, now that going out doesn’t mean paying $100 or more for the family.

We also find that our entertainment expenses are totally different, as they are not focused on the things the kids want to do. Actually, our entertainment expenses are quite low, even though we regularly do a number of activities.

Develop a Retirement Income Business

Just because your company says it’s time to retire, doesn’t mean that you have to agree with them. You have years of valuable knowledge and experience. All you need to do is find some way to put that to work.

Sadly, few companies today will hire older people when they can hire younger ones. That’s actually a rather simple business decision for most companies to make, since younger people will work for less than older ones will. But it leaves you and I without a job, unless we create one for ourselves. Fortunately, there are always opportunities to do just that.

If you haven’t embraced the Internet yet, it’s time to do so. Through it, you can connect with a wide range of people who are willing to pay you money. The best part is, you don’t have to leave home to do it; and if you want, you can even work in your pajamas.

Freelance in Your Professional Field

If you worked as a trained professional in any of a huge number of fields, there are still people who need your knowledge and experience. Maybe they can’t afford to hire you full-time, but there are many smaller companies that would love to hire you part-time or on a per-job basis, to help them out. Freelance opportunities are growing and there are a number of websites that provide a service, connecting companies that need freelancers to the freelancers themselves.

Start an eBay Business

One of the simplest ways to start a business today is to do so on eBay. Pick a category of products and start out small, buying a couple of cases at wholesale and shipping them out from your home. There are a large group of people who have built such a business into a full-time income.

Start a Blog or YouTube Channel

Blogs and YouTube videos both share something in common, the ability to share your knowledge and cash in on advertising dollars. From people who write about craft projects to women showing makeup tips, the income that you can derive from such an outlet is huge.

Develop Your Own Product

There is always room in the world for new products, especially truly innovative ones. Today, so many people are focusing on high-tech gadgets and apps for smartphones, that hardly anyone is making things to make everyday life easier. Yet there are still kitchen gadgets to be created, as well as things for a wide variety of tasks.

Turn Your Hobby Into a Business

If you like crafts, then turn that into a business. Etsy is a wonderful platform for selling quality handmade goods. I have a friend that is making handmade knives and selling the on Etsy. My dad’s retirement business was doing custom gunstock carving. As a sideline, he carved ostrich eggs, which he sold for $300 each.

Woodworking is a profitable hobby, too. Grab your tools and start practicing your skills!

There are literally hundreds of ideas that you can use to earn some additional income. If you start now, then by the time you reach retirement age, you could have a very good business built up; something to add to your Social Security and retirement income.

Remember, as you think about these ideas, that you don’t really need to earn as much income from your retirement business, as you earn now. You will have some retirement income that you will be able to count on.

So what you’re really doing is trying to come up with some means of supplementing that income. If you can do that, you’ll find retirement to be much more enjoyable.

This article has been written by Bill White for Survivopedia. 


from Survivopedia
Don't forget to visit the store and pick up some gear at The COR Outfitters. How prepared are you for emergencies?
#SurvivalFirestarter #SurvivalBugOutBackpack #PrepperSurvivalPack #SHTFGear #SHTFBag

Wednesday, May 17, 2017

Choosing the Best Rifle Sling – Part 2

Written by John Hertig on The Prepper Journal.

Introduction to Slings (Part 2)

Last time we looked at the uses, types and history of slings.  Now let us consider how to choose a sling and look at some choices with potential for tactical use.

How to Choose a Rifle Sling

As is usually the case with anything, the first step in choosing the best rifle sling is to decide what you are going to use it for.  For a sport hunting arm, any old carrying strap will do.  A padded one will be comfortable for those long treks, and these are available in nylon and leather.  I tend to prefer the nylon ones as being more reasonably priced.  If you are doing competition shooting, go with what the rules of your events specify; a M1907 model sling might be optimal for some types of competitions.  For a tactical rifle or shotgun, a single point/two point convertible is often a good choice.

Slings are available in various widths.  I would tend to avoid 1″, the most common, when possible.  This is just because the narrower the strap, the more concentrated the weight applied where it contacts the body.  Of course, a sporting sling with a wider padded part would eliminate this concern, and in my day, I found Uncle Mike’s padded slings to be quite acceptable.  They do not appear to be sold these days, but if I were looking for one, I’d check out Butler Creek (same parent company as Uncle Mike’s), who appear to have some models which would be equivalent or even better.  For slings without a wide pad, the 1 1/4″ sling would often be a better choice than the 1″.

Wider slings are available, but usually only with clips for ring mounts.  For a tactical sling, I’d prefer 1 1/2″, and for a heavy tactical gun, I might even search for a 2″ sling.  There are a few padded tactical slings, but my theory is that if they were really superior, there would be a lot more of them.

When considering any sling, check out the “fixed” adjustment.  You want a sling which is big enough for any likely use of yours, without being too big for any use.  The fixed adjustment should be moderately easy to set, but more importantly, not move accidentally.  Some slings also need to have a “rapid” adjustment to switch between modes, separate from the fixed adjustment for size.  Make sure this adjustment mechanism is conveniently located, easily operated, and stays where you put it when it is not deliberately being moved.

Tactical Sling Choices

As mentioned, sport slings are not terribly different from each other, and competition slings tend to be specified by the competition.  The real excitement is in the tactical sling arena; usually a single point/two point convertible sling is a good choice, but there are a bunch of them, ranging in price from cheap ones from China to the $100 range.  Looking for one appropriate for a tactical shotgun, I set an arbitrary limit of $60.  The first one I considered was the Magpul MS3 or MS4, because they are a good company, and frankly, since they have their own QD clip, they “must know what they are doing”.  But they use 1.25″ webbing, which might be a bit narrow for such a heavy gun.  A very attractive one was the Cetacea Rabbit with two rapid adjustments instead of just one, but the 1″ webbing might be even less appropriate than the Magpul.  Finally, I found a 2″ wide one, the e-RUSH (enhanced Rapid Urban Sentry Hybrid) from Urban-E.R.T Tactical.  This is their top model, with all the sling bells and whistles.  They have a lower level model for economy and even a 1″ version if you like the style but don’t need the 2″ width.

Let’s take a closer look at the e-RUSH and the MS3.

e-RUSH sling

This photo shows the E-RUSH Sling transformed into a one point sling for single point use.

With a strap width of 2″, this is one of the better choices I’ve found for heavy long guns – if it will fit you.  Fixed adjustment is a simple sliding buckle providing one foot of adjustment.  The captured buckle means you can’t make it any shorter than two feet, and a very long label on the strap discourages you from getting three inches more than three feet;  there is a flat elastic section included.  Unlike the “bungee” section which is a more common methodology, this is at the forward end of the strap rather than at the butt end.  This is so that if you jump down and the weight of the gun stretches the sling downward, the elastic does not bring it back up to smack into your face.  And it is more comfortable and useful for chest expansion if you are breathing heavily.  The straps and attachments on each end of the 2″ strap are standard 1″.  With this and all the hardware, this means that using the strap like a normal sporting sling, for carrying (muzzle up) or shooting support, is not comfortable, and the moderate adjustment variance makes it too long for this anyway.  With all the hardware it has, you might be able to disassemble it and “build” it for “normal sporting” use, but it might still be too long and even if not, it hardly seems worth the effort.

On the butt end of the sling there is a locking strap system which allows you to attach a female buckle and ring, a female buckle and male buckle, or a female buckle and push button QD socket.  The female buckle is where you plug-in the male plug which is attached to the mount on the gun, and the ring/male buckle/QD socket is where you attach the forward end of the sling to convert it into a one point sling.  You can also attach a “CQB” adapter here instead, which eliminates the two-part buckle between the sling and the gun so it rides a few inches higher.  That is, the gun adapter is connected directly to the sling rather than through a quick disconnect buckle.

Read More: Top 5 Firearms you need to get your hands on now!

The other (forward) end of the sling has the same locking strap system.  This is attached to a fancy two function buckle.  On the top end, there is a small tab, which if you pull sharply, causes the buckle to come apart, giving an emergency exit from the sling.  The other end is a fast adjustment buckle, which allows you to tighten the sling by pulling on the protruding strap end, or loosen the sling by lifting up on the end of the buckle.  This gives you a rapid adjustment of sixteen inches.  On the other end of the rapid adjustment strap is the female buckle which attaches to the male plug connected to the forward sling attachment.  The rapid adjustment strap is handy to pull on to cinch up the system, but when the sling is cinched tight, that strap end can flop around.

Which QD adapters are available, you ask?  All the major ones are available, except for the Magpul one.  You can choose between the stud, the push button, the Mash clip, the HK clip, a locking strap (for a slot or fixed ring), and a version of the Universal Wire Loop using paracord instead of the stiffer and thinner wire (which may make it less versatile).  In order to use the ring to convert from two point to one point, you will have to use the Mash or HK clip on the front, and to use the QD socket to convert to single point, use the push button QD adapter on the front.  Or if you have the male plug for single point conversion, just unclip the front female buckle from the adapter in use, and fasten it to the male plug near the butt end.  This latter configuration allows you to have a female buckle attached to your belt, which allows you to fasten the male plug attached to adapter at the front end of the gun to that buckle to secure the front of the gun when quick access is not needed.

I’m quite large, and at the three-foot adjustment, it is just the right size.  If I had armor or a thick vest, it might not be long enough.  Functionally, this works quite well in one point mode with a shotgun or rifle with a pistol grip or any stock.  In two point mode, it is great for a pistol grip shotgun, but if the shotgun has a full size stock and a shell saddle, the butt end kind of sticks out (because the shell saddle is between the user and the gun.  The adapters which Velcro around the stock and the forearm to provide sling mount points on guns which don’t have them, or have them only on the bottom, work very well, except that putting it on an AR style stock prevents you from operating the charging handle, so should be avoided.

This system seems to meet my requirements for heavy tactical weapons, and is versatile enough that one sling can be used on any one of a variety of firearms.

MS3/MS4 sling

Magpul MS4 Gen 2 Multi-Mission Single Point / 2 Point Sling with Dual QD Swivels Nylon

This is kind of standard and simple in design.  There is their brand clip (MS3) or a QD clip (MS4) on the butt end, connected to a ring or QD socket.  Then the main strap to a buckle tasked as a double loop.  The fixed adjustment for this strap is two slide buckles, giving you about three feet of adjustment and more if you get creative.  The secondary strap gives you two feet of “instantaneous” adjustment and has another Magpul clip or a QD clip, and that’s it.  Simple and clean, it is more streamlined than the e-RUSH, but not as versatile.  You can also get a MS1 sling and upgrade it to a MS3 or MS4.

It is designed as a two point to one point convertible which means it can provide fast access, but no support for increased accuracy.  But it can be “tricked” into working as a standard sling, allowing the use of the “hasty sling” technique as well as muzzle up carry.  You’ll need a ring or QD socket forward and near the butt.  Rings are rare at the butt end, but you can install an unattached QD clip back there and that works adequately as a ring for the Magpul clip.  Then reassemble the fixed adjustment system to be much shorter (there will be a long strap end to feed back into the buckles) and it actually works fairly well for “hasty sling” and “normal” carry.

In its intended modes, it works quite well, with one big advantage and a couple of minor disadvantages.  The big advantage is the Magpul connecting clip.  This attaches to the ring parallel to the strap, rather than perpendicular like the HK or MASH clips.  And it doesn’t twist or rattle or slide around like those others.  With the cross lock, it is secure, yet very easy to attach or detach.  On the downside, there is no elastic element in the strap, so if you have it cinched up tight, you might restrict your breathing a bit.  The width is 1 1/4″ which is better than 1″, but not as good as bigger.  A heavy weapon gets a bit uncomfortable when hanging in single mode for a long period of time, which may not be normal usage.  And the quick adjustment tends to adjust itself sometimes.  Minor negatives, and for a medium or lightweight weapon, this is a pretty good choice.  There is a padded version of the MS1, which if upgraded to a MS3 or MS4 equivalent, might even be acceptable for heavy weapons.

Conclusions

Personally, I’d have any long gun I owned set up for a sling.  When you find you need a sling, it is often too late to install one.  Although I would be too cheap to have a separate sling for every gun, I would have at least one of every type of sling I would need.  I would install studs or QD sockets in every hunting rifle and shotgun, with a nylon padded sling (or two) with the matching clips.  For any competition gun, I’d probably stick with the sling attachments which came with it, and have a 1907 style leather sling (the one from Brownells used to be hard to beat) and any other sling required by a match I might go to.  For a tactical weapon, I’d have an ambidextrous mount between the stock and the receiver, and a mount in front which either was ambidextrous, or could easily be removed and mounted on the other side, as well as standard mounts forward and at the butt if practical.  My choice for a heavy tactical sling would be the e-RUSH sling, and I’d be tempted to get a couple of Magpul clips and integrate them into the e-RUSH since I like them much better than MASH clips and slightly better than QD clips (I won’t have anything to do with HK clips).  If I had several tactical weapons, I would also have a Magpul sling for the lighter ones.

Are there other slings besides Butler Creek, Brownells, Urban-ERT and Magpul?  Of course, there are many; some similar and a few significantly different.  There might be better ones, and from my experience, I can guarantee there are worse ones.  Some are cheaper and some are more expensive; more expensive ones are sometimes better than cheap ones, but not always.  There is often a choice of colors.  Pick the one (or more) which is suitable for your needs and budget.

The post Choosing the Best Rifle Sling – Part 2 appeared first on The Prepper Journal.


from The Prepper Journal
Don't forget to visit the store and pick up some gear at The COR Outfitters. How prepared are you for emergencies?
#SurvivalFirestarter #SurvivalBugOutBackpack #PrepperSurvivalPack #SHTFGear #SHTFBag