Saturday, August 12, 2017

Prep Blog Review: Today It’s About Food

It’s only the third in line when comes to the rule of three, but you just can’t skip it in case of a crisis. You’ll need shelter first, then water to stay alive, while food will give you energy and comfort.

You have to be able to sustain your family when food will be hard to find, and have the skills to find it when you find yourself lost in the middle of disaster.

So this week is about food.

Let’s see the tips and tricks that other survival websites shared with the prepper community lately.

Prepping: How Much Food is Enough

Prepping how much food for one yearHere’s the deal:

We all come to this journey our own way. For me, I started in gardening, then moved into homesteading, and on one of the homesteading sites, I got introduced into prepping.

I will be the first to tell you that I’m not a prepper. I consider myself more of a homesteader with prepper tendencies. As such…, this article will probably reflect some of those thought processes.”

Read more on The Survivalist Blog.

Prepping 101 – How to Food Prep: 30 days Worth of Food

“The world and our country are going through some pretty rough times these days. We have imminent threat of terrorist attacks, with more threats being made against Western nations almost daily. We have a president in the United States who is not known for his intelligent (or sane) policy. We have a nuclear North Korea and Iran, both of whom have long history of very bombastic threats involving war and the Western world (specifically, the United States and select allies).

Through our overuse of antibiotics, we’re growing ‘super bugs’, illnesses that we could once knock out with penicillin but which are now immune to the vast majority of common antibiotic treatments. In the United States in particular, we have racial tension the likes of which hasn’t been seen for sixty years. We are, surely, slowly running out of oil, and our nations are sitting atop a ticking timebomb of debt. Our world is a fairly dangerous place right now, is the point I’m making.”

Read more on Authorized Boots.

4 Storage Food Mistakes You Might Be Making

“This past weekend my wife and I organized our storage / preparendess area.  We did this together so that we would both know where items of note where, instead of me just taking on the task and her having to dig for something in my absence.

We have various storage items sorted by category on heavy wooden shelving (or on the floor, example 55 gallon drums of water) and other items on commercial grade restaurant stainless steel shelving.  Mostly these are canned food items which are within easy reach, useful when making spaghetti and one is out of Ragu.”

Read more on Prepper-Resources.

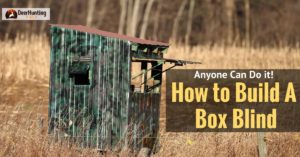
How To Build A Deer Blind-Anyone Can Do it! How to Build a Box Blind

“When it comes to hunting deer, a blind is a favorite for many hunters. They can be especially useful if you own or allowed to build on the land you’re using to hunt on, since you’ll be able to build a permanent structure in their place.

No matter what your building skill level, if you follow this simple guide, you’ll soon know how to build a deer blind that’ll be unnoticeable and allow you a chance at the big ones.”

Read more on Deer Hunting Field.”

The Ultimate Survival Tree That Grows on Almost Every Street in America

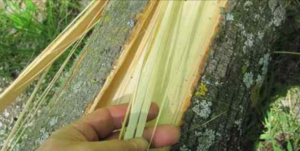
“This tree is so common in the U.S. that you can see it planted on the streets, in parks, and in residential areas (due to its use as a specimen or for its dense shade). But it’s actually native to the Eastern U.S. It prefers moist soils, so it grows nears creeks, streams, and ponds.

What’s interesting about this seemingly average plant is that it has tons of survival uses. So have you guessed what tree it is? Well, I’m talking about the American basswood tree, also known as the American linden (from Latin Tilia americana).

Read more on Ask a Prepper.

This article has been written by Gabrielle Ray for Survivopedia.


from Survivopedia
Don't forget to visit the store and pick up some gear at The COR Outfitters. How prepared are you for emergencies?
#SurvivalFirestarter #SurvivalBugOutBackpack #PrepperSurvivalPack #SHTFGear #SHTFBag

Friday, August 11, 2017

What We DON’T See in Peoples Range and Bug-Out Bags!

Written by Wild Bill on The Prepper Journal.


I climb upon my soap box” and scream “ENOUGH!” We don’t see enough, but can we have “enough?”

What we do not see in Range Bags: tools, the right tools for the weapons and mechanical items contained therein (site adjustment tool, break-down kits, D.O.P.E Cards – Not that kind of Dope, Data On Personal Equipment cards!). All these tools and a cleaning kit . Planning on what people are going to the range for other than pushing rounds down range (which is fine if that is all they are planning). I see people trying to sight in weapons with no dope sheets or without the instruction on the sight; people running different grain rounds within a magazine, or even different grains in different magazines when they are scoping in a weapon. No First aid kit. My last three trips to the range and I saw no one with a first aid kit, with 50 shooting positions occupied (Saturday mornings).


I see this because I abhor inefficiency, so like the person who is annoyed by a barking dog because they are not a dog person, I am annoyed by inefficiency. Don’t get me wrong, I love pushing things down range just because, once the sights and all else are working. And I love dogs, not so much cats as they are natures definition of inefficiency, but that is an opinion based on my personal preferences 😉 BTW, the “just because” has a purpose because practice makes better (only in the movies does it make perfect.) Bottom line, goals are important and planning is always rewarded.


When do most injuries occur because of a natural disaster like a hurricane or earthquake? The first 24 hours after the storm. Why? Because we prepare for “the storm” more than “the aftermath” which is always longer and has many more components to it. Looters, downed power lines, animals, ruptured utility systems, broken infrastructure, uncontrolled fires, contaminated supplies, panic, no information, no situation awareness. In earthquake California, we build houses on mountainsides held up with stilts, you know, the ones you see on the news sliding down a hill side in a rain storm that would be considered “high humidity” in most other parts of the country. In New Orleans, we build houses across from dikes almost 30 feet high, making the homes 30 feet below sea level, in a hurricane zone, in what was once a swamp. Yes, I understand all the economic and political considerations compounded by population density, and on and on, but still.

Bug-Out Bags: Enough, we never see “enough” bug out gear – enough water, MEDICAL supplies, food and clothes and ammo. Since you don’t know the duration of the emergency only common sense and personal experience of your needs can be applied to solve this, your SWAG (Scientific Wild-Assed Guess.) Tools to support what you did bring; tools to help you live for the x days if the rule of law fades or disappears. PLANS, a purpose, a destination, an alternate and a way back. A portable Ham Radio, rechargeable batteries and rechargers and a solar way to recharge them, flashlights, more than one knife, a saw, a shovel, paracord, alternative shelter, foul-weather gear, water purification, a second good medical kit . I know, it is starting to sound like a fully stocked motor home may be too small to carry everything. Reality is that may be true, so we plan, project and hope.

You know mobile phones are only “cellular” to the nearest cell tower, right? While some of these may use microwave to further transmit the signal, it is good for one or two hops before the call is routed through existing land-lines. Not knowing things such as this may kill you, end your plans or just push you further down the food chain, none of which is a plus.

There are articles ad nauseum as to how many millions of rounds of ammo you MUST have, how many millions of gallons of potable water, and just about everything else. I do not dispute any of them but propose that having a staged plan helps us all with these. For a range and bug-out bag (these should be a matched-set and never far apart, like you and your dog when you are cooking in the kitchen.) I carry 3-days’ worth of supplies. I also have my 3-days “past due” plan – where I go on day three and what I stockpiled there. If I am home and home is safe still, fine. But everyone should have an alternative location planned, restock their matched-luggage set and be ready to move out again if required.

As I put the final edits on this post sabers are rattling around the world, some very big ones, so keep those bags close as the view from the soap box can be scary at times. Climbing down now.


The post What We DON’T See in Peoples Range and Bug-Out Bags! appeared first on The Prepper Journal.


from The Prepper Journal
Don't forget to visit the store and pick up some gear at The COR Outfitters. How prepared are you for emergencies?
#SurvivalFirestarter #SurvivalBugOutBackpack #PrepperSurvivalPack #SHTFGear #SHTFBag

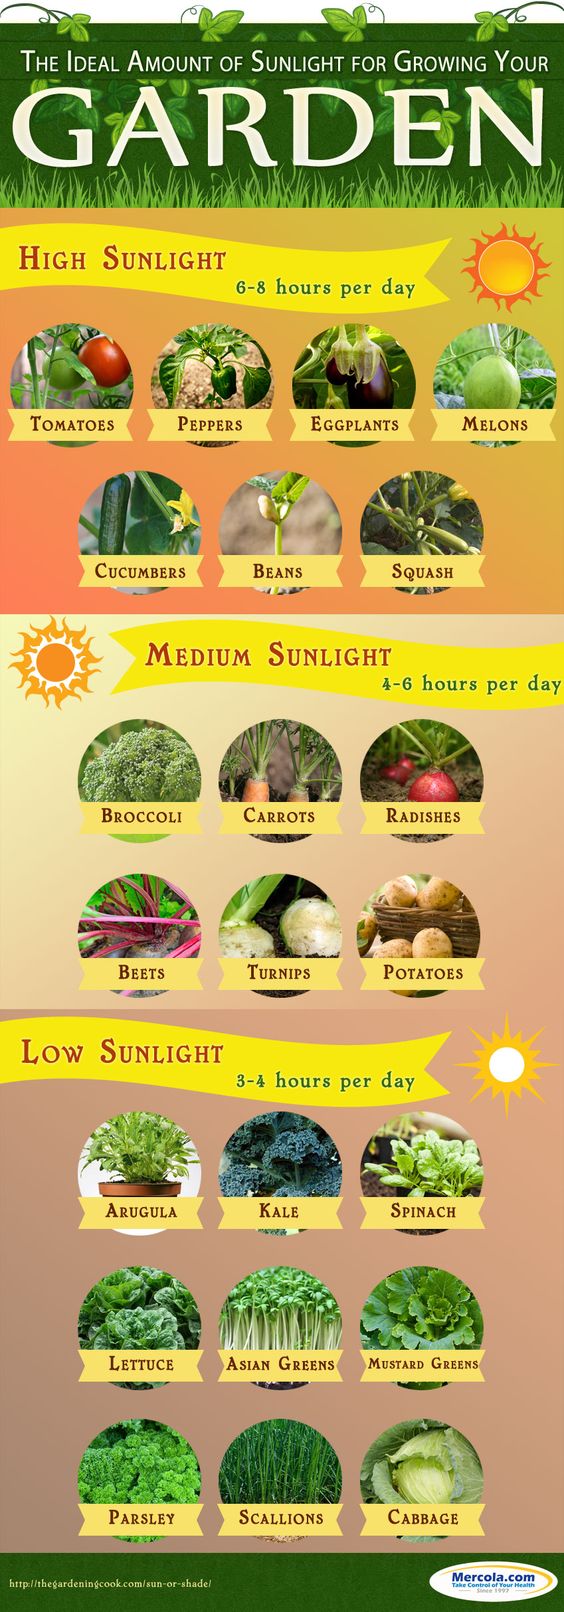
Top 10 Easiest Vegetables For New Gardeners

We’ve talked at length about the most nutritious vegetables to grow, and about how to choose seeds and save them for the next year.

We’ve also talked about how to build a compost pile, and do container gardening, and just about every other gardening topic that you can think of, but what about what’s just plain easy?

Now you need a list of the easiest vegetables to grow, so this is for anybody trying to make a successful first attempt at gardening.

Potatoes

Potatoes are probably the easiest vegetable … err … tuber to grow because you basically plant them and forget them. I actually learned how to plant them in a 5-gallon bucket and haven’t looked back because it’s so easy.

Before we do that, though, let’s talk about the traditional way. Just let your potato grow eyes, then cut them off so that each section has an eye or two – that really is all that you need. Bury each start a foot or so apart and bury under about three inches of soil.

Once the plants reach a foot or so tall, pull dirt in from between the rows to make a mound around each plant. After that, just keep an eye out that they stay planted because they may work their way to the top of the soil.

To grow them in a bucket, just let the potato grow eyes, and plant the whole thing six inches or so down in the center of the bucket. You can cut it into eyes if you want, but you don’t have to.

In both circumstances, the potatoes are ready when the plant dies off.

Discover the golden days’ practice for getting all you can eat food without buying from the supermarket!

Herbs

Just about any herb is a piece of cake to grow. You simply plant the seeds a half-inch or so deep (I like to use the small seedling trays then separate them out into 6-inch pots when they get their second set of true leaves.  As long as you keep the soil damp but not wet, they’ll grow marvelously.

Peppers

Peppers are super easy to grow, too. They’re another where you just plant the seeds a half-inch deep, water them a couple of times a week, and watch them grow. They do like a sandier soil, and it needs to be loose enough for the roots to grow, but packed enough to hold the roots in.

As far as water, they like the soil damp but not soaked, so again, the sandier soil helps with the drainage. Still, peppers are super low maintenance.

Cool trick – pepper seeds love warm soil – 75 degrees or better. When I start mine, it still gets cool at night, so I water them in the mornings with warm (not hot!) water to hurry germination along.

Melons

Some people are intimidated by melons, but I don’t really know why. They’re great for a traditional garden, or you can raise them in raised beds of even containers. Just make a mound of dirt, plant three or four seeds an inch or so deep in the center of the mound, and watch them grow.

Cucumbers

Cucumbers are another easy crop. They don’t mind sun and they’re happy with just a moderate amount of water. You don’t have to do any pruning or much babysitting at all. Grow them the same way that we just discussed growing melons, and they’ll be fine. The good thing about cucumbers is that you really can’t pick them too early. As soon as they look like cucumbers, whether they’re three inches long, or ten inches, (depending on variety because they don’t all get that big), they’re ready to eat.

My only suggestion with cukes is to keep an eye on them because they have a tendency to grow in the shady spots under the leaves and you’ll miss them if you don’t pay attention.

Lettuce

You seriously can’t get any easier than lettuce. It’s also an instant-gratification plant because you’ll see growth in just two or three days. Scatter your seeds over your soil (I use plastic Chinese takeout containers), rub your hands over them to sort of cover them in soil, give them some water, and you’ll have lettuce in no time. I like to mix my leaf lettuces, but that’s just me.

Carrots

Carrots are also easy to grow; in fact, you can grow them in window boxes, and they come in a whole variety of cool colors that offer visual distinction and a variety of nutrients. Carrot seeds are tiny like lettuce seeds are and you plant them in much the same way, except you want to spread the seeds out so that you’re only planting four seeds every inch or so.

Water the soil well before you plant, then cover them with a quarter-inch of soil and lightly pack it down. Pat it may be a more accurate term. Carrot tip – if you want pretty, elongated carrots instead of stubby deformed ones, make sure your soil is a little sandy and loose-packed because if it’s too packed, you’re carrots will look weird.

Green Beans

Beans are easy to grow, too. Bush beans may be the easiest to grow because they don’t need stakes, but I kind of like the runners because they’re tied up and ready to pick. If you’re going for something easy, especially if you’re growing in a container, then go for the bush beans.

If you’re planting traditionally, plant the seeds one inch deep and two inches apart, then thin bush bean seedlings to four inches apart, and pole bean seedlings to six inches apart.

Onions

Onions are another easy-peasy veggie to grow. I like to grow green onions – the ones similar to scallions – for eating raw with a sandwich or in a salad, but I prefer Vidalias or red onions for everything else. I’m not a big fan of that strong, oniony flavor, but onions are an absolute necessity in almost all of my savory recipes in one way or another.

If you’re planting green onions, plant them exactly as you planted your carrots. To plant big onions from seeds, plant the seeds about an inch down and about six inches apart. If you’re growing in containers, they can be a little closer together than that, but picture the full-sized onion under the soil to get a good visual idea of how much space to leave.

They like a looser soil, too.

Pumpkins

I used to love growing pumpkins just to see my son’s face when he was little. He used to love picking them for Halloween. Now just to be clear, there are many different kinds of pumpkins, so check that out before you plant. If you’re going to cook them into pies, for example, you don’t want to use jack-o-lantern-type pumpkins because they’re too stringy. That being said, any pumpkin can be a jack-o-lantern if you want it to be!

Still, the basic premise of growing pumpkins is pretty much identical to growing melons and cucumbers, so make last Halloween the final one where you had to buy a pumpkin.

I want you to succeed. I want you to enjoy growing your own food as much as I do, and I’ve tried to include a variety of different foods to help get you started. In that same vein, I’ve written a book called the Forgotten Lessons of Yesterday, which is a compilation of skills that were passed down to me.

It details everything from canning your own foods to making cheese, wine, and beer, to butchering meat, and I wrote it because I think that everybody should have the skills within it. We’re giving away some pretty cool bonuses with it too, so check it out!

Now, as usual, if you have anything that you’d like to add to this article – tips for beginners, questions, or just other veggies or fruits that are easy to grow – share them with us in the comments section below!

This article has been written by Theresa Crouse for Survivopedia. 


from Survivopedia
Don't forget to visit the store and pick up some gear at The COR Outfitters. How prepared are you for emergencies?
#SurvivalFirestarter #SurvivalBugOutBackpack #PrepperSurvivalPack #SHTFGear #SHTFBag

Thursday, August 10, 2017

What Did You Do To Prep This Week?

Well, folks, here we are again…

I hope that everyone has had a great week and got some prepping done. Unfortunately, a lot of folks start out prepping and quickly become overwhelmed because they can’t get everything they are told that they

Unfortunately, a lot of folks start out prepping and quickly become overwhelmed because they can’t get everything they are told that they need to have squared away for a major disaster. They become overwhelmed and soon just give up shortly after starting

They become overwhelmed and then just give up shortly after starting to prep. And, it...

Read the whole entry... »


from TheSurvivalistBlog.net RSS Feed
Don't forget to visit the store and pick up some gear at The COR Outfitters. Are you ready for any situation?
#SurvivalFirestarter #SurvivalBugOutBackpack #PrepperSurvivalPack #SHTFGear #SHTFBag

The Truth about Bartering Part 1

Written by Guest Contributor on The Prepper Journal.

Editors Note: A guest contribution from Mike Harris, it is the first of several articles on the subject of understanding economics in order to understand how it may change in different EOTW scenarios. As well as my predecessor, I am not a fan of multi-part posts BUT some subjects need to be understood a little at a time as there is a lot of information to absorb. Your constructive comments are always welcome! 

Part 1 Money VS Barter VS Commodity

There is a lot of misinformation out there on bartering and money exchange. The purpose of this piece is to briefly introduce the concepts of bartering, money (currency), and commodity money. It is important not only know what they are but how they work on both a macro and micro economic scale. Only then can we make the best-informed decisions on how to go about these exchanges.


What is Bartering?

So, to begin, what is bartering? Simple defined it’s the act of exchanging goods and services without using money; “I’ll give you three hens for 20 feet of chicken wire”. Now exchanges like these happen every day and are relatively easy to do, most people think of this type of scenario (Bilateral trade) when they think of bartering. However not all trade in a bartering scenario can be done one to one. For example, if you own a landscaping company and a legal firm is wanting your services for a water fall feature but your priority is getting new work clothes for your workers and have no need for legal services a bilateral trade (one to one trade) may not be possible. The clothing store that does sell the work clothes has no need for your landscaping services, however the clothing store is interested in legal consultation for the importation of raw materials across state lines. So, in this situation it is very possible that a three-way trade (multilateral trade) can be made. As the individual (microeconomic) and local commerce grows into a national (macroeconomic) economic environment trade becomes more complex the arrangement of trades has to become more and more elaborate.

Are Silver Certificates still legal tender?

What is Money?

So instead of creating an extreme multifaceted or even computerized bartering system, governments and localities implement an official medium of exchange known as money. When money is established as a medium of exchange, people then depend its value for dependable and accurate calculation, meaning the money becomes a unit of account (currency). It is important for these steps to take place because even in the example noted earlier using a medium of exchange (money) does not mean transactions will happen instantaneously meaning exchanging money for items happens over the course of days, weeks, even years. So, it’s important that the official currency holds it’s worth; this is known as “store of value”. Subsequently when a government simply declares something with no intrinsic value as holding value to use as a medium of exchange we call this fiat. If you look at bills backed by the Federal Reserve (not a government agency) you will see the phrase “legal tender for all debts, public and private.” Simple put this means if someone is selling something and you “tender” (offer the official government implemented “medium of exchange” aka money) you have legally paid, regardless if the seller accepts the currency.  This allows the government to force people to accept it’s official “currency” as the medium of exchange. This is how a government can turn worthless colored paper into something of value.  The colored paper allows for complex exchanges to take place more easily then bartering. This coupled with government intervention is what keeps public confidence in the colored paper (dollar). This leads right into the last portion I want to quickly touch on which is seigniorage.  Seigniorage is the difference between the value of money and the cost to produce and distribute it; this tax is known as seigniorage. A great example of this is to look at our history. Historically speaking, seigniorage was the profit resulting from producing coins. Silver and gold were mixed with base metals to make durable coins. The British “sterling” was 92.5% pure silver; the base metal added (the pure silver retained by the government mint) was (less costs) the profit, the seigniorage. United States gold coins before 1933 were made from 90% gold and 10% copper. Seigniorage is earned by selling the coins above the melt value in exchange for the government guaranteeing the weight of the coin (fiat).


What is Commodity Money?

Commodity money is anything that holds intrinsic value in and of itself and is widely accepted as a medium of exchange. Things like Gold, silver, jewelry, precious metals/stones, seashells are all considered commodity money. Even items like chocolate and cigarettes can be seen as a commodity currency. This is frequently seen on Military deployments, and in prison/refugee settings. The main difference between commodity money and official currency is commodity money is “widely accepted” meaning voluntarily accepted due to its intrinsic value. In this kind of economic environment (micro/macro-economic) sellers and consumers will want to hold onto the more valuable commodities and use the lesser value commodities as payment. Examples of this would include a Marine trading an off brand can of chewing tobacco for new boot inserts and gloves. In doing this he keeps his higher quality Copenhagen chewing tobacco for himself and trades his lesser value tobacco for items he wants and or needs. This tendency for the least valuable commodity to circulate is known as Gresham’s Law, this can be seen in every economic system including our own fiat currency system just look at the Coinage Act of 1965.

Summary

It’s very important to understand not only why we use fiat currency but also how it works. As one can clearly see economics is more than just adding numbers together. While Commutative Law (a + b will always equal b + a) will always hold true, the values of these numbers will be ever changing. Now with this being said economics is not impossibly difficult to learn and understand and should NOT be seen as a field of study only for the worthy few. I believe the more we know the more empowered we become. The more empowered we are the better we are as prepared minded individuals who are responsible for securing our future! I hope for this short series to be a way to dispel a lot of the bartering and money myths being spread out there. By using science, facts, reason and logic to prepare we can help safe guard our futures!

The post The Truth about Bartering Part 1 appeared first on The Prepper Journal.


from The Prepper Journal
Don't forget to visit the store and pick up some gear at The COR Outfitters. How prepared are you for emergencies?
#SurvivalFirestarter #SurvivalBugOutBackpack #PrepperSurvivalPack #SHTFGear #SHTFBag

Prepping: How Much Food is Enough (Updated for 2017)

by SW

Here’s the deal:

Prepping how much food for one yearWe all come to this journey our own way. For me, I started in gardening, then moved into homesteading, and on one of the homesteading sites, I got introduced into prepping. I will be the first to tell you that I’m not a prepper. I consider myself more of a homesteader with prepper tendencies. As such…, this article will probably reflect some of those thought processes.

When I started down this road I kept looking for blog posts or videos that would tell me I need to store XXX number of whatever item. No matter how hard I looked I could never find what I...

Read the whole entry... »


from TheSurvivalistBlog.net RSS Feed
Don't forget to visit the store and pick up some gear at The COR Outfitters. Are you ready for any situation?
#SurvivalFirestarter #SurvivalBugOutBackpack #PrepperSurvivalPack #SHTFGear #SHTFBag

Wolf Pack Pantry Challenge (Week 15)

Week 15 “Plus 5” Ingredients

• Chicken
• Cherry tomatoes
• Green beans
• Okra
• Bell peppers

cooking for survivalThis week you’ve butchered a mean rooster. So you have chicken as a protein source. Your garden is going well: you have cherry tomatoes, green beans, okra and bell peppers. What would you make for supper? Please post your recipe below.

Scenario: We are in a grid down situation. We are already several months into the situation. There is no running water, no electricity and no refrigeration. You are well stocked in the basic pantry staples and spices, you have some home...

Read the whole entry... »


from TheSurvivalistBlog.net RSS Feed
Don't forget to visit the store and pick up some gear at The COR Outfitters. Are you ready for any situation?
#SurvivalFirestarter #SurvivalBugOutBackpack #PrepperSurvivalPack #SHTFGear #SHTFBag

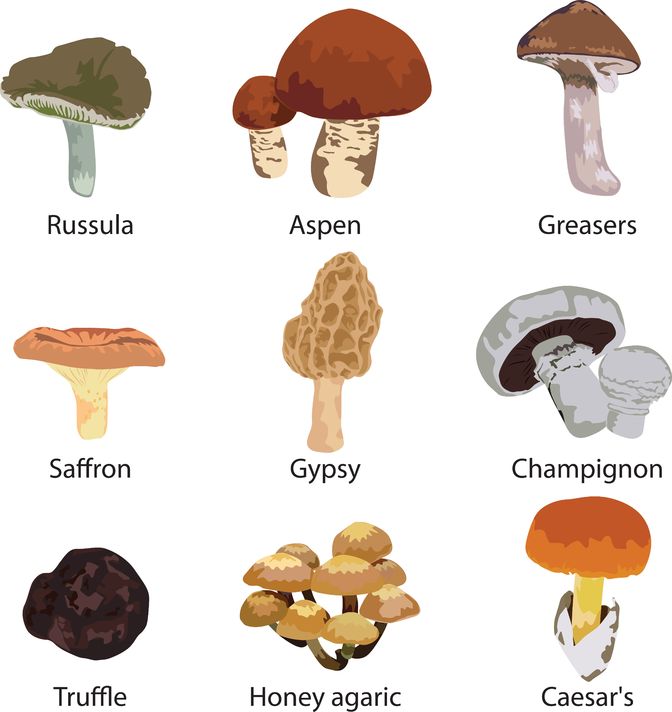
How To Recognize And Use Mushrooms For Food And Fire

Many people that find themselves in the woods with no edible resources other than mushrooms may be tempted to give them a try. It’s not easy to know exactly which species of mushroom is safe to eat, and which ones can kill you. Making a mistake can kill you, so you really have to know what you’re doing.

On the other hand, you won’t be hurt if you burn the wrong type of mushroom, but knowing what to choose to start a fire will help you for sure.

Take a moment and get a few tips on how to recognize and use this natural resource for food and fire!

General Characteristics of Most Poisonous Mushrooms

Simply assuming that mushrooms eaten by animals will also be edible to humans is a mistake. Consider that humans can consume chocolate with absolutely no ill effect (and may even consider chocolate medicinal and downright miraculously curative), yet dogs can die if they eat even small amounts of chocolate. By the same token, animals can eat mushrooms that have chemicals in them that are poisonous to humans.

3 Second SEAL Test Will Tell You If You’ll Survive A SHTF Situation

Here are some general guidelines you can use to avoid many mushrooms that are poisonous to humans:

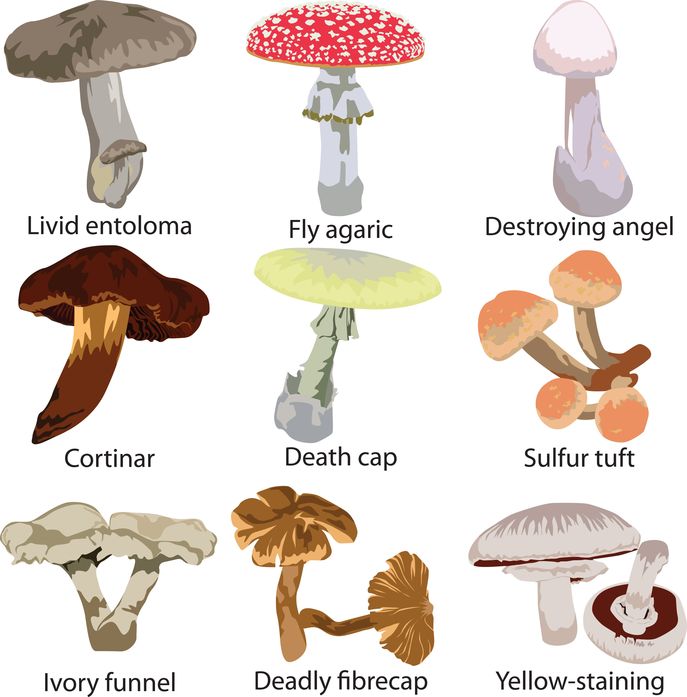
  • Avoid mushrooms that are red colored or have red on them. These mushrooms are like many other living things in nature. Their bright colors are meant as a warning to stay away from them.
  • Some white or dull colored mushrooms are also some of the most deadly. Mushrooms with a bulbous base, or a skirt around the stem can also be poisonous. You should also avoid mushrooms with white gills.
  • If you touch the gills on a Milkcap mushroom, it will emit liquid or “milk”. Even though some mushrooms in this family are safe to eat, most are toxic. It is best to avoid all of them until you know which ones are safe and which ones aren’t in the area you are traveling through.

If you have ever tried to survive on foods gathered from nature, then you know that experimenting with unknown food types is vital. With the exception of mushrooms, you can use the Universal Edibility Test to determine if the item is safe to eat.

The poisons some mushrooms house can take days, or even weeks to kill. Some poisons may slowly attack and destroy your liver, while others will cause toxic, and eventually fatal buildups in other organs. Other mushrooms cause hallucinations, which can lead to accidents, injury, and death. Since just one bite of a poisonous mushroom can get you killed, you just can’t rely on these tests to evaluate them as a food source.

Start Your Own Mushroom Identification Table

If you can get a field guide for the area you are foraging in, they can help you identify mushrooms that are safe to eat, and build your list into a table based on the mushrooms that you encounter.

Here are the basic fields your table should have, or the questions you should be able to answer about each mushroom that you encounter. Keep a few pages for spore prints (once you know how to make them safely) or other tests that will help you compare patterns later on.

  • What season are you encountering the mushroom in? As with many plants, fungi also have set temperature, humidity, and lighting requirements. In some cases, a poisonous strain that looks like a safe one may pop up during a different season. While it is possible for them to overlap if temperatures are unstable, you can still count this data and compare it with other features.
  • Where is the mushroom growing? Contrary to popular belief, mushrooms won’t grow in just any place with sufficient dead material to live on. For example, some mushroom species will only live on a certain tree type, and cannot be raised in fields, or on other wood types or parts of the same tree. Also, edible mushrooms may differ from poisonous counterparts because they grow on different kinds of dead material.
  • How are the mushrooms growing in relation to each other? In some cases, edible mushrooms may grow in a ring, while poisonous ones grow in tufts, or vice versa. Pay attention to where each mushroom of the same strain is in relation to the others. You’ll still need to rely on other tests, as you never know if an animal or something else came along and disrupted the original growing pattern of the mushroom crop.
  • What color is the exposed side of the mushroom cap? What does its texture look and feel like?
  • How big is the mushroom cap? If you have ever watched mushrooms crop up overnight, then you may already know that some emerge as small buttons that quickly form wider, flat cap shapes. Others will emerge almost fully sized and then fall apart within a matter of days. There is still a maximum size for various mushroom species that you can use to help try and identify them.
  • If the mushroom has gills or other markings underneath, what is their pattern? You may notice forks in the gills, or other shapes that will help you distinguish between a poisonous mushroom and a safe one. Make note of how the gills or underside parts feel. Are they brittle or do they bend easily? Do they appear close together? Are the underside structures attached to the stem?
  • What color are the gills, or if the mushroom does not have gills, what color is in the area where the gills would be?
  • Does the mushroom have a bulb at its base? Does it have a ring around the stem?
  • Is the mushroom brightly colored or red?
  • How does the mushroom smell? Does it have a pleasant “mushroomy” odor, or does it smell acrid, like iodine, otherwise unpleasant? (In many cases, pleasant smelling mushrooms are more likely safe to eat. Still, every person’s sense of smell is different, and some people may consider iodine a pleasant smell and actually be nauseated by the odor of an edible mushroom).
  • Pay attention to how the mushroom’s flesh changes color when cut or bruised. If you have some lye available, you can expose some mushroom flesh to it. In some instances, the color change and what the color changes to may be the best test you can use to confirm which species of mushroom you are dealing with.
  • What color are the spore prints? While it can take several hours for the spores to drop onto paper, they will give you some very important information that will help you identify the mushroom you are dealing with.
  • As with potatoes and some other foods we take for granted as being edible, some mushrooms need to be cooked in order to be edible. When scavenging for edible mushrooms, list this information as well so that you know how to prepare the mushroom safely after harvesting it.

14920747 – collection of edible mushrooms on white background

How to Choose Fungus for Starting Fires

Humans have been using mushrooms for survival for thousands of years. Certain kinds of mushrooms were widely favored for medicine, food, and even starting fires.

Knowing the characteristics of polypore mushrooms can give you an enormous advantage if you need to start a fire, or carry a smoldering ember from one place to another. There are also other strains of mushrooms for the same purpose, but they may not be as effective.

Do you wonder how to recognize a polypore? This mushroom type usually grows on rotting wood. You’ll notice ridges of hard material growing out from tree trunks, as well as near areas where the tree trunk is covered with moss.

Polypores usually have hard, almost woody caps that may have a smooth or rough texture. They may also be brown, gray, or multi-colored.

Some polypores also look like “shelves” extending from the surface they are growing on. Depending on the species of mushroom, they can grow quickly, while others may take years to produce a good sized cap.

If you look underneath the cap of a polypore, you will more than likely find tubes or pores instead of gills.

Even though the polypores grow on tree trunks, there are others that grow on or near the roots of trees. In many cases, these mushrooms form a symbiotic relationship with the trees: they can help the tree communicate with other trees in the area by sending certain chemical signals.

Mushrooms can also cleanse the soil of contaminants, or change the pH to one that is more amenable to the the tree species in question. Polypores may also offer increased resistance to disease, insects, and other organisms that might otherwise cause damage to the roots of the trees.

As you learn more about these kinds of polypores, you may be surprised at how many uses humans have for them.

Basic Steps for Starting a Fire With Mushrooms

Overall, you will find that it isn’t especially hard to start a fire using polypore mushrooms. Here are the steps you will need to take:

Start off by locating some woody polypore mushrooms. Do not be concerned if they have a hard outer surface that cannot be broken or cracked easily.

Take a knife or other sharp object, and dig into the cap. You should reach a soft interior that feels something like felt. Pull off the hard outer shell of the cap until you have the felty inner surface to work with.

Next, you can shred the inner soft part of the cap, or cut it into thin slices. You may also want to crush the soft part to make something of a chunky powder. If you can, try to set aside some slightly thicker slices. Later on, once you have the fire going, you can use these bits to make charcoal, and also something similar to tinder cloth.

To start a fire using mushrooms, simply use your favorite sparking method and then use the mushrooms for tinder. Even though the mushroom will smolder quite a bit, surrounding dry tinder will ignite easily enough.

Other Ways to Use Fungus for Starting Fires

Today, many people interested in survival and off gridding make it a point to study as many different ways to start a fire as possible. Human history is also filled with a number of interesting, albeit strange methods and devices. In this case, lets have a look at how the Vikings used Polypores to start fires, and also carry the embers need to start a new fire from one location to another.

As with most other methods used to build fires with polypores, the Vikings also started off by separating the hard outer shell from the soft interior. Next, they cut this cut the softer part into thin slices, and then beat them until the became soft and pliable.

After using a method similar to what you would use to make tinder cloth, only with the mushroom bits, the Vikings went on to boil the mushroom bits in urine. Since urine has sodium nitrate in it, the resulting charred mushroom ignited more easily. It would also smolder for days on end, which made it safer and easier to carry from one location to another.

If you don’t go camping very often, or have not had to try and live in the woods for a prolonged period of time, it is easy enough to dismiss mushrooms as a source of survival food and fire.

On the other hand, mushrooms are some of the oldest and most resilient organisms on the planet. This, in turn means that many catastrophic disasters that will wipe out other organisms may not do much damage to mushrooms.

It might take some work and effort to learn how to classify mushrooms, it will be well worth it. They might save your life one day!

This article has been written by Carmela Tyrell for Survivopedia.


from Survivopedia
Don't forget to visit the store and pick up some gear at The COR Outfitters. How prepared are you for emergencies?
#SurvivalFirestarter #SurvivalBugOutBackpack #PrepperSurvivalPack #SHTFGear #SHTFBag

Wednesday, August 9, 2017

The Sling An Often Overlooked But Critical Firearm Accessory

by Joe Nobody

One extremely important accessory for a shoulder-fired weapon is frequently overlooked by preppers. It is unpretentious, cheap, readily available, and easy to install. It’s the sling.

Suffering from a lack of sex appeal, lost in a plethora of available furniture, and definitely not the cover-girl of gun porn, the lowly sling often suffers from a lack of appreciation – until your body has paid the price.

Through the years, I have conducted numerous training sessions and can now easily identify the guys and gals who have experience in the field… the folks who have carried a...

Read the whole entry... »


from TheSurvivalistBlog.net RSS Feed
Don't forget to visit the store and pick up some gear at The COR Outfitters. Are you ready for any situation?
#SurvivalFirestarter #SurvivalBugOutBackpack #PrepperSurvivalPack #SHTFGear #SHTFBag

How to Choose a Bug-Out Bag

Written by Guest Contributor on The Prepper Journal.

Editors Note: A contribution from Zac and timely as we move towards more rugged gear for the Fall and Winter. Zac will be receiving a $25 PayPal payment for being published and is automatically entered in Round Eleven of our Prepper Writing Contest. Don’t be shy, follow in Zac’s footsteps!


I do a lot of backpacking, it is something I really enjoy, do quite often, and feel that it is something at which I have become quite efficient.

That’s why when I see peoples’ advice on what a bug-out bag should look like I often end up shaking my head. Nobody would last an hour out deep into the woods with the bags I constantly see flaunted. More often than not, they’re poorly made tacticool bags that were created by somebody who’s spent the majority of their life in a cubicle.

You want something that will actually work out in the woods, not something that just looks good on a website. So if you want to avoid ending up letting apathy win 20 miles out with a sore lower back, achy shoulders, and chafed hips I highly recommend picking a bug out bag based off of the following traits:

  1. Bag Size

This is the very first factor that you need to consider. Do you need a big bag or a little one? The answer to that question depends on your length of stay out in the woods, mobility needs, desire to blend in, and sheer convenience.

A large bag allows you to carry more gear (aka survive longer) at the cost of mobility, convenience, and concealment. A smaller bag doesn’t allow you to pack as much, but permits you to move fast, blend in better, and will more likely be nearby when the poo poo flies.

  1. Hip Belt

If the bag doesn’t have a hip belt, forget it. These things are heavenly. A hip belt allows the majority of the weight of the bag to ride on your hips rather than your shoulders. The amount of weight that they take off your back is unreal.

I’ve done a few hikes with a broken hip belt and you tire sooner, end up hunched over a good portion of the day, travel slower, and tend to wake up with an achy back.


Also, make sure that the hip belt has a comfortable amount of padding. Some cheaper military-style bags contain a nylon strap which they claim is a hip belt. Those things will cut into your stomach and leave you raw within the first couple of miles.

Pick something that is actually high quality.

If you’re going to be spending any time moving about in the woods, you need to have a padded hip belt.

  1. External vs Internal Frame

You need a bag with a frame, and to get one without any form of frame is sheer stupidity based on the ease with which one can pick up a quality, reasonably priced framed bag.

Framed bags not only help to distribute the weight of your back better, but they also permit you better posture, and keep pointy packed items from jabbing into your back. Without a frame you end up hunched over with your tent poles digging into your lumbar every step.

If you choose a smaller bag, it’s going to have an internal frame. External frames are only placed on larger backpacking bags. Knowing which one to pick between the two choices depends on your location and personal preference.

An external frame will allow you to stand up higher, permit more ventilation between the bag and your back, and are built to let you carry heavier loads more comfortably. This comes at the cost of mobility though. These packs can sway a bit side to side when you’re moving quickly, and if you need to scramble through any tight spaces you’ll quickly end up in a game of tug of war with your stuck bag.

An internal frame gives you greater mobility when it comes to scrambling up hills and moving across rougher terrain because it stays close to your back. This means that there’s no ventilation there though, and you may not be able to hike as upright as you would like.

  1. Color

Pick a bag that doesn’t stick out in a crowd like Hulk Hogan playing the recorder. Neon colors are out. Find a more earthy tone that doesn’t scream as loudly to the world where you are whether that be in a crowd or in the woods.


  1. Pocket Distribution

If the bag only has two gigantic pockets, it cheap and non-functional. Find something with a respectable number of pockets to keep you from having to journey deep within the bowels of your bag every time you need your rain gear.

  1. Sleeping Bag Space

I don’t care what time of year it is, if you go out into the woods to spend the night without a sleeping bag, you’re not going to be doing very much sleeping. Make sure your bag has enough space for some sort of tool to keep you warm at night.

Yeah, I realize that aluminum blankets will keep you relatively warm, but they alone will not keep you from being miserably cold at 3:00 AM out in the woods unless you have two as you need insulation from the cold dark ground as much as from the sky above.  Make room for a sleeping bag, a quality, compact one.

  1. Feel/Fit

Does the bag feel good when you have it strapped to your body? Remember, this thing is going to be with you for the long haul. You may as well spend the extra money now. Backpackers like to chide each other when they’re deep within the woods with “Do you wish you had paid the extra $20 now?” Usually the answer is an exasperated, drawn out ‘yes’.

Just like tools, buy the best quality backpack that you can right now with the means that you have. Otherwise, you’ll make up the difference and then some when you have to buy a proper bag not long down the road. It’s cheaper to pay for quality up front.

In Conclusion

The last thing you need when the need to get out fast happens is a crummy bag that either spills your goodies everywhere, makes life miserable, or that doesn’t allow you to get away from what you need to quick enough. There are a lot of bags out there to choose from, but as long as you follow the above seven (7) guidelines to picking out a fantastic bag, I’m confident that you’ll have chosen a good one.

The post How to Choose a Bug-Out Bag appeared first on The Prepper Journal.


from The Prepper Journal
Don't forget to visit the store and pick up some gear at The COR Outfitters. How prepared are you for emergencies?
#SurvivalFirestarter #SurvivalBugOutBackpack #PrepperSurvivalPack #SHTFGear #SHTFBag

6 Prepping Goals To Aim For In Case You Become Disabled

If you are not disabled, it can be very hard to relate to challenges associated with limited mobility. As a prepper, you may even avoid thinking about becoming disabled because it will make planning, purchasing supplies, and actually using them much more complicated.

But if you aren’t prepared to deal with hand, arm, leg, or foot related disabilities, all of the efforts you have been making will go to waste. What if you get a disability while struggling to survive?

Rather than have that happen, add a line in your prepping agendas for what you would do if you become disabled. It might change your perspective!

Here are six areas that you should focus on and be ready for regardless of whether or not you are disabled at this time.

Know How to Make and Use Mobility Aides

Consider a situation where you routinely go camping, and may have broken a leg or ankle while on an excursion. If you have already gone through this, then you know how hard is to navigate when one or both legs or feet aren’t able to support your weight or move properly.

Now let’s say you are also young enough or in good condition and don’t see a need to worry at this time about problems such as arthritis or other conditions that make navigating harder as you get older.

Even if a major social collapse takes 10 more years to develop, your body will be 10 years old and may not be as strong as it is right now. Rather than simply leave your bug out gear and bug out plans on the shelf, make sure you can use everything even if you have an arm or leg impairment.

3 Second SEAL Test Will Tell You If You’ll Survive A SHTF Situation

Here are some things you can practice as well as mobility aides that may be useful to you:

  • Tie your stronger arm loosely to your side and see how much you can do with your non-dominant hand. Are you able to prepare foods, wield a knife, or carry out dozens of other tasks that you take for granted now? If not, then you need to practice these skills and find ways to do them with just one hand. As an extreme challenge, see how much you can do using your feet and toes. Surprisingly enough, it is possible to do many things with your feet that you normally do with your hands, however it takes a lot of practice.
  • Practice moving around in a wheelchair on crutches, or while using a walking stick. This is also a good time to practice using weapons and other items that you may need to use even if you are dealing with limited mobility.
  • Look for braces, pick-up tools, and other devices that can be used in increase what you can do with just one hand or limited strength in your arms and shoulders. There are many devices on the market for this purpose, as well as newly emerging motorized devices and robots that can be controlled with a minimal amount of effort.

Avoid Becoming a Target

As disgusting as it may be, even at the best of times there are people that pick on others they perceive as weaker than themselves. If you are disabled or become less able to take care of yourself, there will be people that try to take from you or cause you some kind of harm.

While many of these actions should be, and are illegal, it does not change the fact that having a disability already makes you a target. When the crisis strikes, it will be even worse.

If your disability occurs just before or during the crisis, and you don’t know how to avoid becoming a target, then you’ll be left at a serious disadvantage.

Here are some things you can do to develop those skills:

  • Spend time with people that have different kinds of handicaps. You can volunteer at centers where disabled people meet and learn more about how they cope with various problems.
  • Many people that become targets do so simply by virtue of appearing older. In this case, try dying your hair grey or white, and use makeup that makes you look older. Use a cane or other device to indicate mobility impairment and see how it changes the way you are treated. If you have one available, use your smart phone and record the interactions.
  • Learn how to use situational awareness and body language to your advantage. Sometimes, just appearing more alert than others around you can prevent people with bad intentions from approaching you. If you are perceived as weaker, criminals may decide to attack you.
  • Learn how to defend yourself if you are in a wheelchair or must rely on some other mobility aide. There are many self-defense classes you can take to learn basic techniques as well as gyms and dojos where you can practice.

Grow and Prepare Food

One of the most important things you can do is learn how to grow and prepare food using a minimal amount of physical effort, as well as how to obtain and purify water.

When it comes to simple food growing methods, sprouts require the least amount of effort. Combine that with container gardening in order to obtain enough sprouts to meet a significant percentage of your dietary needs.

Overall, taking care of fish and animals requires a good bit of physical work and strength. Try raising smaller fish in a very large aquarium, however you must choose ones that are raised for human consumption. Chickens, rabbits, and some birds can also be raised in fairly small areas, however you may not be able to kill them humanely if you have limited strength.

On the other hand, if you can get used to consuming crickets, ants, and other insects, you can have a fairly good sized indoor bug farm and eat well with far less effort.

Do what you can to grow food indoors. Setup lights and other systems so they are easy to reach and repair if needed. Installing lights on the ceiling will save some space, but you won’t be able to get to them.
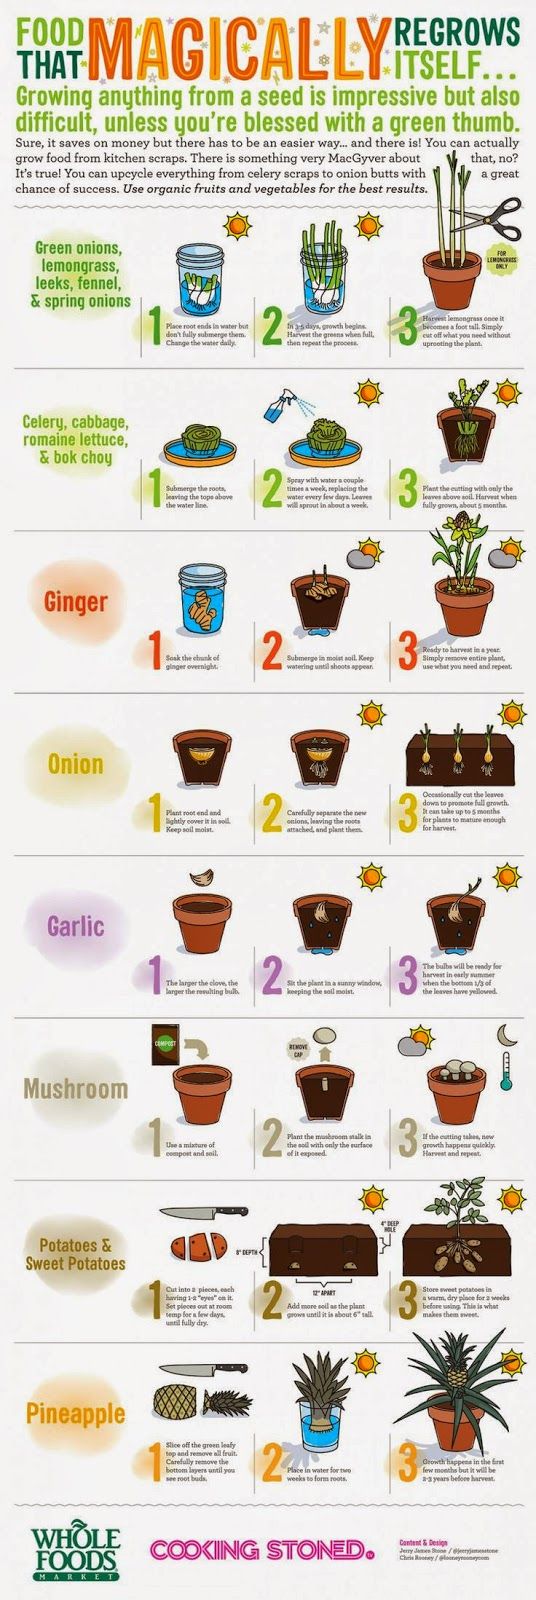
By the same token, if you are interested in any kind of solar or wind power that will be used to generate electricity for the lights, you will need systems that do not go on a roof or another area where you cannot make changes or repairs as needed.

Choose lightweight, portable gear so that you need as little strength as possible to use the items and take care of them. Never underestimate what you can do with a solar oven, or even a larger sized toaster oven as compared to a full sized stove.

Manage Shelter Needs

One of the hardest parts of dealing with a disability revolves around building both long and short term shelters.

If you aren’t disabled now, purchase plastic, tarp, and items that you can use to build temporary shelters. You should always be able to build something that will shelter you from rain using contractor size trash bags as well as standard tarp or fireproof emergency blankets.

Over the years, many people have developed a considerable interest in living in various kinds of vehicles. If you are disabled, you could set up a sleep area as well as meet many other needs while living in a truck or van.

Here are a few things you can practice now while you still have more abilities:

  • Go to a safe area where you will not encounter any traffic or obstacles. Practice driving using just your left foot and just one hand. Even though it can be confusing at first and feel very uncomfortable, you can and will get the knack of it.
  • If you have a truck or van, practice getting in and out of the back without using your hands or arms to lift yourself up or down. You can use braces as well as other assistance devices. Look for ways to get in and out of the back with limited foot and leg usage. This may include making sure that you have some kind of steps, platform, or ramp that can be deployed and used to help you raise and lower yourself in relation to the vehicle.

Building a permanent shelter on your own can be complicated even if you are in good condition. Rather than try to build something using conventional materials, make sure you know how to use old plastic bottles or other materials that can be combined with mud and straw to build sturdier walls.

Alternatively, practice building an underground dugout or other underground shelter while sitting in a chair or with just one hand. Remember, even though it takes longer, the purpose of this drill is to show you that you can do it.

When building a permanent shelter, look at circular designs as well as single floor options. Also practice digging pits for foundations as well as for sanitation needs. If you can’t dig very much, make sure that you know how to assemble a composting toilet, as well as make use of other methods for meeting sanitation needs using outdoor plumbing.

Simple Machines to Expand Muscle Use

I wrote about simple machines that can be used to lift weights and do other kinds of work.

Learning how to make and use these devices now will help you even if you never need to use them in conjunction with a disability. Practice using them in weight free, safe drills with limited hand or leg strength or movement so you could see if braces or other devices can make them easier to use in actual situations.

Here are the six devices you should know how to make and use even if you have leg, foot, arm, or hand impairments:

  • the lever
  • pulleys
  • the wheel (and axle)
  • ramp or inclined plane
  • screw
  • the wedge

Understand and Work Around Mental and Emotional Disabilities

If you are approaching middle age, you may already realize that you aren’t as energetic as you used to be. Your body may not be necessarily weaker, but mentally you may be more forgetful, or simply inclined to think that you can’t do the same things as you did when you were younger.

Some aspects of mentation decline faster even as experience and skill seem to give you more of an edge in some ways. Regardless of what parts of your mind are aging, be aware of developing impairments as quickly as possible.

Use puzzles, memory games and other aides to try and retain as much mental strength as possible. Since the ability to read and process information can also decline faster than expected, be sure to store important information in video and auditory formats.

During a crisis, you can also expect some fairly debilitating emotional changes. Watching dramatic movies or pretending you are in a crisis isn’t going to give you the kind of core driven emotional strength that you will need to endure a major crisis.

In fact, it is my contention that these kinds of games and role playing only weaken you because you are practicing a set of patterns that were created by others. As such, there is a critical loss of variance that you may not even realize exists.

You are better served by using meditation, reading spiritual materials, and making sure that you can control your emotions with trigger words and images that will help you get on track and stay on track regardless of the situation.

If you do some research, you will find that 3D printers and new motor control technologies are used to create all kinds of devices that can be used to increase mobility for the disabled. No matter whether you are concerned about surviving a hurricane or want to make sure you can still navigate after a major crisis, think about how you will manage these kinds of limitations.

Failure to take into account changing physical limitations can truly spell disaster even if you have a full range of mobility and strength at this time. Always remember that the worst part of surviving a crisis will always involve the unexpected.

If you have not thought about disability and impairment, then this can truly be one of the biggest overlooked part of your plans. Don’t ignore the risks and do whatever it takes to prepare!

This article has been written by Carmela Tyrell for Survivopedia.


from Survivopedia
Don't forget to visit the store and pick up some gear at The COR Outfitters. How prepared are you for emergencies?
#SurvivalFirestarter #SurvivalBugOutBackpack #PrepperSurvivalPack #SHTFGear #SHTFBag

Tuesday, August 8, 2017

The Best Survival Guns: Handguns, Shotguns and Rifles for the Survivalist …

by Jeff C

Best Survival Guns: Handguns, Shotguns and Rifles for the Survivalist and PrepperThe Best Survival Guns: Handguns, Shotguns, and Rifles for the Survivalist and Prepper… My Choices.

I live in a small town in the Midwest, not on the outskirts but smack dab in the middle. There are about 5,000 people in my town, not a large town by any stretch of the imagination, but big enough for my tastes. A preppers mindset has to make a bit of a shift when living in town, versus a more rural area. Namely, your garden is smaller, you can’t keep chickens and your ability to maintain a watchful perimeter is greatly diminished. These are all challenges that we need to...

Read the whole entry... »


from TheSurvivalistBlog.net RSS Feed
Don't forget to visit the store and pick up some gear at The COR Outfitters. Are you ready for any situation?
#SurvivalFirestarter #SurvivalBugOutBackpack #PrepperSurvivalPack #SHTFGear #SHTFBag

Superfoods in Seven (7) Days

Written by Guest Contributor on The Prepper Journal.

Editors Note: Another contribution from Ra Denney, and timely as our normal growing season draws down. More proof that where there is a will there is a way to achieve your goals. 

Most crops take an awfully long time to grow, however not Microgreens (see Nutritional Analysis). Most varieties are ready to eat in a week or two. Researchers at the USDA have determined that the cotyledons, or “false leaves” that are the first to pop out of a seed are a concentrated storehouse of nutrition designed to feed the new plant until the roots can grow and take over.

Broccoli microgreens have been shown to contain as much as 40 times the vitamins & minerals as an equal weight of broccoli florets. You can turn a 40-pound sack of Black Oil Sunflower seeds into an enormous quantity of highly nutritious vegetation. Microgreens taste great in salads, on sandwiches, in smoothies or just by themselves. My chickens love these more than any other food!

Another benefit for Preppers, in addition to the fast turnaround on a high nutrition food, is that Microgreens can grow in the dark. You merely need to take them out into the sun when they are big enough to eat and let them green up and perform photosynthesis for a few hours. Your plants never need to be exposed to possible theft. To get started, all you need is any kind of fairly tall tray with a lid.

You can use a plastic clam-shell cake box or even something smaller. Put an inch of soil on the bottom, spread your seeds & sprinkle soil lightly over them. Spray them & keep them damp for a few days until they begin to sprout. You can then water once a day.


I have even grown peas on a couple layers of paper towels. When they’re ready, cut them off at ground level & enjoy.

You can get the Sunflower seeds at a feed or box store and you can get whole peas at an ethnic food store – these are usually the most economical sources; for other varieties, you can order seeds from many online outlets.

To be clear, certain types of beans, such as Kidney are NOT suitable for microgreens. Some safe varieties of plants for microgreens include Arugula, Basil, Beets, Lettuces, Celery, Chia, Clover, Cilantro, Cress, Dill, Flax, Garlic, Kale, Mizuna, Mustard, Popcorn, Kohlrabi, Onions, Tatsoi and Turnip.

Most seeds can be stored for a long time with care, so for years into the future, you can have a fresh variety of super-nutritious vegetables on your table in mere weeks.

Some of the nutrients found in these microgreens are vitamins K, C and E, lutein, and beta-carotene, usually boasting up to 25%-30% pure protein. “All of these nutrients are extremely important for skin, eyes, and fighting cancer and have all sorts of benefits associated with them,” says researcher Dr. Gene Lester, of the USDA.

I was first introduced to microgreens by a friend name of Lorenzo and Khang Starr has been a great mentor. You can visit his microgreens forum to share your efforts and see what others are growing and how they’re using their produce. (https://plus.google.com/communities/118293278099960528255)

Microgreens must surely be a Preppers dream, with seeds being so compact & easy to carry and store. Being able to turn them into a super food in as little as a week is a phenomenal result compared to other crops. Growing them indoors eliminates the stressful fear of losing everything to rippers or critters.

Get yourself some Sunflower seeds and start experimenting today so that when the time comes, you can quickly grab a bunch of sacks and keep your neighbors fed for months.

The post Superfoods in Seven (7) Days appeared first on The Prepper Journal.


from The Prepper Journal
Don't forget to visit the store and pick up some gear at The COR Outfitters. How prepared are you for emergencies?
#SurvivalFirestarter #SurvivalBugOutBackpack #PrepperSurvivalPack #SHTFGear #SHTFBag