Well, folks, it’s time for another what did you do to prep this week. I hope everyone has done something prep wise this week… Remember the more the better but even little things count.
I had a reader email me a few days ago telling that he had been prepping for a few months and had done a lot prep wise but wasn’t sure where to go from there, he asked what my suggestions were for taking his preps to the next level.
I told him to cut off his power, water, phone, and to not go to the store or buy anything for two weeks. I told him that by doing so any holes in his preps would...
from TheSurvivalistBlog.net RSS Feed
Don't forget to visit the store and pick up some gear at The COR Outfitters. Are you ready for any situation?
#SurvivalFirestarter #SurvivalBugOutBackpack #PrepperSurvivalPack #SHTFGear #SHTFBag
In Part 1 of Introduction to Building a Storage Shed we considered why as a Prepper or survivalist you might want to build a shed, and gave some options and preliminary decisions to make and checking out to do. In this part, we will look at some other things to consider before you install your storage shed. And some general lessons learned to keep in mind through the process.
Storage Shed Kit Sources
Doing an online search seems to be an effective method. Doing a search for “shed kit” on eBay gave me an idea of what was available. Searching for the top brands found companies specializing in shed kits such as ShedsForLess.com. Once I found the make and model I was looking for, more specific searches found the best price. Prices seem fairly universal, although I did happen to find a sale on my choice. A local source may be cheaper since delivery can be handled in house, but will be increased by sales tax, so the total price should be compared with companies which have to include freight in the cost but don’t have to charge tax. It seems that shipping is usually “free” (more accurately, included in the cost) on some of the major brands.
Keep in mind that the floor is usually not part of the kit, although often can be ordered with the kit. Often it is delivered first, from a local source, which means the quality might not be optimal. On mine, most of the joists could be forced into place, but I had one beam which was warped at a knot, and attempting to force it straight caused the beam to snap. Replacing it was not trivial, since the only receipt I had was the shipping order, and it took a long time for the local store to find it in their system, since it did not have my name on it or even the name of the company I ordered from. It was under the name of the kit manufacturer.
There are kits which are material only, and those which are pre-cut. The latter is easier to assemble and requires less equipment.
Also, when pricing a (wood) kit, keep in mind that hardware is often included, but paint and roofing are usually not, and these products are not cheap. I could not believe they get over $30 a gallon for paint these days; fortunately Ace had a buy one gallon, get one gallon free sale. For most (wood) sheds, the specified roofing is shingles, and those run about $1 a square foot. Flooring, roofing and paint was about 1/4 of the total cost of my kit, and that did not include the roofing gun and scaffolding which will be used for other projects as well.
Options
Often a kit company will offer “options” such as additional or different doors, windows, a ramp, shelving/cabinets and various ventilation methods. If offered by the kit company you pretty much have to order it with the kit. Ventilation is good to prevent heat build-up; a “ridge vent” methodology is probably the best, but usually not available with the kit. If you are going to use the shed strictly for storage, then windows would seem to be pretty silly since you lose wall space and reduce the security. However, if you are going to be spending much time in there, a window or two will be quite helpful for light, ventilation and to reduce claustrophobia.
What to Have on Hand
The first thing to attempt to arrange is other people. There are a couple of aspects of building the shed which will be very difficult for a single person to accomplish, without using “tricks” which need to be purchased or constructed. More people not only allow completing these aspects in a “normal” manner, but will make things quicker and perhaps even “more fun”. After all, if a single person needs to drive 1000 nails, two people only need to drive 500 each, and so on. Plus, don’t discount the motivation having others involved provides. If you can arrange for a person or group to help, that should be great. If you don’t have people available or that you trust, it does not mean you are out of luck, just that you will need to approach the project differently.
There are certain basic tools you will need. For a pre-cut wood building, that will be a hammer, drill (primarily for driving screws), tape measure (25′ may be adequate for medium sized buildings), level, framing square, carpenter’s pencil and a circular saw. Having a cut-off saw was nice (more ergonomic and precise), but is not really needed by the pre-cut kit; the square and circular saw will suffice since there are not that many cuts left to be made. A panel saw would have been handy, but for the one cut needed for the floor of my kit, a long straight edge, a pair of clamps, and the circular saw did just fine. And you will need a ladder or two. And, of course, don’t forget safety glasses and work gloves. Plus arrange for the equipment for your preferred painting methodology.
Remember those 1000 nails? I’ve used a nail gun for construction and it is very helpful indeed. However, since the kit came with all the correct nails, I did not bother getting the pneumatic equivalents. However, roofing nails were NOT included, and roofing is enough of a pain; I got a roofing nail gun and the nails for it. Some kits say that “felt” under the shingles is “optional”. I disagree. Not only does it provide protection from a small leak in the shingles, but it protects the shingles from the roof panels and vice versa. For the felt, you will need a hammer stapler and staples (no, a pneumatic stapler won’t do; it goes right through the felt, and your hands will hate you if you try using a standard squeeze stapler). For the shingles, a utility knife and a bunch of hook blades for it, and a pair of tin snips (for the edging). Be sure the hook blades fit your utility knife; my knife had a couple of extra pins which match up holes only in the same brand’s (much more expensive) blades.
This list assumes that everything goes perfectly, which it sometimes does not. For instance, if there is a warped or twisted board, it can often be forced into position using a pipe wrench. Or a twisted beam can be encouraged to stay in place with a long bolt and nut, tightened with a wrench and socket wrench. Some places get rain, and getting raw wood wet is not wise. A tarp big enough to completely cover the roof (and bungee cords to fasten it down with) can be a great help. Things sometimes don’t fit quite right; I found a package of composite (not wood) shims (from Timberwolf) to be of great help in these cases. If you end up with a crack or hole that insects can get through, some spray foam like “Great Stuff” can help. Although roofing CAN be done with ladders, it is a tedious, slightly more dangerous process. Buying or renting scaffolding can make it go quicker and is a bit safer to boot. Of course, it might be easier and not much more expensive just to hire someone to do the roofing.
I used several other tools which I had on hand, to overcome problems and make “enhancements” to the shed. These should not be normally needed.
Caveats
It is tempting to just order the kit and work on the site when the floor kit arrives. This can be problematical; it took me over a month to get the floor flat and level (since the ground was very much neither). Yet, the shed kit arrived only a few days after the floor kit. Be aware of what the relative weather is between the source and your location. My kit came from Pennsylvania when it was cold and wet, and arrived in Arizona where it was warm and dry, and sat in that wildly different environment for over a month. It is not surprising that I had more warping and twisting than expected. Two lessons learned. Prepare site before ordering, and be aware of relative weather between source and destination.
The floor kit is often delivered by a local lumber outfit, who may have a trailer and fork-lift, and can put the pile in a relatively out of the way location. The shed kit may be shipped by a standard shipper who has nothing other than pallet jacks to move things around with. Pallet jacks require a smooth, solid surface, so they had to leave my kit in the road and I had to quickly and manually move it into my pickup. The total kit weight is a bit over a ton, so to move it from curb to site will take more than one trip with a “1/2 ton” pickup. When you get to the site, have something for the materials to sit on to keep them off the ground, sort the parts by size, and then stack them with the last needed pieces on the bottom and the first needed pieces on top. I had two stacks, one of boards and one of sheets. Cover with tarps if precipitation is expected.
Find the inventory list before you start unpacking and use it to verify the contents as you unpack. I did a manual inventory, and matching it with the official one I found later was a bit of a challenge, since my descriptions did not match theirs. There were a couple of pieces missing and a couple which were unusable; a call to the company got replacements sent right out. Read the manual from cover to cover before you start, then follow it “exactly” (except for any typos) unless you are doing the build by yourself.
It was annoying that the 16′ shed floor kit came with 8′ runners; it was a challenge to keep them together and straight; I eventually gave up and used “StrongTie” connectors to hold them together end-to-end.
Standard felt is very easily torn. It usually takes two people to install, and after we got one side up and took a break; the wind, more accurately a gentle breeze, ripped most of it off. I finally had success with double thickness felt which is somewhat stronger, a “tool” I built which allowed me to put it up by myself, and putting on the edging as quickly as possible to prevent wind from getting under the felt edges. Yes, you need more rolls (being thicker, there is less length in each roll), but in climates such as ours, you generally put on two layers of standard felt anyway.
How to start
The first step is to figure out everything you want to accomplish with your shed, then find out any limitations on what you are “allowed” to put up and where you want to put it. This includes finding out what is required by building codes. Make sure you have plans for any alterations to be made to the shed; find the materials and figure out when in the build process you will need to diverge from the standard instructions. Next, find the model or models of kits which you like, and get an idea of the pricing. Arrange financing (cash or credit), prepare the site (marking and leveling for wood, forms. rebar and pouring for concrete), then order the kit. Find out when it will be delivered and arrange to be available, with a truck or two to move the parts from where they deposit them to the construction site, and preferably people to help to load and unload.
from The Prepper Journal
Don't forget to visit the store and pick up some gear at The COR Outfitters. How prepared are you for emergencies?
#SurvivalFirestarter #SurvivalBugOutBackpack #PrepperSurvivalPack #SHTFGear #SHTFBag
Winter is here! The winter season and the holidays bring a lot of joy but the cold weather adds significant challenges to your prepping, such as health problems, home heating issues and even extreme situations when you have to survive a winter storm.
But you can overcome any challenge with the proper knowledge, with practice and experience, right?
Have you ever imagined how our ancestors survived during harsh winters? Well, for this week’s Prep Blog Review I’ve gathered four articles with winter survival tips, many of them inspired by the lessons of our great forefathers.
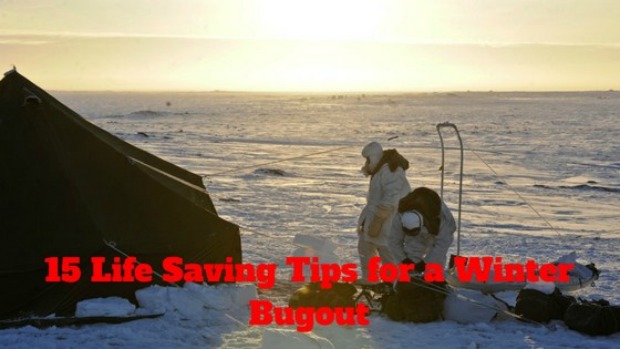
1. 15 Live Saving Tips for a Winter Bugout
“In 1939 the Soviet Union invaded Finland in what was called The Winter War. This war caused about 70,000 Finnish causalities with most of them being innocent civilians. As a result of this invasion many Finnish civilians were forced into a winter bug out in order to avoid death or being captured.
At the beginning of this invasion Finnish military went through towns and villages letting them know that they had 15 minutes to leave and burn down their own houses so that the Soviet army couldn’t use them for cover. They had to leave all of their belongings.
The Finnish people didn’t have time to sit down and put together a bug out bag list or even given the wealth of knowledge that we have in the preparedness community.”
2. Winter Storm Warning! Surviving a Winter Storm Trapped Outside
“Winter weather can go from beautiful to deadly in a matter of hours. Whether you’re on the road or in the wilderness on a winter camping trip, it’s important to know how to keep yourself and your loved ones safe when a winter storm warning is in effect and until the storm passes.
According to Farmers’ Almanac, the winter season for 2016-17 is expected to be much colder this year as opposed to last year.”
“While the winter season brings joy to both the young and the old as families come together, it also brings some health problems we shouldn’t ignore. We are all familiar with the common cold and the flu and we know they can strike when we are stressed or run down. The following herbal remedies will help you deal with all the problems the cold season may bring.
In this polluted world we have to be careful of what medicine we take as we are bombarded with chemicals every day, from every direction. I’ve been using herbal remedies ever since I can remember and I learned their secrets from my mother and grandmother. “
4. 7 Things Our Ancestors Stockpiled To Survive The Winter
“Life was hard for our ancestors — much harder than it is for us today. Most of them didn’t have running water and electricity to make their lives easier. These modern conveniences have changed our way of life, to the point where we often forget what people had to do throughout history in order to survive.
We look at survival today as something needed in a time of emergency, but to many of them, survival stared them in the face every day of their lives. That was especially true in the wintertime, when it wasn’t possible to glean what you needed from nature. Basically, if you weren’t ready for winter, you didn’t survive.
So our ancestors all became experts in stockpiling. They’d spend the warmer months preparing, so that when the cold winter months came around, they’d be ready. You could tell a lot about a family’s wealth and industry by that, as there were those who struggled through the winter and those who didn’t.”
This article has been written by Drew Stratton for Survivopedia.
1 total views, 1 views today
Rate this article!
[Total: 0 Average: 0/5]
from Survivopedia
Don't forget to visit the store and pick up some gear at The COR Outfitters. How prepared are you for emergencies?
#SurvivalFirestarter #SurvivalBugOutBackpack #PrepperSurvivalPack #SHTFGear #SHTFBag
Reading through a book .. a good one or not .. takes a piece of your life away so like the rest of you.. I’m picky. My tastes are eclectic. I’ve read Homer.. more than once. My ‘Slush Pile’ of paper backs .. in a continuous loop. Find a copy of Hugo’s ‘Les Miserables’ and you will know what printed classical music sounds like in the mind. If I like the tome.. you’ll find tabs and high lighter all over it. I find a good read .. Instructional… A ‘good read’ does not have to fit into any sort pulp or classic category. A good read just...
from TheSurvivalistBlog.net RSS Feed
Don't forget to visit the store and pick up some gear at The COR Outfitters. Are you ready for any situation?
#SurvivalFirestarter #SurvivalBugOutBackpack #PrepperSurvivalPack #SHTFGear #SHTFBag
Currently, the number of e-mail newsletter subscribers stands at just over 15,000, which is very good, but I’ve set a personal goal of reaching 25,000 subscribers by the end of December. Can we do it… I hope because let’s face it, the more people who are prepping the better off we will all be when the balloon goes up.
The e-mail newsletter is FREE and it’s fast and easy to signup – all you need to do is add your e-mail address in the field below so I know where to send it and hit the subscribe button. You’ll then receive an email asking you to confirm by...
from TheSurvivalistBlog.net RSS Feed
Don't forget to visit the store and pick up some gear at The COR Outfitters. Are you ready for any situation?
#SurvivalFirestarter #SurvivalBugOutBackpack #PrepperSurvivalPack #SHTFGear #SHTFBag
from TheSurvivalistBlog.net RSS Feed
Don't forget to visit the store and pick up some gear at The COR Outfitters. Are you ready for any situation?
#SurvivalFirestarter #SurvivalBugOutBackpack #PrepperSurvivalPack #SHTFGear #SHTFBag
1.) 12 ‘healthy habits’ you’re better off giving up : So interesting ideas and opinions presented but I’ll keep taking my multi-vitamin, using hand sanitizer and toilet seat covers if I must use a public restroom.
2.) Daily Aspirin Benefits Could Outweigh Risks : A new study from Cardiff University has examined the risks and benefits of taking aspirin daily. Researchers found that aspirin’s potential side effect of stomach bleeding is less of a concern than the spontaneous bleeds that can happen in people who don’t take the drug.
from TheSurvivalistBlog.net RSS Feed
Don't forget to visit the store and pick up some gear at The COR Outfitters. Are you ready for any situation?
#SurvivalFirestarter #SurvivalBugOutBackpack #PrepperSurvivalPack #SHTFGear #SHTFBag
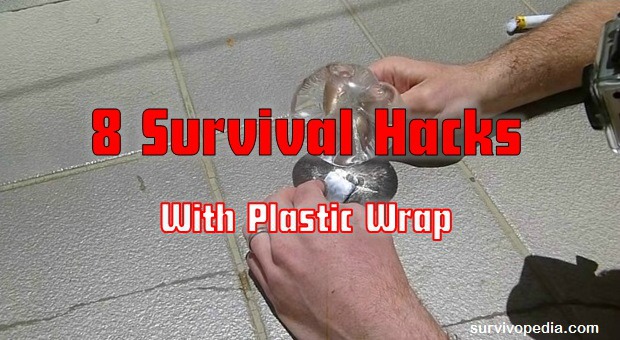
You’ve probably battled with your fair share of plastic wrap while trying to cover a bowl of leftovers, but that stickiness is one of its biggest assets when it comes to using it for survival.
That’s right – you can use plastic wrap for many different things if SHTF, so keep several rolls of it in your stockpile!
When I say plastic wrap, you can use the kitchen plastic wrap in a pinch, but you can also buy an entire roll of clear or green translucent plastic wrap at the hardware store that they use to wrap pallets. This type is much more durable than the plastic wrap meant for use in the kitchen. It’s dirt cheap, too.
1. Staying Warm and Dry
Possibly the best thing about plastic wrap is that it’s pretty much impermeable. That means that air and water can’t pass through it, so if you’re stuck in a storm or have to venture out in the cold, plastic wrap can be one of your best friends.
Not only does it keep air and moisture out, it keeps body heat in, so if you wrap your torso, limbs, and feet in it, you can preserve a ton of body heat and stay dry at the same time, which will also help you stay warm.
The only thing to remember when you’re using it this way is that your skin needs to breathe. That means that as soon as you get someplace warm and dry, you need to take it off.
2. Collecting Rain Water
There are a couple of different ways that you can use plastic wrap to collect water. The first way is the obvious way –hang a sheet of it so that it’s horizontal to the ground and let it collect either rainwater or dew.
If you have a bucket or container, even better – set the bucket underneath the plastic and use a stone to tilt it to one side, so that the water pours off of the plastic into the bucket.
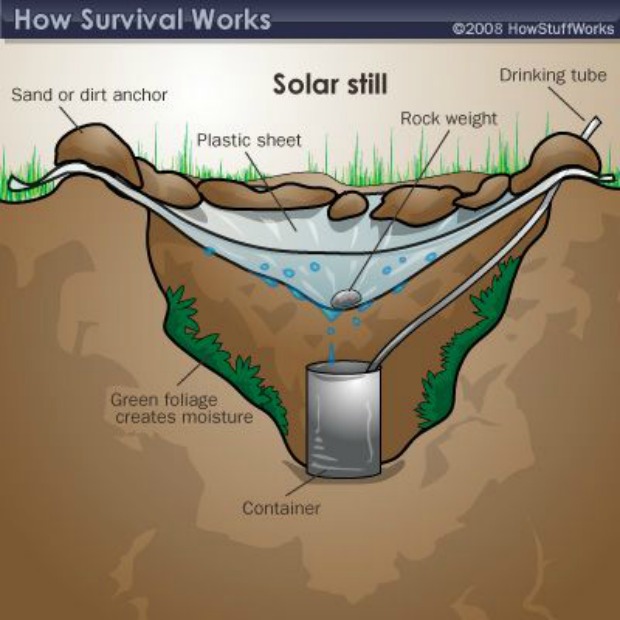
The second way that you can use plastic to collect water is to build a solar still. This sounds a lot fancier than it actually is.
Dig a hole in soil that is in direct sunlight – this is important because you’re using the sun to dehydrate the moisture from the damp soil.
As the soil dehydrates, the water evaporates and rises, creating condensation on the plastic. Here’s how to do it:
Dig a hole in direct sunlight, preferably early in the morning. Make the hole a foot or two deep – the more damp soil you have exposed, the more water you’ll get.
Place a mug, bowl, or some other vessel to collect the water in the center of the hole.
Fill around the cup with any damp vegetation that you can find. The more moisture, the better.
Cover the hole completely with plastic wrap.
Place sand, dirt, and rocks around the outside perimeter of the hole to seal the plastic wrap to the ground.
Place a small stone or some dirt on the plastic directly over the center of the cup so that it forms a V into the cup. The plastic can’t touch the cup, though.
Leave the still there as long as possible – either until the dirt dries up or the sun goes down, whichever comes first.
If the hole dries up, either dig it deeper to reach more damp soil, or dig another hole and start over.
Enjoy the water. You won’t collect much this way, but in a survival situation, some is better than none!
You can also use plastic wrap to make a solar still to distill dirty water or salt water into drinking water. For a better visual for this purpose, check out this video.
Yup, you read that right. You can build a shelter using plastic wrap. As a matter of fact, we just built one to use as a make-shift paint booth. We used the skeleton from a picnic tarp for the frame, but trees would do just as well.
Simply wrap the plastic wrap around the trees, or poles that you cut, then cover the top of it, too. We used a piece of cardboard to fashion a door, but you could just as easily cut a small, 3-sided entrance in the hole then wrap a stick around the vertical side and stick it in the ground to “close” the door.
Seal it up from the inside with another piece of plastic. You’re creative – I’m sure you can figure out an entrance.
It also collected dew on the top, so your plastic wrap house serves double duty as a water collector. This will make a wind-proof, waterproof shelter that is actually fairly durable and will hold heat inside.
This trait would also make it excellent material for building a greenhouse.
5. Start a Fire
You can use plastic wrap to start a fire. I didn’t really believe this was possible until I found a video that proved it. The idea is that water in a piece of plastic wrap acts as a magnifying glass.
The paper actually caught fire fairly quickly – within a couple of minutes, so it’s not something that I would discount.
Actually, starting the fire with the plastic and water seemed easier than using a bow, so if those were my only two options, I’d probably try the plastic wrap and water first. We have other great ideas for staring fires.
6. Waterproofing Your Gear
There’s nothing worse than trekking through a downpour and stopping for the night only to find that everything in your pack is soaked, too.
Maybe you’ve dropped it in a stream that you were crossing, or had to swim at some point. In any of these scenarios, plastic wrap would have kept your gear dry.
It’s not a total waterproofer, but I have used it when I’m out on a long distance ride – I don’t have saddlebags – to keep my pack dry. I just have a piece folded up in the bottom of my bag and when I need it, I unfold it and wrap my bag in it.
It probably wouldn’t do a lot of good if my bag was submerged, but it would give me a few extra seconds to catch it if I dropped it in the lake. You could also use it to cover things such as your firewood in camp to protect it from a downpour.
7. Rope or Lashing Material
Yes, rope is always good to have on hand. There’s no doubt about it. Plastic wrap used for shrink wrap is extremely strong and if you twist a piece into a rope (you have to twist it), it will stretch to about three times its original length then hold there. We tested it and it held 115 pounds without threatening to give.
That’s pretty solid for some plastic, especially when you consider that you can untwist it and use it for other things.
8. First Aid
There are several ways you can use plastic wrap for first aid.
First, a sucking chest would needs to be covered with plastic. You could also use it as a non-stick covering to keep water and debris out of a wound. It would work as a sling, or you could wrap it around as a binding. Throw some in your first aid kit.
In a survival situation think of what you can do with what you have. This is what our ancestors used to do.
Click the banner below and discover their most valuable survival secrets!
This article has been written by Chris Black for Survivopedia.
2 total views, 2 views today
Rate this article!
[Total: 0 Average: 0/5]
from Survivopedia
Don't forget to visit the store and pick up some gear at The COR Outfitters. How prepared are you for emergencies?
#SurvivalFirestarter #SurvivalBugOutBackpack #PrepperSurvivalPack #SHTFGear #SHTFBag
A crisis of any scale is a tough time to either have to learn to do without, or create a lot of work for ourselves. With a little practice and planning, we can still have things that make our next dish of soup or pinto beans or squirrel a little happier, and give us some versatility in how we use flour and mixes for baked goods. We can do it without adding a ton of steps, mess, and in most cases a lot of ingredients to our daily tasks. Whether we’re at home or on the trail, that can save some sanity as well as time and labor.
This is me, so you’re mostly going to see 5 ingredients or less through here, and a focus on cleanup. I’m just not Martha Stewart. But I do like my breads and I do like something sweet now and again, so here’s half a dozen ways we can still get them, even without a working oven or supermarket.
Ash Cakes & Bannock
What would a soup be without some sort of bread? Not as happy, that’s what. Two of the simplest breads to make have already been talked about in the 6 One-Day Projects article, down in the list of other things to try.
Any flour will work for either an ash cake or bannock bread, even purchased mixes like the dinner rolls Augason Farms apparently figures I’ll be making – ever, but especially in a disaster. Even when it’s got extra stuff in there, I go ahead and follow the cup-tablespoon-teaspoon ratio for bannock, or just drizzle in water or milk for an ash cake.
Those ash cakes and bannock can also be augmented by rolled oats, rolled wheat, or instant rolled barley, although you need to let those sit for 10-20 minutes to make sure they have a chance to soak up some liquid, and you’ll probably need to add more liquid than usual. It’s a way to both add some texture and variety to diets, as well as use up some of the cheaper ingredients like oatmeal that are in our storage even when we haven’t planned for no-bake cookies.
Any cornbread or cornmeal can also be turned into ash cakes or pseudo-Johnny cakes, to go beside a soup or under a stew, or to add variety to our breakfast meals.
Drop biscuits & dumplings
Most pancake and dinner roll mixes have the potential to turn into nice, easy biscuits; and anything that’s a biscuit (or bannock bread) can be dropped by mounded tablespoons into a simmering pot of broth, gravy or soup, simmered for 10 minutes, flipped, simmered another 10-12 minutes, and whala – we have a fluffy(ish) bread right there in our soups.
Head’s up: Biscuit dumplings will regularly turn your clear, light broth into something thicker and more gravy like. That is not a bad thing, just a point.
Something that can be a bad thing, is that if you completely cover the top of your soup with dumplings, it gets really hard to stir the bottom.
Both of those factors go away if you opt to make your meal in a solar oven or similar. You can do it one of two ways, just like a regular biscuit bake – stick the biscuits/dumplings on the bottom to slowly rise and fluff, or space them out on top from the get-go or after part of the bake time has elapsed.
An advantage to dumplings over other ways of getting a breading into our soup meal is that it’s still only one cooking pot.
Drop biscuits have advantages in clean-up, too, and in time and waste. When we mix a batter and then spoon biscuits out onto a sheet pan, we don’t even have to dip our fingers in flour for molding them. We sure don’t have to flour a counter and a rolling-pin or drinking glass (which is also what I usually use for a cutter).
When I make drop biscuits, they’re ingredients to oven in 5 minutes or less, and my cleanup involves a bowl and two spoons. When Mr. P makes *real* biscuits, I consider just torching the kitchen and starting over.
In a life with limited water, limited resources, and a lot of labor involved with every aspect of survival, the differences can matter. The same holds true for the drop biscuit dumplings instead of rolling out and cutting even more to make flat drop dumplings.
Hardtack
Hardtack is definitely an option to go with our soups, just like it was in colonial and pioneer days. There are lots of recipes online for baking it.
There are not as many as I’d have expected where people actually eat this stuff, and discover that it’s best soaked for a few hours first, then simmered right along with broth, tea, or soup, anywhere from 10 minutes to an hour depending on the alignment of the stars*.
*Snicker; but not entirely kidding on the predictability front.
That veers it away from a convenience food, but if you’re using a crock pot or equivalent, or are simmering soup for a few hours anyway, heating the house anyway, it’s pretty handy to be able to pop open a bucket of these things 2-5 years after you made them and have a nice, portable, calorie-dense portion to pick up and eat or saw with a fork and knife. We can even sub in some of our crazy flours like ground dry beans, acorn, and barley if we’re so inclined.
Just be aware that real hardtack is not Mountain House pilot bread or a cracker, and that 5-20 minutes under gravy or in a fry pan goes nowhere without a pre-soak once it’s hard and dry.
Beer bread
I am lazy, if it was not obvious from the articles about bed sheets, laundry, and gardening. I’m also not big into babysitting food at timed intervals.
Beer bread fits me to a T.
Price out some inexpensive light beer, and don’t neglect the option of a local store ordering a couple flats of forties for you. They’re actually the cheapest option for me, both bottles and cans, because I’m not willing to buy Natty Ice even for a disaster, even though there’s boxed wine in case I decide a wine IV or camelback is necessary for my sanity.
There are many recipes online. I like this one, although I sometimes just omit the butter entirely or use oil instead. This one skips the salt and goes straight to self-rising flour. We can sub in a dinner roll mix or Bisquick for either.
And the sifting … I call it optional.
We can use a beer bread recipe in any kind of cooker, from a crock pot or facsimile to a solar oven. We can make it in little cans around a campfire or rocket stove, too, or atop a clay pot candle heater.
Spread out in a pie plate or frying pan instead of a loaf pan, or separated into muffin pans, it’ll cook faster and be easy to portion out.
That can save arguments over who does or doesn’t get the heels (there are freaks out there who consider that a lesser slice). It can also just make it faster and less messy to serve, while also saving cooking fuel and time.
If you want more flavor to your bread, you can go with heavier and darker ales as you like. While I’m happy sipping a well-built Guinness or Killian’s Red, I don’t actually like them in my bread and that bread is no good for PBJ.
Griddle Cakes
Another cheat I learned for backpacking is that you can make any baked good into a griddle cake. For those of us who want fast and easy in a disaster, or who aren’t *ready* yet and are dying for a quick and easy treat, bag and box mixes I have successfully made into little rounds of goodness with a pan or on the greased top of a canteen mug and any heat source include:
Oatmeal cookies
Brownies
Muffin mixes
Cake mixes
Scone mixes
Cornbread & corn muffin mixes
Hushpuppy batter
You can follow the directions (or portion them, depending on how easy fresh or powdered eggs and oil are to divide) or cut some of the liquids, and they come out about like puffy pancakes.
Thin them down a fair bit, and, boy oh boy, we’re starting to look into the gourmet side with crepes.
They can be eaten as-is like a soft cookie or roll-up, or topped with powdered sugar, cinnamon sugar, ice cream and milk flavoring syrups, nuts in syrup, honey, tree syrup, Karo, and jelly.
Frosting in a Ziploc bag offers the ability to make cute spirals and grids or fluffy artistic mounds. Pudding can be reserved and mixed thick to do the same, or used as a filling for crepes.
They can also be topped or filled with canned or rehydrated fruits, cannoli filling, pie filling, cream cheese, or peanut butter. You can also play with adding shredded coconut and nuts (and chocolate) to German chocolate frosting, or use sweetened condensed milk and shredded coconut as a super-sweet filler.
Fun note: They can also be baked in a skillet to cut like wedges of cornbread. I regularly bake muffin mixes in a pie pan to create thin little slices that are usually drizzled with something. Tuna cans and soup cans can also be used for any batter, as can small Pyrex bowls or ramekins. Those containers are also all options for baked pancakes, such as this one .
Off-Grid Cooking
Even when we’re not as prepared as we’d like to be, or when we like convenience and we want to continue to have convenient options in a disaster, we can still get the feel-good foods that bread and even “baked” sweet treats can be.
Whether it opens up options for us, just provides some extra backups, or becomes part of our daily habits, keeping an open mind about what we can accomplish – and how much effort it has to take – can only benefit us in the future.
This focused on my weakness: Breads. (And laziness, okay.) I totally endorse knowing how to do and make things from scratch. There are preservatives and cost issues with some of my cheats. However, from things like ash cakes and bannock that truly need few ingredients, to new ways to make and use mixes we might already have around, we don’t want to pigeonhole ourselves, especially if our disaster plans involve holing up in summertime or a lot more physical labor year-round.
Other things to consider when we look at these lists are the amount of fuel some of the treatments take, the amount of pan scrubbing and kitchen cleanup involved, and even the cookware we have at our disposal.
We also might want to look at some of our guilty pleasures when it comes to eating. Even if we don’t stock our cupboards to make it a daily or even weekly staple, we might consider stashing some premade mixes, hiding away some beer, and holding onto some tin cans so we can pop them out now and then for special occasions.
from The Prepper Journal
Don't forget to visit the store and pick up some gear at The COR Outfitters. How prepared are you for emergencies?
#SurvivalFirestarter #SurvivalBugOutBackpack #PrepperSurvivalPack #SHTFGear #SHTFBag
Let me start today’s article with an axiom: despite the fact that DIY-ing briquettes is a hard and messy job, if you’re not afraid to get your hands dirty, you can make a reasonable income by selling (your extra) charcoal/wood briquettes.
Now, as per the dirty part of the job, the hardest and dirtiest part of DIY-ing briquettes is represented by the charcoal dust, which must be crushed and mixed.
To begin with, briquettes are blocks made from compressed charcoal dust, coal dust, wood chips, sawdust, biomass etc, which are used as a fuel in boilers, stoves and what not.
Basically anything that burns can be used in making briquettes, but some materials are better than others with regard to their caloric output. In other words, some burn better and give more heat than others.
Today we will concentrate on the best stuff around for DIY-ing briquettes, which is wood and its derivative (charcoal).
How to Transform Wood into Briquettes in Three Easy Steps
Of course, I am not talking about getting out in the forest and chopping wood like an old school lumberjack. The idea is to use wood shavings, wood chips or sawdust which are byproducts of wood processing factories. Also, these materials are almost the ideal stuff for making fuel briquettes.
Actually, many of these factories (furniture/woodworking businesses) are buying wood briquette machines for processing the wood residues and making a few bucks from what others may consider waste.
Now, if you’ve got what it takes, i.e. the will power, skill, the briquette-machine, and the aforementioned raw materials, let’s talk about the specifics of DIY-ing briquettes from wood residues.
1.Prepare the Raw Material
First things first: you’ll have to take your wood raw material and get it ready for the manufacturing process. You’ll have to transform the big chunks of wood chips and/or wood shavings into sawdust, which is much smaller and thus more malleable. If you’re already in the possession of sawdust, you’re all set.
Generally speaking, sawdust can be more or less humid, depending upon how it was transported, stored and so on.
If there’s too much moisture trapped inside, you’ll have to dry it with a the dryer or whatever means you have at your disposal, as moist sawdust is not suitable for making briquettes. You’ll have to do this if the moisture level is over 16 percent. The lower the moisture, the better.
Truth be told, dryers are regularly used in large scale briquetting operations, but you can always air-dry your sawdust by spreading it out on the ground and letting it dry.
Obviously, the weather is key in this endeavor, so you’ll have to choose a sunny period that’s as close to dry as the Sahara desert as you can get. Just find a piece of smooth, clean ground and have patience. Drying your sawdust indoors would be the best idea, provided you have the means.
2. Put the Raw Material Inside the Briquetting Machine
Now, for the second part, you’ll have to put your nice and clean sawdust inside a briquetting machine. Usually, the feeding mechanism is an elevator, but you can feed the machine yourself, though you’ll have to be cautious and take care about the feeding-speed, so you don’t block the machine.
There are basically two main types of wood briquetting machines: the screw briquette machine and the mechanical stamping wood briquette machine.
The latter can be used for making both thick briquettes and thin pellets while the former is regularly used for charcoal briquettes and/or barbecue briquettes. These are the droids you’re looking for. More about charcoal in a moment, right after the break.
3. Prepare the Briquettes for Storage
In the last step, after you’ve already made sawdust-briquettes, they must be cooled for storage and stored or sold, or whatever.
The idea is that if you have plenty of wood residues available, spending some money on a wood briquette machine would be a clever investment, as you will become more energy/fuel efficient, get off the grid in small incremental steps.
Also, you’ll be able to make some extra money selling your excess briquettes to your friends and neighbors. Go in together with a friend on a second-hand piece of gear if you need to. Ideally, you should go for a briquetting machine which can build both wood and charcoal briquettes.
How to Make Briquettes from Charcoal
If you were wondering what’s up with the charcoal briquettes, well, charcoal is made of wood, alright folks? Hence, charcoal briquettes are basically the same thing as wood ones, just better.
The only messy thing about making charcoal briquettes is the crushing and the mixing of the charcoal dust itself, which is a dirty job by any measure.
Transforming the charcoal dust into fuel briquettes will require a binder – something like the Force, which binds the universe together. I am talking about an agglomerating material which must be added to the charcoal dust to keep it together after enough pressure is applied to transform that dust into a solid and stable briquette.
Charcoal briquettes have higher caloric power than wood briquettes; they burn for longer and they produce more heat and less (almost zero) smoke. Also, they’re lighter.
In order to DIY charcoal/char, you’ll require wood scraps. The best material for making charcoal is hardwood such as birch, beech, hickory, maple and oak.
Charcoal briquettes are basically 90% charcoal/char dust and 10 percent “minor” ingredients, including the binding agent I already told you about above, which is typically starch made from wheat or corn, an accelerant (sawdust or nitrite for hard-core chemists), and lime as an ash whitening agent.
Here are some recipes for making your own charcoal briquettes:
10 kilos of charcoal/dust fines and 0.3 kilos of starch or
40 kilos of charcoal/dust fines, 4 kilos of sawdust, 2.5 kilos of starch, 1 kilos of lime (or calcium carbonate) or
100 kilos of charcoal/dust fines, 3 kilos sodium nitrate, 7 kilos starch, 2 kilos of lime.
The accelerant is important because charcoal briquettes need the stuff to burn faster because, due to the compacting process, the briquette cannot absorb enough oxygen for a proper combustion, unlike a lump of charcoal for example. Here the accelerant comes into play.
You’ll require 3-4% of sodium nitrate (this is an oxidant which releases oxygen when heated and accelerates the burning process) in your charcoal briquette or 10-20 percent sawdust.
Keep in mind that if you’re using uncarbonized sawdust, your briquettes will be smoky; hence if you’ll be going for sawdust as an accelerant, it would be ideal to ferment it for 4-5 days by keeping the sawdust in water in order to reduce the smoke.
The ash whitening agent is an indicator in charcoal briquettes. When the briquette are burning inside your stove turn white, it means that they’re ready. The white ashes are very appealing in briquettes especially if you’re going to sell them.
To use starch as a binding agent, you’ll have to gelatinize it first, which in laymen’s terms means that you’ll have to make a porridge from your starch and then use the porridge to bind the charcoal dust together. You can also use mashed waste paper pulp as a binder if you don’t have starch or it’s too expensive.
Now that you have enough info to start making your own briquettes, it only takes some will to proceed with this project. Or maybe you already have any experience in making this type of fuel? This is a great skill that you would need for surviving an energy crisis or even an EMP.
Click the banner below to find out more about surviving this disaster, and even much more than that!
This article has been written by Chris Black for Survivopedia.
9 total views, 1 views today
Rate this article!
[Total: 0 Average: 0/5]
from Survivopedia
Don't forget to visit the store and pick up some gear at The COR Outfitters. How prepared are you for emergencies?
#SurvivalFirestarter #SurvivalBugOutBackpack #PrepperSurvivalPack #SHTFGear #SHTFBag
“In peace prepare for war, in war prepare for peace.” Sun Tsu
Repetition in training breeds success in life. This is the mantra followed by the most successful warriors, businessmen and individuals in life. Whether they know it or not, habits learned well and with consistent, proper approach lead to a much easier transition when emergencies occur.
My life began on a farm in Illinois, my dad was for all intents a sharecropping field hand at the time, winters meant no work, no income, so we trapped muskrat, beaver and hunted raccoon for pelt money. In...
from TheSurvivalistBlog.net RSS Feed
Don't forget to visit the store and pick up some gear at The COR Outfitters. Are you ready for any situation?
#SurvivalFirestarter #SurvivalBugOutBackpack #PrepperSurvivalPack #SHTFGear #SHTFBag
Lot’s of readers have sent emails asking me about the forest fires in Tennessee, with the most common questions being – how close the fires have gotten to me, and if I’m okay. Thank everyone for asking and caring it means a lot to me and shows that we have a great community here.
First off, I’m fine and my home is fine, the fires got to within about a half a mile from my location a few weeks ago but that was successfully brought under control by firefighters and no deaths, injuries, or homes and or buildings were damaged by that fire.
from TheSurvivalistBlog.net RSS Feed
Don't forget to visit the store and pick up some gear at The COR Outfitters. Are you ready for any situation?
#SurvivalFirestarter #SurvivalBugOutBackpack #PrepperSurvivalPack #SHTFGear #SHTFBag
Seems everyone online is focused on prepping for a nuclear war these days. Shows the stupidity of humanity that this is even a thing but it is, so I thought I’d share the contents of my radiological medical response kit. There are plenty of excellent sources out there covering the other issues around this topic but get a hard copy of Nuclear War Survival Skills. There is a free download is the 1987 version. There is a 2012 updated version for purchase but I do feel some books require owning as hard copies and this is one of them.
My kit started in 2008 before I became a prepper after attending a compulsory Canadian Government conference for a few days on the Medical Emergency Treatment for Exposures to Radiation (METER) . I am sure some of you have had more recent training and I’d love to read about USA and UK equivalent training. The course enrolment in 2008 was managers of trauma hospitals and emergency services and included a dirty bomb table top exercise. It was fascinating stuff and great speakers. I am including some more recent information from the Ontario Government Radiation Response Plan.
I did not use FEMA for this article but this slide show is interesting if you want more background of a general nature on Medical Management of Radiologic Casualties
I am including some directions to take materials and over the counter medications to limit radiation dosing but you should only take these on medical advice and under medical supervision. No self-treatment even in the apocalypse!
I am not going through the types and methods of exposure, or the protective materials/clothing/masks. Look that information up but there are a few things the average person might overlook. I am giving the general ideas here and some will not work in a nuclear war but work great if it was a dirty bomb or power plant incident so adapt as required.
Exposure to Radiation
If treating an exposed casualty keep them outside an established Cold Zone (an area where outside material, clothing, foot wear never enters. The area of treatment is a Hot Zone so protect yourself as best you can while there. Try to avoid treating for prolonged periods near the casualty as they might be radioactive enough to give you a lethal dose. Have your Cold Zone at least 5 metres (About 20 feet) away from any casualties and preferably with a concrete wall in between. Alter this if contamination is everywhere but even if they have driven to you still remember they might be a radioactive source internally or externally.
Decontamination is supposed to occur after treatment of any regular injuries but honestly I would decontaminate first to avoid exposing yourself while treating. Minimum here is double gloves and plastic suit with duct tape sealing the arms and legs. An NBC mask would be great but goggles and a N95 mask might be all you have. None of these supplies should be reused if possible or left anywhere near the Cold Zone after use. Be checked or check yourself every 5-10 minutes to make sure your gear is intact. Approach the casualty with the wind to your back if possible. Remove all their clothes by cutting gently to avoid making anything airborne and dispose away from the casualty and the Cold Zone.
Use potassium iodide to block your thyroid’s absorption of radiation.
Water is not recommended for decontamination but likely it will be all you can find to achieve removal of visible and invisible external contamination. Pour clean water over them and hose them down if you can. Try to make sure this water runs away from the Cold Zone and think about any drains it might enter. If you have enough consider using wet wipes rather than water and will you have enough clean water anyway for this sort of thing in a nuclear war? The goal is to remove anything visible and then hopefully wash off any invisible sources of radiation. This will not make them safe to enter the Cold Zone as they might have absorbed, ingested, and/or inhaled radioactive material and remain deadly to you. A few hours to a day will tell as they will show obvious signs they are going to die. If you can keep them outside the Cold Zone for at least 24 hours and a week would be good but again depends on who it is and circumstances locally.
Treat injuries but place Cold Zone equipment in minimal amounts on doubled clean tarps not the ground. Remember not to kneel down or rest against walls or the casualty. Ideally the casualty should be doing all of these interventions themselves with you shouting encouragement and throw gear to them. If you have to move them then place them on a thick clean tarp and a sheet and literally wrap them up entirely to avoid contact for the transport.
They are contaminated until a Geiger counter says they are not or several days have gone by and they are showing no major progressive radiation illness. Until then treat them as if they are radiative to you. Do not forget this ever. As the hours and days go by the threat of this lessens but it does not take much source material to kill.
Radiation Sickness
Occurs a few hours to several weeks after exposure and are mainly the signs and symptoms from dead stem cells that you will see. Of interest if you have seen Threads or any film it takes 2-4 days before you see gastric signs. Diarrhea and abdominal pain take about 48 hours for most lethal doses to appear so being fine a day afterwards means nothing for survival. Gastric symptoms lead to a horrible death in about ten days so if they get to two weeks it looks good but… it takes 30 to 60 days before you know they will not die from blood failure. The earlier lack of appetite, nausea, vomiting (persistent), and lack of energy occur the more likely it is the casualty will die.
The most useful sign is their consciousness as it gets hit hard early by lethal and high radiation. It can kill in 24-48 hours but expect drowsiness and feeling very ill even in none lethal exposures. Diarrhoea is always a bad sign for survival and remember that poop might well be radioactive so keep away from it and keep it away from your Cold Zone.
Bleeding and vomiting and diarrhea can all occur within minutes of high level exposure. Interestingly a type of pneumonia can occur after about 50 days and pulmonary fibrosis can occur about a year afterwards. Carry a few N95 or similar masks with you everywhere you go as inhaling is the easiest way to become contaminated in a nuclear incident.
Radiation Symptoms and Management.
Treatment
This gets complex but basics are needed such as an antiemetic (Gravol). Antipyretic such as Tylenol but do not use Aspirin as they are likely to bleed and this really won’t help that. Keep hydrated and warm. Treat other injuries as best you can. Use ciprofloxacin and/or cephalosporin antibiotics and consider also using Vancomycin (Gram Positive antibiotic) and Amphotericin B (anti-fungal). You will need a Doctor to prescribe these but Vets have these and there are sources available to treat your tropical fish that might help in a pinch. Antivirals (acyclovir) are good but there is no information on using HIV treatments for Acute Radiation Sickness but if available I would consider it. The casualty is going to feel really ill from this therapy but worth a try if available and if not obviously dying.
Cutaneous Syndrome
Typically a hand or foot might develop this even if there are no signs of systemic Acute Radiation Sickness. Of note the First Aider is at high risk from this if the casualty has high doses. This is basically a really bad burn that swells and then develops tissue death. Treat with removal of dead tissue, ingesting steroids, eating lots of protein, and avoiding nicotine (vasoconstrictor). Pain killers will be nice here as it is agony so consider early amputation if loss of the area is clear.
My Radioactive Medical Response Kit
Most radioactive elements are not easily absorbed by the bowels but Iodine, Tritium, and Cesium are 100% absorbed. Strontium is about 30% absorbed while most other elements about 10%. This is an ongoing issue in a radioactive environment so consider using double bag clean soil and secure water barrels to construct your Fall Out shelter with and using these for food production later on after clear vegetation and soil from your garden (this is arguable as might put you at risk of inhaling)
Metamucil. High fiber intake promotes bowel clearance to flush out any ingested radioactive materials. Start as soon as you think there is a radiation issue. Vegans clear the bowel in less than 24 hours and meat eaters about five days.
Use Potassium Iodide tablets to block radioactive iodine from being absorbed by the thyroid gland in the neck. Ontario Government gave me free ones but I’d go for 14 days supply for all members of the group and a 28 day supply for all people under the age of 25. Make sure they are not allergic to iodine (shell fish) and it only works if taken before exposure and only helps the thyroid not the entire body. A 130mg tablet provides protection after six hours and last about 36 hours. One tablet for adults a day and half a tablet ages 3-18. Under 3 years give a quarter of a tablet. Under one month an eight of a tablet. Only used if intake of radioactive Iodine is likely. 130mg of Potassium Iodide is equivalent to 170mg of Potassium Iodate.
Drink fresh water in large quantities (3-4 litres a day) as it helps flush some elements out and you need to be hydrated if you get sick. Urinate outside the Shelter and think about drainage away from the Shelter. Not likely to be radioactive but no point doing all this and overlooking the portable toilet in the shelter that is emptied every week. The goal is to reduce all radioactive exposure as far as possible and for as long as possible.
Barium Sulphate (not commonly available but see if you can get a friendly ICU nurse to get you a supply). Not an enema but the oral version as it is really good at binding to Strontium and excreting it via the bowels. Your poop will by clay like and you should consider it to be radioactive. Use one oral dose of 300mg but repeat is ingestion reoccurs. I’d basic this on where the food is from and if your poop is normal again but honestly do not eat or drink anything that is not from your stores to avoid this fate. It causes constipation so a mild laxative added to the Metamucil is a good move.
Use Prussian Blue by mouth as it is absorbed in the bowel instead of Cesium, Thallium, and Thorium which is then pooped out. Your poop is highly radioactive in this case. Use about 3gm per day for a minimum of 30 days. It is not absorbed by the body and is relatively harmless. It will cause constipation and your poop will turn blue. If used, maintain a high potassium diet as it rips this out of you as well and that can easily kill you.
Maalox or similar. You want colloidal Aluminum Phosphate or Aluminum Hydroxide (antacids). Hard to find these days as the anti-aluminum movement due to Alzheimer’s risks means many brands no longer contain Aluminum. Read the label. Use about a 2.5 gm dose once a day for five days. It binds to the radioactive elements in the bowel allowing you to excrete them in your poop .
Sodium Bicarbonate. This helps depleted or enriched uranium leave the body by the kidney. I can only find intravenous doses but it seems a spoonful a day for a week might help if you can stomach it. The dose is two tablets every four hours until three days after there are no symptoms but tablets might be hard to find. Use pure sodium bicarbonate powder and check the label for additives.
You might consider charcoal ingestion but this is not recommended for radioactive contamination as it does not do much to block absorption and can lead to vomiting and then aspiration of radioactive material into your lungs which is a far worse issue than in the bowels.
I also have the ability to stop all treatment humanely. Well that is my kit and the background to it. Enjoy!
from The Prepper Journal
Don't forget to visit the store and pick up some gear at The COR Outfitters. How prepared are you for emergencies?
#SurvivalFirestarter #SurvivalBugOutBackpack #PrepperSurvivalPack #SHTFGear #SHTFBag