
via Instagram https://www.instagram.com/p/BGiB_UmFhwl/

Written by Guest Contributor on The Prepper Journal.
One lesson I have learned from my parents and now encourage my children to participate in is being an Outdoorsy Kid. It didn’t matter if it was after school or during the summer time my brothers and I would often hear my mother say “Go play outside.”
The post Lessons Learned from Being an Outdoorsy Kid appeared first on The Prepper Journal.

Being able to independently feed our families is the main focus of self-sufficiency. Whether you call this prepping, gardening, or animal farming, that’s the goal.
The main issues I encounter when it comes to food is lack of money and storage.
Here are some useful tips I could find this week, on this topic. If you have any other suggestions (you can also check this and this), let me know in the comments section. Remember, we’re in this together!
1. 15 Common Food Storage Mistakes To Avoid
 “Coming to terms with a realistic food storage strategy can be tough. Everyone seems to have an opinion whether it is to focus primarily on store-bought canned goods, commercially packaged freeze-dried products, or food that is preserved at home using a pressure canner. Each has advantages and disadvantage in terms of space, cost, portability, and convenience. Regardless of your stand on food storage, there is a common thread among all preppers. We want our food storage to remain viable and nutritious for the longest period possible.”
Read more on Backdoor Survival.
2. 10 Best Survival Foods at Your Grocery Store

“An emergency can strike without warning and unfortunately, most people find out too late that they are missing the essential supplies. Far too many times you’ve seen on the news how people line up in front of grocery stores hoping to get some last minute survival foods. If you end up doing the same, you should at least know what to buy for your grocery store.”
Read more on Prepper’s Will.
3. How to Make Ezekiel Bread

“Several years ago Julie posted about an Ezekiel Bread Recipe that one of our readers shared on Facebook and asked someone to try for her since she didn’t have a wheat grinder. I recently started a new eating plan and one of the recommended foods for my carbohydrates is Ezekiel Bread. I knew I needed to finally try this recipe for myself as it makes way more sense to rotate through my grains and legumes as opposed to buying this expensive bread from the store.”
Read more on Food Storage Made Easy.
4. Garlic-Dill Sauerkraut

“I have converted several self-professed haters of sauerkraut with this garlic-dill blend. It tastes just like dill pickles. And almost everyone likes dill pickles, including kids.
People who tell me they hate sauerkraut often also say they want to like it because of the many health benefits that lacto-fermented foods such as sauerkraut offer.”
Read more on Zero Waste Chef.
5. Lacto Fermented Garlic Scape Recipe

“It’s garlic scape season! Garlic scapes are the edible flower stalk of hard-neck garlic that shoot up in late May or early June. It is important to remove the scapes so the garlic plant can put its energy into developing beautifully big bulbs. (Check out my Ultimate Guide to Growing Garlic for more information on growing great garlic!) Luckily, garlic scapes are intensely flavored, delicious, and versatile, and taste wonderful in a variety of dishes, including this lacto fermented garlic scape recipe.”
Read more on Homestead Honey.
Prep Blog Review Bonus: Food Storage Calculator
Fill all the info required and click on the “Calculate My Food Storage Needs” button @ Ready Nutrition
For even more back to basic tips on the matter, click on the banner below:

This article has been written by Brenda E. Walsh for Survivopedia.
3 total views, 2 views today
Before we get started with this weeks segment, I’d like to thank and give a shout out to Mr. B Dunn, Victoria S, Tonya V, and Melody H for their generous contributions this week. It is appreciated. If you feel that this site has helped you in some way and would like to give a little something back then you can do that here.
I would also like to thank R.U.T. KYDEX for sending me two of their awesome holsters for my Glock 42 (my concealed carry choice), the holsters are well made and work perfectly.
Unfortunately, I didn’t get a lot done this week as far as the...
Back in January 2011, my lovely bride Jojo and I sold our home and moved into a new R.V. It’s a 42 ft. 5th Wheel Toy Hauler. On the way to our first RV Park, I put 30 gallons of gasoline into the onboard fuel tank used to run our generator. A week later I added double the recommended amount of Stabil. Note that the manufacturer of Stabil only guarantees safe fuel for two years by doing this.
Now I know I am going to catch some flak by telling everyone this but it’s the truth and I completely own up to it. For the first two years, I only test ran my generator 3 times. After that, I...
1.) Southern California rocked by 5.2 earthquake: An earthquake with a preliminary magnitude of 5.2 rocked Southern California, rousing residents out of bed at about 1:05 a.m. PT on Friday.
2.) 200 years ago, we endured a ‘year without a summer’: While they didn’t know the chill’s cause at the time, scientists and historians now know that the biggest volcanic eruption in human history, on the other side of the world.
3.) Russia vs NATO: Putin’s military might could overrun NATO forces in 60 hours, defense official warns: RUSSIA could steamroll NATO forces in just 60...

With only two ingredients and a little time you can stockpile a survival food that’s been used for centuries. Let’s take a lesson out of the history books and learn from various soldiers, sailors, and explorers throughout time.
It’s time to look at hardtack.
Hardtack is a simple survival food. It’s really inexpensive to create, and lasts for years. In fact, there’s still some on display from the Civil War that’s still good.
The most basic of recipes call for only two ingredients: all-purpose flour and water. Other recipes call for additional ingredients, but the basic recipe has stood the test of time. We’ll start with that one.
Hardtack provided nutrition for hard times throughout history. It’s a good source of carbohydrates. If you keep it and protein-rich pemmican in your bug out bag, you’ll have sustenance to keep you alive for a while.
It’s also a good addition to your supply of emergency food. You just have to ensure you keep it away from pests and moisture. If the bugs get it, you’ll find weevils living in your stored food. If the hardtack gets wet, it’s prone to mold.
Making Hardtack
 Hardtack is simple to prepare. Before you begin, turn your oven on to 350 degrees.
It won’t take long to mix your hardtack up and you want your oven ready when you are.
Now, get yourself a big bowl. Measure out two cups of all-purpose flour and dump in.
Next, slowly add a half-cup of water and stir.
Keep adding water, a tablespoon or two at a time.
Your goal is to achieve a thick dough that’s just slightly sticky. A thick playdough type consistency.
While many recipes tell you exactly how much water to add, it really varies quite a bit. Your humidity, the dryness of your flour, and the type of flour you’re using all play an important role.
A rough estimate is ½ the amount of flour. So for two cups of flour, you’d need about one cup of water.
If you accidentally add too much water and your dough is pasty, just add some more flour. Once it’s the right consistency, mix it for a couple of minutes. This will ensure your moisture is evenly distributed throughout the whole batch.
Now it’s time to roll out your dough. A rolling pin works best, but in a pinch you can just pat it out with your hands. You’ll want to roll the dough until it’s somewhere between ½ an inch and a ¼ of an inch thick. Any thicker, and it’ll be even harder to eat when it’s dried.
Once it’s thin enough, you can cut the dough. A pizza cutter works really well, but so does a sharp knife. If you want your hardtack to look uniform, you can pull out a ruler and cut it into 3X3 pieces. Or use a biscuit cutter and have round pieces. Otherwise, just cut it into rectangles that are roughly the same size.
Grab a chopstick or a clean nail, and dock each piece. Docking means you poke holes in it, but don’t go all the way through. You’ll want to poke about sixteen holes in each piece, with four rows of four. It’ll resemble a modern day saltine cracker.
Then flip over each piece and dock the other side. Docking your hardtack will keep it from puffing up in the oven. It’ll also help ensure the moisture gets out by allowing the steam to escape.
Place your docked hardtack pieces on a cookie sheet. You’ll want to bake them for 30 minutes. When the time is up, remove and flip over each piece.
Bake them for another 30 minutes before removing them from the oven. They should be fairly hard at this point.
You’ll want to set your hardtack pieces on a rack to continue drying. Let them sit out at room temperature for a couple of days. They’ll be hard as bricks when they’re fully dry.
Storing Hardtack
Proper storage is essential for optimal shelf-life. You can pack the hard tack into glass Mason jars, or metal tins. These will keep the moisture out better than regular Ziploc style bags.
You can also store them in vacuum-sealed bags. No matter how you keep them, you want to prevent moisture and bugs from getting in.
Video first seen on SNO Multimedia.
Eating Hardtack
Now that you know how to make and store hardtack, let’s talk about storage. While hardtack will help your belly feel full in an emergency situation, it can be difficult to eat. That’s because it’s so hard.
Back in the day, this survival food was commonly called “tooth-breakers.” Make sure you don’t bite into it directly with your front teeth. They can break.
Of course if you’re a parent to a baby, you’ll find a benefit from the hardness. A chunk of hardtack makes a good teething biscuit. Just be sure to provide supervision with it to ensure a small chunk doesn’t break off and become a choking hazard.
If you don’t desire to simply gnaw on a chunk of hardtack all day, there are other ways to eat it. Here are a few common methods:
Soaking
As hardtack sits in moisture, it absorbs it and becomes softer. You can soak your piece in just about anything. Coffee, soup, and water have all been used historically.
Another benefit of soaking the hardtack is bug removal. During early wars, proper storage wasn’t always possible. Weevils became prevalent in this grain-based ration.
Once placed in liquid, the bugs began to float to the top. Diners could easily scoop them off the top and discard them before eating.
Frying
After cooking up salt pork, soaked hardtack can be fried in the grease. This adds flavor and fat, helping to make it more palatable.
As a Thickener
You can crumble your hardtack with a pestle and mortar. If you don’t have one accessible, you can take a lesson from soldiers and hit it with the barrel of your rifle until it breaks. Once it’s powdery, you can stir it into a stew. It’ll act as a thickener and add some caloric bulk to your recipe.
As a Holder for Spreads
Many people have used hardtack as a bread of sorts. When you add a moisture-rich spread like soft cheese, honey, or peanut butter and jelly, the moisture will slowly soften your hardtack.
Using Hardtack Creatively
You don’t have to be limited to the above recipes when eating hardtack. With a little creativity, you can turn these hard squares of dried flour into many dishes. Here are two more ideas for you to try.
Slather it with pizza sauce and toppings and make yourself a mini-pizza. Just be sure to cut it before consuming so you don’t break a tooth.
Soak your hardtack overnight in buttermilk. In the morning, fry it up in butter or bacon grease. Serve with maple syrup and call it a pancake.
Recipe Variations
Since basic hardtack tastes a lot like flour, many variations of the original recipe have crept up. While the addition of salt, seasoning, oil, or protein powder may improve the taste, they do have an impact on long-term storage ability.
If you decide to make a batch of one of these recipes, inspect your hardtack closely before consuming. Make sure it’s still hard and hasn’t started to go soft. Be on the lookout for any mold growth. You might even decide to make a new batch every year or so, just to ensure your supply is good when you need it.
Adding Salt
To your original recipe, just add 2 teaspoons of salt. Then, continue as directed above. It’ll help improve the flavor.
Adding Seasoning
Hardtack is pretty bland. You can add some other seasonings like garlic or onion powder to the original recipe to enhance the flavor. Feel free to add your favorite seasoning blends as well.
You can even experiment a bit within a single batch. Before you roll it out, break your dough into smaller chunks. Add different seasonings to each, and then continue with the recipe. This will allow you to take notes on what you like or don’t like before committing to making an entire batch.
Adding Fats
Several recipes online call for the addition of about a tablespoon of shortening, butter, or oil. While the added fat would help improve the texture, it is prone to becoming rancid. This addition is better served for short-term storage.
Substituting the Flour
All-purpose flour is not the most nutritious flour out there. But, it stores well since most of the oil from the bran has been removed. By simply experimenting with the flour you use, you can change up your hardtack.
Give whole-wheat flour a try to increase the nutrients. Try substituting a cup of flour for a cup of cornmeal. Or a cup of protein powder to add protein to your emergency ration.
Hardtack is an excellent DIY addition to your survival food stores. When properly stored, it can be added to this list of foods that’ll last longer than you do!
Have you made hardtack? With the endless variations, I know I didn’t cover them all. What are your favorite additions or ways to use your hardtack?
Leave a comment below and share your tips with all the readers. And click on the banner below to get more tips on how our ancestors survived!

This article has been written by Lisa Tanner for Survivopedia.
2 total views, 2 views today
Written by R. Ann Parris on The Prepper Journal.
We hear about how shotguns are the do-all when it comes to hunting and self-defense. What we don’t always hear is how to best choose one or that to make them a do-all, we need to know what to feed them.
The post Shotguns – the Firearm Do-Alls appeared first on The Prepper Journal.

Each year, too many people drown in the United States just because they don’t understand the dangers of water. People have drowned in as little as 1 inch of water when they were knocked unconscious and landed face down in a mud puddle.
Drowning chokes and kills over 372,000 people each year, being the world’s 3rd biggest cause of unintended death. That’s 7% of all injury-related deaths due to something most take for granted, even if they don’t live near water. It takes 3,536 innocent US lives each year, with one in 5 being children.
Even if you’re lucky enough to survive, brain damage could leave you in a vegetative state.
However, most drownings occur in freshwater lakes, rivers, streams, backyard swimming pools, or at the beach. Learning all you can about how to recognize and avoid drowning is a first step to building a water survival plan that should include all of the elements that you will find below.
How Do you Know He / She is Drowning?
When a person begins to drown, a very small amount of water enters the lungs. This tiny amount triggers a spasm in the trachea muscles, which then causes the throat to close. Once the airway seals up, there is no way for air or water to get through. This is why people who are drowning usually are unable to scream for help.
Here are the signs and symptoms of drowning and near drowning:
If you are going to rescue somebody in a body of water, you must be sure that you do not become a victim yourself by being dragged under by a panicking individual in the water. If the person in distress is relatively close to you, your first option is to try to reach for him with your arm, a pole, or a long stick.
If this individual is farther out than you can reach, try throwing a rope with a safety ring attached to it. If this does not work, then you may want to go out to them with a row boat or other watercraft. As a last resort you will have to go into the water after them.
If you must swim after the individual, use a lifeline that is tied in a loop around your chest. In the event that the individual starts to panic and tries to use you as a flotation device, the rope-handling crew on the edge of the water can pull you both back to safety.
If you are swimming to the rescue and you are not using a lifeline or rescue buoy, approach the victim so that he cannot reach out and grab you. If he tries it in his panicked mental state, you will have to push away from him, block him, or go under water fast. These actions will cause the victim to let go so that you can try to come in for your rescue a second time.

How to Survive Drowning
Using the Clothes to Avoid Drowning
If you fall into the water and your shirt is tucked into your pants, you can use your shirt to make an air bubble to float on.
It is also possible to make an air floating device by using your jeans or other long-legged pants. This air float will last longer and can be used to keep up to four people floating for a good length of time.
Using the Drown-Proofing Method to Stay Alive
Drown-proofing is a water survival technique that was invented by Fred Lanoue, a swimming coach at Georgia Institute of Technology from 1936 to 1964. It was his belief that everyone should be able to survive in the water, and he developed a simple technique that was easy to learn and did not depend on physical strength.
According to Lenone, everyone has a small amount of buoyancy, but it is not enough to keep all of the head above water. An individual can float in an upright position, with their face submerged and only lifting the mouth and nose above the water when it is necessary to breathe. Using this method, it is possible to float indefinitely while only using a small amount of energy.
The first thing you’ll likely wonder is how effective drown-proofing is. Anyone can learn to survive indefinitely in the water as soon as this technique is mastered. The average person can only swim a few laps of the pool, but with drown-proofing, the swimmer can take a break and rest until they are ready to continue swimming. Drown-proofing techniques are also useful to handicapped swimmers that might not be able to swim for a long period of time.
The following are the basic steps that you need to follow for drown-proofing. If you take a class on this skill, you can learn in just a few days.
Using Only Your Arms
Using Your Arms and Legs
Get the Breathing Right: It’s Very Important
Knowing what to do around water is the key to your survival. Always be attentive and don’t panic in dangerous situations.
Planning is the key to your survival. Without a water survival plan and regular practice, the end result could be the death of you or your friends or family.

This article has been written by Fred Tyrell for Survivopedia.
3 total views, 3 views today
Today we present another article in our non-fiction writing contest – by Robert L. Burns Jr.
It has been one of my goals in the last six years to get family more involved with prepping for disaster, or as commonly referred to, “W.S.H.F.” Between sounding crazy to those stuck in “everyday living” mode and the time constraints of those same folks, it’s been a challenge of mine to get family and friends more involved while dealing with my own budgetary issues at the moment.
One of my former bosses (one of the nicer ones) once looked at me and said “I don’t know why, but...
1.) The US Is Pushing Toward WWlll: The US military/industrial complex has long since been completely out of control. Now, as the biosphere collapse accelerates exponentially, the power structure is more desperate than ever before.
2.) The Federal Reserve’s Strange Behavior Makes Perfect Sense: The Fed’s job is not to protect the U.S. economy. The Fed’s job is to DESTROY the U.S. economy to make way for a truly global system.
3.) JUST HOW SERIOUS IS THE RUSSIAN NUCLEAR THREAT?: Russia possesses enormous advantages. And Russia has the motivations to use these weapons. The issues are...

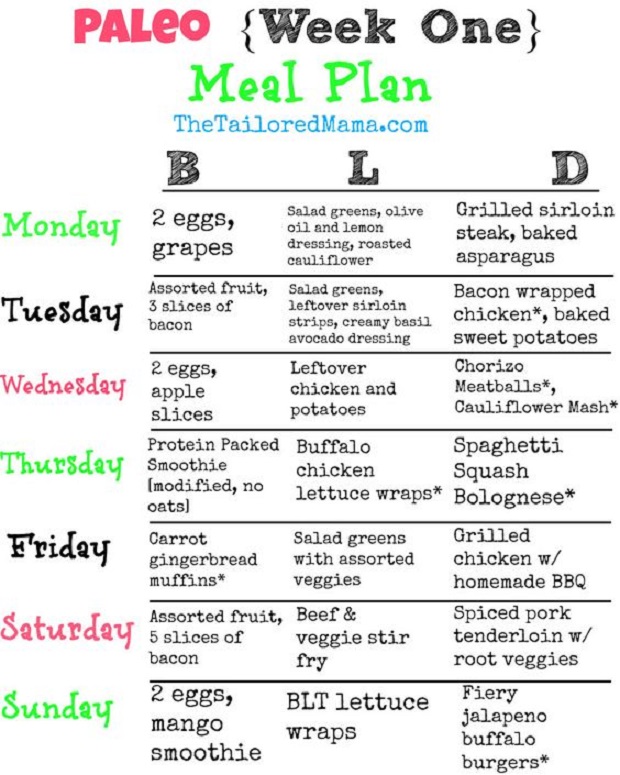
Our ancestors were hunters and gatherers long before they began farming. They also rarely made use of cooked or processed foods. Many people today feel it is best to go back to the kind of diet our ancestors consumed, and choose to follow the Paleo diet.
The Paleo diet is meant to mimic the kinds of foods that our ancestors were able to find and eat with relative ease. This means consuming foods that are readily available in nature, and ones that require a minimal amount of preparation.
Just about any type of wild game or fish might be found in a Paleo diet, but you would eat very little milk or cheese. Berries, roots, and fruits tend to be favored over beans and grains that require special preparation.
Here are some common foods you might find in a Paleo diet. This includes foods that may not be readily available on supermarket shelves, but can be found easily enough in nature, or raised in aquaponic systems.
Recommended Meats
Meat is an essential part of the Paleo diet. Keeping a good supply of meat may be very difficult to some people, because you need to know key breeding seasons and the food requirements of targeted animals.
As you consider this list of healthy paleo meat sources, select a few of interest and see if you can raise them. Finding the best way to prepare alternative meats will also help you and your family in the quest of living a healthy life.
The conventional animal meats are chicken, pork, fish, beef, turkey, lamb, lobster, shrimp, goat, goose, quail, oysters, clams, scallops, crab, and bison. Other healthy Paleo meat sources are rabbits, rodents, young hedgehogs, termites, earthworms, grasshoppers, grubs, beetles, ants, snails, caterpillars (non-butterfly), deer, bear, buffalo, freshwater fish, clams, oysters, kangaroo, turtle, snake, and birds.
Recommended Dairy
Since dairy products require a good bit of preparation, they should be avoided as much as possible. Raw goat or cow milk may be permitted, but nut and vegetable blends are preferred. For example, you can use almond or rice milk, but should not use soy milk because it is made from legumes.
Eggs are allowed in the Paleo diet even though they are listed in the dairy food group. If chicken or goose eggs are not available, you can eat eggs from other bird species. Make sure you know when the breeding season starts for different bird species so that you do not destroy eggs with developing embryos.
Recommended Fruits, Herbs, and Vegetables
In the modern world, it becomes all too easy to believe that the vast majority of plants will flourish regardless of climate and seasonal constraints.
When it comes to adapting the Paleo diet to your needs, find out which plants are available in your area. At the very least, even if it takes time to raise crops, you can still make use of local plants to meet your nutritional needs.

Plant Based Foods to Avoid
As you look at the list of plants most suitable for a Paleo diet, you may be wondering why rice, wheat, beans, peas, potatoes, and peanuts do not appear on the list. While these foods were all derived from wild sources, it is believed that our ancient ancestors did not make use of them until they began growing things in domestic settings. They are considered less healthy than other foods that were easily obtained in nature.
The Recipes
Rather than follow precise recipes, you are best served by memorizing proportions of some basic staples, and then work with them based on the foods available at hand.
1. Baked Meat with Stuffed Peppers or Tomatoes
Remove tops and seeds from peppers or tomatoes so that only outer shell of flesh remains. Cut into bottom until shell sits straight in baking pan. Partially brown beef, pork, or lamb in animal lard or vegetable oil. Chop broccoli or cauliflower until it is grain sized. Stir in with meat and finish to brown.
Combine meat, vegetables, and tomato sauce in mixing bowl. Keep some tomato sauce aside for basting. Fill peppers or tomatoes with mix. Top off with basil, parsley, or other seasoning as desired. Bake at 350 for approximately 1 hour, or until pepper or tomato shells are soft. They will need to be basted 2 -3 times to prevent burning.
2. Basic Omelettes
Sear chicken or pork in hot oil until surface is light brown. This seals in juices and also gives a better flavor to the omelette. Dice onions and peppers. Fry lightly in hot oil and set aside. Scramble eggs or prepare egg substitute and pour into hot frying pan. Fold meat, onions, peppers, and seasoning into the omelette. Add tomatoes last to keep them as crispy and fresh as possible.
There is also a baked version for this recipe: after frying meat, mix all ingredients together and pour into an 8 ounce baking dish. Cook at 350 degrees until center is cooked through, but before edges burn.
3. Vegetable Pancakes
Prepare ground seeds as noted in flour substitute table above. Chunk tomato, pepper, or onion. While you can also boil and mash vegetables for addition in pancakes, they taste better when left in chunks.
Prepare egg substitute or scramble eggs. Add ground seeds to water and stir until smooth. Fold in vegetables, salt, eggs and seasonings. Add a tablespoon of oil to griddle or pan and allow to heat up. Pour a few drops of batter onto hot griddle, and remove when drops are evenly browned.
Proceed to pour enough batter into pan to make individual 4 inch sized pancakes. Flip pancakes when bottom side is golden brown and remove from skillet when both sides are cooked and inside has sponge like consistency.
4. Protein Cookies
Combine mashed pumpkin, ground dandelion leaves, and ground seeds. Mix in salt and shredded chicken. If dough is too moist, add more ground pumpkin seeds. Flatten out dough on cutting board and cut into 1 x 2 inch squares. Place dough on non-stick cookie pan. Bake for 20 – 30 minutes at 350 degrees until golden brown. Remove cookies from sheet and place on cooling rack as soon as possible.
5. Conventional Vegetable Chips
Slice eggplant, tomatoes, or peppers into 1/8 inch slices. For onions, slice into 1/8 thick slices and then separate rings. For cabbage leaves, remove from head one at a time, and try to keep them as whole as possible.
Arrange vegetable slices on a cookie sheet so that they do not overlap and brush with water. Sprinkle with powdered seasoning, but not more than will be absorbed by the water. Bake at 325 for 25 – 30 minutes. Remove from oven when chips are dry and start turning up at edges. Let cool and store in airtight container.
If done correctly, these vegetable chips will have a bit more texture from the cauliflower and broccoli bits.
The Paleo diet’s high energy foods and simplicity also make it ideal for living a healthy life. No matter how difficult times are, the Paleo diet will help you remain strong and healthy.
Remember that you need to stay healthy to be among the fittest who survive, and click on the banner below to find out more about the way our ancestors lived!

This article has been written by Carmela Tyrell for Survivopedia.
1 total views, 1 views today
Written by Guest Contributor on The Prepper Journal.
Recently, my quest to match my budget to the purchase a good tactical knife led to consider these nine points before purchasing a good tactical knife.
The post What to Consider Before Purchasing a Tactical Knife appeared first on The Prepper Journal.

Every year, some of us remember the importance of June the 6th. That’s the day, 72 years ago, that 73,000 of America’s young men stormed Normandy, France, making up almost half of the 156,000 troops which landed on French soil, to take back Europe from NAZI Germany.
As a country, we lost 2,500 young men that day, casualties of the largest amphibious invasion in history. But those 2,500 soldiers weren’t simply forgotten; they represented each and every American alive on that day.
Although they were fighting to free Europe of the clutches of the tyrannical NAZI regime, they were also fighting for something much more precious to us as Americans… they were fighting for freedom.
Historians have dubbed that generation with the moniker “The Greatest Generation.” When you look at what they accomplished and how the country pulled together to accomplish it, that’s not too surprising.
There has been no other time in our history, when the United States pulled together for a single purpose, like it did in World War II. You really can’t even say that about the Revolutionary War, as there were many who were opposed to it.
But while that war brought our country to new heights of patriotism and accomplishment, it also started us on the road to decline and moral decay. Sadly, one of the things that always accompanies war is a lowering of moral standards. That was no different in the time of the Greatest Generation.
The current moral decline of the United States of America actually started in that time. While it may seem as if the Americans of that day were bigger than life, they felt an urgency caused by the realization that they might die any day. This urgency was responded to by drinking, smoking and extra-marital sex. Many lived for the day, because they weren’t sure if the next day, they would die.
Hollywood had their part in that as well; as always, showing the glamorous side of war. Part of that was including a love interest in all those war movies. Being Hollywood, love became sex; and while they didn’t show it as clearly back then, as they do today; everyone knew how to read the signs.
But even amongst the debauchery of the day, there was much nobility and bravery. Countless people dug down deep within themselves and found the strength to do what they had to do; both overseas fighting the war and here at home keeping the home fires burning. The courage displayed by that generation in facing adversary was something we could all learn from.
Video first seen on Net Stoopid.
Sadly, there seems to be little of that courage left coursing through America’s blood. Our young people don’t have the courage to face someone who is speaking something they don’t like, let alone the bullets of an enemy. Instead, they cry for “safe spaces” where they can be assured that nobody will say anything that might cause them any emotional turmoil. Apparently, forcing someone to think about their beliefs and justify them is too much of an emotional strain for today’s youth.
As a country, we have taken some huge steps backwards since that day, all in the name of “progress.”
Whereas they fought for freedom in that time, today people fight for something free. Where they fought for principle, today people fight for entitlements.
Rather than blacks and whites coming together to defeat a common enemy, today’s blacks are being told that whites are their common enemy and that they should therefore kill the whites.
World War II brought this country together in a way that has never happened before or since. The common goal of defeating the Axis powers gave us national purpose.
Later, national purpose was invested in things like putting a man on the moon and standing strong against the aggression of the Soviet Union. Yet today, we have lost our national purpose. No longer are we pulling together, but rather we are being pulled apart.
I remember asking myself the question, shortly before 9-11, whether the United States could ever pull together, like we did in World War II, to accomplish such a major goal once again. Then, on that fateful day, the Twin Towers came down and the nation pulled together in support of New York City and the War Against Terror.
But sadly, that unity has not lasted; it has fallen apart once again.
In the last seven years, we’ve seen more division in this country than has existed anytime since the Civil War. No longer is the national attention focused on defeating the radical Muslim terrorist enemy, but instead our political leadership is inviting them in to take up residence. We have blacks against whites, poor against rich, women against men and the LGBT community against those who are straight.
Is it fair to blame all this on Barack Obama? Yes, I would have to say it is. While he has not been the only one causing division, he has definitely been the most influential. He has been the most divisive president in the history of the United States, bringing to the forefront each and every phony war he could, to turn one group of Americans against another and destroy what unity we had.
He has also been instrumental in turning the tables on the War on Terror. Where we were actively pursuing radical Muslim terrorism under President Bush, Obama has all but outlawed the use of that term. He refuses to acknowledge that the possibility of Muslim terrorism exists and instead talks about right-wing terrorism, something that is totally fabricated in his mind.
Apparently in Obama’s world view, patriots who are willing to defend their country are more dangerous than radicals who are trying to destroy countries.
Liberalism has destroyed the moral fiber of this country, and they are now on the road to destroying the country itself. The list of things that liberals have demanded of our society, all in the name of some twisted idea of “fairness” could ultimately be out undoing. It is certain that their demands have made life more dangerous for many, as they push to further their agenda.
There is something inherently wrong about causing the majority of society to suffer for a minority. That is especially true when the minority is extremely small and mentally imbalanced.
Yet apparently the only way that the political left can find what they consider to be fair, is to make people suffer. They must make the majority suffer, so that the minority can have what they want; even if what they want is destructive to society as a whole.
Where is Our Country Going?
Could we once again pull together and become the great nation that we once were? Is it possible for another “Greatest Generation” to rise up and set this nation back on track? Can we throw off oppression as we once did and set our course once again by the Constitution?
We are living in a time which demands greatness. It demands people who will stand against injustice committed in the name of fairness. Who will be willing to be ridiculed by the PC police, in order to make a difference. People who care more about integrity, than they care about popularity. Those who have the moral fiber to shout from the rooftops that “This is wrong” and get others to see things as they do.
Our country’s history is filled with such people. The Revolutionary war was fought because of such people. We stormed the Normandy Beaches because of people of like character. Together, we declared “Better dead than red” against the rise of the Soviet Union. We, or rather, those who came before us had that moral fiber; it’s time that we found ours.
Conservatives are still the majority in this country, outnumbering liberals by 3 to 2. But you would never know it by looking at what’s going on in the media or the public square. It is the voice of the liberals that is being heard, not the voice of the “silent majority.” It is time for that to change.
Unless we rise up and make our voice be heard in the halls of power and the public places across this land, we may soon find that we no longer have a voice. As in Orwell’s 1984, the voice of those who stand against a tyrannical system may very well be silenced.
I don’t know about you, but I won’t go down quietly. The Founding Fathers swore their lives, their fortunes and their sacred honor to this country; can we do any less? Are we willing to lay down our lives, or only to lay down? Are we willing to give up what fortunes we have, or only a mere pittance? Do we even care about our honor anymore?
If this country is ever going to be great again, if it is ever going to have another Greatest Generation, it will be because people say “enough is enough” and take a stand.
It won’t start in Washington, but in the grass roots. But the fire in those grass roots will spread and it will eventually get to Washington, if we but fan the flame.

This article has been written by Bill White for Survivopedia.
References:
https://en.wikipedia.org/wiki/Normandy_landings
https://www.army.mil/d-day/
3 total views, 3 views today
Written by Guest Contributor on The Prepper Journal.
We know what is coming. We've let it happen as a nation and now we will suffer. As a nation, we've cared too much about our wealth and our ease and not enough about whether our Constitution was staying intact.
The post Did 100 Year Old Prophesy Point to Future Collapse? appeared first on The Prepper Journal.

Wouldn’t it be great to just reach for a jar and know that all you had to do was add water, juice or broth and everything would be ready to cook? Dry canning is also a good way to extend the life of some dehydrated foods and to keep your dried goods fresh and bug-free.
I have some great tips and instructions to help you get started with your own dry canning projects.
What is Dry Canning?
Dry canning, also referred to as dry packing, has essentially the same purpose as traditional water bath canning: you want to extend the life of the food by storing it in sealed jars so that bacteria that can cause illness or spoilage can’t get in. Dry-canned foods can be good for 30 years or more as long as the seal remains intact.
The difference, as the name suggests, is that you’re not going to be using any type moisture; not in the food or in the process. In fact, the idea of dry canning is to keep moisture OUT. There are a couple of different methods that you can use to dry can your dried goods.
Note to Keep You from Drying Painfully
Yeah, the heading got your attention, didn’t it? Because we’re dealing with canning dried goods, we have to talk about botulism. I’ve talked about it in other articles, including my one on canning meat, but it bears repeating. Botulism spores thrive in high-moisture, low-salt, low-acid environments.
Any food with a pH lower than 4.6 is considered low-acid. This includes most vegetables, some fruits such as pears and bananas, and all meats. Drastically reducing the risk of botulism is one of the main reasons that most water traditional canning recipes call for adding lemon juice, vinegar, or citric acid to the food when you can it.
Dehydrating is a good way to preserve low-acid foods too. The key to doing it safely is to dry it until it has less than 10 percent moisture; a good rule of thumb is that the food snaps in half when it’s done. Grains will be hard and unable to bite.

Dry Canning Using Oxygen Absorbers
This is the preferred method for a lot of preppers because it’s easy and it’s thorough. Basically, you have two options.
First, you can use standard mason jars. Sterilize your jars and seals, add the dried food, then toss in an oxygen absorber before you put the seals and lids on. Make sure that your jars and seals are dried well after you sterilize them. You don’t need the seal to be hot when you put it on the jar; the oxygen absorber will seal it cold.
You can also use Mylar bags and food-grade buckets. Put your food and oxygen absorbers into the bags, seal them, then store them in the bucket.
The oxygen absorber isn’t edible but it’s not toxic, either. The active ingredient is iron oxide, so it doesn’t release any type of harmful gas and doesn’t affect the taste or smell of the food. It’s a great way to preserve any type of dried food from flour to cold cereal. You can use these to preserve your dried meats, too.
Just remember that if you’re dry-canning dehydrated meat, your shelf life still isn’t going to be as long as other foods because usually meat still contains enough moisture or fat to spoil or go rancid eventually. Trimming as much fat and tendon off the meat and dehydrating it after soaking it for 24 hours in a high-salt, high-acidic marinade helps extend the shelf life of your meat, too.
Some sites will tell you that it’s OK to use hand warmers to dry-can your food, but it’s not. That’s fine to use with your guns, ammo, and other non-food items that need to stay dry, but it’s not food-safe.
You can also store foods in PETE plastic bottles using oxygen absorbers. They’re lighter and less bulky than mason jars. Make sure that the bottles have screw on lids with plastic or rubber seals in them. To test to see if your bottle will seal, screw the lid on and submerse it in water. Squeeze. If air rushes out of the bottle and you get bubbles, the bottle won’t work. Just make sure that the bottles and lids are sterile before you pack them.
Dry Canning Using Vacuum Sealers
Did you know that you can use your vacuum sealer to seal dried foods in mason jars? Well, now you do. You can get a jar sealer for your vacuum sealer and suck all of the air right out. The jar will seal and you’ll be good to go. This isn’t great for powdery substances but is OK for foods such as beans, pasta, etc. The powdery stuff gunks up your machine.
One word of warning here: this is a good method if you’re just shooting for storage of foods such as flour that you don’t really have to worry about spoiling, but it doesn’t necessarily get enough air out to prevent the growth of mold. You need less than .02% oxygen for that and there’s not really any way to know how much oxygen is left in the jar with vacuum sealers.
Many people assume that as long as the jar is sealed, the food is safe, and usually that’s correct but there’s always that one-in-a-thousand chance that it’s not. Oxygen absorbers, when used as directed, take oxygens levels down to about .01 percent.
Dry Canning in the Oven
This is one of those topics where people stand on either side of the creek and throw rocks at each other. There are those who swear that they’ve safely preserved their dried goods using this method for years without a problem. On the other side, there are those who say it’s dangerous and should never be done.
As with everything, both sides are right. You can dry can in the oven for years with no problems, but there’s always the chance that the jars are going to explode in the heat.
Now I will lean slightly in the direction of the naysayers in one area: foods that have more than 10% moisture or have any significant fat content (including nuts) shouldn’t be dry-canned because the chance of bacterial growth or rancidity. You also can’t dry-can brown sugar and you absolutely CAN NOT replace water bath or pressure canning wet foods with oven canning.
Personally, I’ve dry-canned flour and some blended recipes in the oven and haven’t had a problem. Of course, I’m super cautious and use common sense. Besides the whole fat and moisture thing, I also never let my jars heat or cool too quickly, but then again, I do the same thing when I’m canning wet foods.
The theory that the jars will explode because of the heat bemuses me a bit because I put them in a pressure canner and expose them to an environment that, to me, is much more severe than a 200-degree oven. However, you’re on your own here. Do it at your own risk, as you do everything.
If you decide to dry can using your oven, here’s how to do it:
Test your jars to make sure that they’ve sealed. Just as with water canning, you may hear the ping or you may not. Touch the top to see if the seal is pulled in and can’t be pushed in with your finger. Store jars that don’t seal in the pantry and use them first.
If you have a problem with the seal, you likely didn’t get the rims clean enough.
Storing our food long-term is critical to our survival if SHTF and we lose our modern sources of food. Dry canning food is also a good way to save money because food is almost always cheaper when you buy it in bulk. Oh, and don’t forget bugs. Maybe it’s just me, but weevil pancakes are gross even though they are a source of protein.
If you’ve dry canned using any of the methods above or have any other ideas or questions about dry canning, please share it in the comments section below! And click on the banner to get more about ancient ways to preserve food and water!
This article has been written by Theresa Crouse for Survivopedia.
References:
http://www.extension.umn.edu/food/food-safety/sanitation/low-acid-vegetables-botulism/
3 total views, 3 views today


