In these times, riots, earthquakes, hurricanes, and many other problems make it likely you will be trapped in a building or need to get over a mountain.
While many people don’t think much about rappelling, it is a vital skill to have.
Basic rope working techniques associated with rappelling can help you get safely out of a multistory building to the ground, down the side of a mountain, or down from some other height when you need to save yourself.
Learning Rappelling
Essentially, when you rappel, you will be making your way down to the ground or a lower level using ropes and other accessories that enable you to control your downward motion and speed.
When compared to climbing up a mountain or to some other height, you will find that far more accidents happen on the way down.
Rappelling skills take time to learn and practice to maintain. Never rappel on your own until you master the process under the watchful eyes of an expert.
Better yet, sign up for classes in a certified climbing school.
Where to Practice
Like any other activity, it is best to start off in a place where you will be as safe as possible while you develop good habits and improve your skills.
When it comes to rappelling, the school you go to should have access to small cliffs or other safe locations.
Never try to learn the basics on a large cliff or off a building. This is where most beginners get into trouble and can get seriously injured or killed.
Don’t rush to meet your next goals just for the sake of completing them. Unfortunately, just because you think you are ready, that doesn’t mean you haven’t overlooked something critical.
Take your time and see what kind of mistakes emerge while you can fix them before they cost your life in a more dangerous setting.
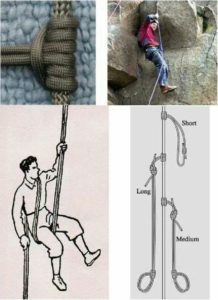
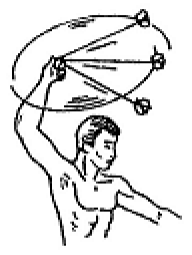
Basic Hand Positions
Regardless of what you are doing or the hand positions you are using, NEVER let go of the rappelling ropes. When rappelling you must have both hands on the rappelling ropes.
- If you are right handed, your right hand will be the braking hand. Keep your right hand below the rappelling device. Your left hand will be your guide hand, and must be kept above the rappelling device.
- If you are left handed, then your left hand will be the braking hand, and right hand will be your guide hand.
Guide Hand Position
When rappelling down easy faces or slabs that are less than vertical, place your guide hand above the rappelling device. Use a light grip on the rope and let it slide through the hand.
Insert your guide hand’s index finger between the two ropes to keep them separated during the rappelling. This simple process keeps the ropes untangled and makes it easier to pull the ropes down.
Brake Hand Position
Your lower hand controls your speed of the descent down the rope. When rappelling using a single brake hand, keep the brake hand down by your hip to allow you to maintain a constant friction on the rope through the rappelling device.
Warning! If you are using thin ropes and you let go with your braking hand, the thin ropes might to slip through the rappelling device and drop you to the ground below! This is just one of many reasons why you must always keep two hands on the ropes at all times while you are rappelling.
Two Braking Hands
Consider a situation where you are on a steep slope, or overhanging in a way that leaves you suspended in the air and not touching any surface with your feet. It is safer to use both hands as brake hands because it gives you more control than using a single brake hand.
On free rappels, always use an autoblock knot as a safety backup knot. This knot keeps you from zipping down the rope in an out of control fall.
Always put your lower brake hand on the autoblock knot so it slides easily and does not lock up unless you need to stop. Put your upper brake hand below the rappelling device and let the rope run through it.
Using Friction While Rappelling
How to Slow Down Using Friction
As you are rappelling downward, let the ropes slide through your brake hand. If you are going too fast apply more pressure to slow down.
You can also ratchet the ropes down in the rappelling device with your brake hand, which will increase the friction on the rope as it moves through the device.
Some rappellers wear a leather glove on their brake hand to help control their descent speed, as well as to protect their hands from cuts, friction burns, and debris from the ropes.
When to use extra friction on free rappelling
On very steep rappelling, you may need more friction than both your brake hands and the rappelling device can provide. For extra control and friction, wrap the ropes around your butt and hold onto them with a brake hand on the opposite side.
Another way to add more friction is to drop the rappelling ropes between your legs and pull them up against a thigh for more friction.
Basic Rappelling Steps
1. Choose the Rappelling Area Carefully
Before you prepare your ropes and gear, it is important to choose a safe area for the ropes to fall.
For example, if you are rappelling down a mountain, look carefully at the first ten feet or so for notches, grooves, sharp edges, and loose rocks. For safe rappelling try to avoid these features, as they can hang up the rope or damage it.
As you are rappelling downward, you will need to repeat the study process and look for other possible problems like tress, bushes or large rocks that could hang up the rope when you pull on it from below. Loose rocks and other debris can still fall and hit you or anyone with you when you pull on the ropes no matter how far along you may be.
Remember that rope safety is your first concern. If there is a chance of the rope getting stuck or having it rip out rocks or other hazards, try to relocate the rope to a safer spot.
2. Rappelling rope preparation
Take the two ropes and knot them together using a Double Overhead Knot or a Double figure 8 Fisherman’s knot, and then a stopper knot at the end of each rope tail.
Next stack the two ropes separately and throw them down separately so they don’t get tangled.
3. Safety check of the rappelling knot and rigging
 Before you or anyone else begins rappelling, do a safety check of the knot between the two ropes to make sure the knots are tied correctly, both ropes have autoblock knots, and stopper knots on them.
Make sure that one of the ropes go through the metal descending ring. Check the slings or chains that secure the ring to the anchor bolts.
If your equipment is not in good working order, do not use it. If the sling isn’t working right, you can add an additional sling or a piece of webbing as a safety backup.
4. Recheck the ropes
Look at which side of the descending ring that the knot is on. This is the side to pull. Always look at the color of the rope and decide which color to to pull before rappelling. This helps to keep the wrong rope from being pulled and jamming the knot in to the ring.
Make sure the ropes haven’t crossed each other and are not twisted on the chains or slings. Be sure both strands of rope run cleanly down the wall from the rappel anchor without binding or twisting against each other.
It is possible for just one twist against the anchor or ring to hang up the rope and make it impossible to pull.
Sometimes as you are rappelling the ropes can twist against each other. Always be prepared for this problem and be able to solve it without putting yourself in danger.
5. To keep the rope strands separated use a guide finger
As the last individual goes down the ropes have them use a guide finger to separate the ropes so they drop without kinks or tangles to the next set of rappel anchors.
The best way to do this is to put a finger of your gloved guide hand above the rappelling device between the two ropes and descend.
If the ropes get twisted up at the anchor it will be nearly impossible to pull the ropes down. If this happens. Someone will have to reascend the stuck rope to untwist them.
6. Always test the rope pull from below
When the first climber rappels down to the next rappel station, have them test the pull of the ropes.
If the pull is easy, then the odds are you will be fine. If the rope is hard to pull, then the top climber will need to make adjustments from the top before rappelling down.
If you are rappelling alone, then you may need to go back up and adjust the ropes before moving on to the next point.
Some solutions to a rope that is hard to pull include:
- Move the bulky knot that connects the two rappelling ropes downward.
- If there is a ledge at the top, move the rope knot down below the ledge. Retest the rope pull from below. Do not forget to climb down over the ledge before adding your weight to the ropes.
7. Pulling the rappelling ropes
After you and your partner have both completed rappelling down to the next rappelling station or to ground level, it is time to pull the ropes. If everything has checked out, the ropes should pull easily.
Here are four safety tips for pulling ropes:
- When pulling ropes on multiple rappels, feed the free end of the rope through the new descending ring as you pull it. Failure to do this could result in losing the rope if you just let the rope fall to you before threading the ring.
- The flying free end of rope can lash out and cause injury after being pulled through a rappelling anchor. Wear gloves and a helmet to protect your face and hands.
- While pulling the ropes, always be on the look out for falling rocks or other debris.
- It is very important to yell “Rope”! When pulling down a rope so that everyone you are with knows. This alerts everyone that ropes and possibly rocks will be falling.
Why Can Rappelling be so Dangerous?
Rappelling, in my opinion is the most dangerous technique used by climbers in the sport of mountain climbing. Here the safety of the climber depends on both their rappelling equipment and their anchors.
Once you lean back on the rappelling rope and you are committed for the descent, all that keeps you safe is your climbing skills and your equipment.
When rappelling your life depends on an anchor system. This system has to be well secured for your safety and well being. If you fall you could end up as a statistic for getting killed or being critically injured.
Most rappelling accidents are the end result of the rappeler’s errors in judgment and could have been avoided.
When rappelling always use the buddy system to check out each others rappelling gear and rappelling set up.
Each individual needs to visually check the other person’s climbing hardware, the anchors, bolts and slings on the anchors, and finally verify that the knot connecting the two ropes are tied correctly.
What can go wrong?
Rappelling is always dangerous and sometimes a bit scary when you are trusting your life to anchors and a rope. When rappelling there are a few things that can go terribly wrong.
Here is a list of a few of them:
- Failure to tie a stopper knot in the ends of the ropes and you rappel off the end of the ropes.
- The rappel anchors fail and you fall down to the ground.
- The rope connector knot comes untied. This can also cause you to fall to the ground.
- Didn’t use an autoblock knot as a back up, which can cause you to run off the ends of the rappelling ropes.
- Letting go of the rope with your brake hand can cause an uncontrollable slide down the rappelling ropes.
- The pull rope gets stuck when you try to pull it. Don’t forget you can try pulling on the other rope to free it. If not, someone must ascend back up the ropes to untangle them.
- The rope gets cut on a sharp edge. Access, repair, or replace the cut rope before further use of it.
- You might lose control if the overhang is too large. If possible relocate the rappelling ropes to a better location where the overhanging is not as bad.
- The rappelling device was rigged wrong. The rappelling ropes will not operate correctly in the rappel device, which will prevent you from moving downward in controlled fashion.
- Clothing or your hair gets stuck in the rappelling device. This will jam the rappelling device and must be carefully removed to allow the device to work properly again.
Even though many people don’t think about rappelling much beyond an outdoor sport, it is also an important skill to learn for preppers.
You can use rappelling to get out of a building or down a mountain as long as you have the right training and gear.
As dangerous as rappelling can be, it can still save your life as long as you know how to avoid the most common problems and approach the event with care and consideration.
Practice this skill, as your life might depend on it one day! Would you survive?

This article has been written by Fred Tyrell for Survivopedia.
from Survivopedia
Don't forget to visit the store and pick up some gear at
The COR Outfitters. How prepared are you for emergencies?
#SurvivalFirestarter #SurvivalBugOutBackpack #PrepperSurvivalPack #SHTFGear #SHTFBag


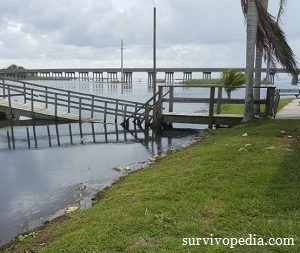 After learning about all of the disgusting contents in floodwaters, the last thing you would probably think to do is swim in it. But many people don’t.


 We can’t know for sure how or when the world as we know it will end, but we are definitely headed for destruction. Some of the most popular scenarios for doomsday are natural disasters (and with the
  Specialists Jimmy Marzan and Michael Rollins sat next to each other, packed tightly with four other soldiers into their filthy, rattling Humvee which itself was held together in places with duct tape and bailing wire. They rode...