Saturday, February 4, 2017

Winter Prepper Project Ideas – Indoors

Written by R. Ann Parris on The Prepper Journal.

Some of them relate to food production, some to increasing our efficiency, and some are little off-the-wall tasks that don’t get as much attention as they otherwise could.

The post Winter Prepper Project Ideas – Indoors appeared first on The Prepper Journal.


from The Prepper Journal
Don't forget to visit the store and pick up some gear at The COR Outfitters. How prepared are you for emergencies?
#SurvivalFirestarter #SurvivalBugOutBackpack #PrepperSurvivalPack #SHTFGear #SHTFBag

Prep Blog Review: Best Practices For Storing Survival Food

articol_11 (1)

Disasters can happen to anyone, anytime and hence you can’t prevent them, you can prepare for them. I want you to answer to one question: if disaster strikes tomorrow, do you have the basics covered? And when I say basics I mean food and water.

Water and food are at the top of the list when it comes to storing for survival if you want to have a healthy, ever-lasting, super-diversified diet when SHTF. But storing food for survival becomes overwhelming when you keep buying, and buying without a plan in mind.

That is why, for this week’s Prep Blog Review I’ve gathered 4 articles that sum up the best practices for storing survival food.

  1. Top 10 food Storage Myths

TOP-10“The internet is full of websites that give information on survival topics, including food storage. There are dozens and dozens of books that will teach you “the right way” to store food and YouTube videos galore. Most contain valid, trustworthy information, but mixed in with that are a number of food storage myths that many people accept without question. Here are 10 that I take issue with, and I explain why.

Myth #1:  You should stock up on lots of wheat.

When I was researching foods typically eaten during the Great Depression, I noticed that many of them included sandwiches of every variety. So it makes sense to stock up on wheat, which, when ground, becomes flour, the main ingredient to every bread recipe.”

Read more on The Survival Mom.

  1. The Best ORAC Foods to Stockpile

“ORAC stands for ‘oxygen radical absorbance capacity.’ It is a unit of measure to determine the antioxidant capacity of a particular food. The higher the ORAC unit value, the more antioxidants a food will have.food Storage

Antioxidants neutralize free radicals and therefore play a role in overall long-term health. Of course, you may think: why should I care about my long-term health when SHTF? No, you probably shouldn’t. But, if you are like me, you’re probably rotating your food stockpile. So when your cans are about to expire… instead of throwing them away you can eat a healthy balanced meal.”

Read more on Ask A Prepper.

  1. 50 Food Items To Keep Stocked for Emergencies

food-storage“Emergencies happen every day. We are faced with everything from a broken-down car on the freeway, medical emergencies, financial difficulties and natural disasters on a pretty consistent basis. Over the last 16 years, our country has been faced with some major events. We were attacked on 9/11 and many other terror attacks followed, we were faced with the devastating effects of Katrina, school shootings, our officers being shot, economic difficulties, and even rioting in our streets. All of these things are red flags that remind us to be prepared for just about anything.”

Read more on The Well Prepared Mama.

  1. How To Dehydrate Herbs for Long-Term Storage

dehydrating-herbs-for-storage

“Herbs are one of the first plants we put in our garden. There is nothing like fresh culinary herbs to intensify the flavors of food. As well, herbs are hardy garden plants that don’t have to be watered as much as vegetables and can serve more than one purpose by being used as natural medicine. For instance, did you know that a sage leaf can be used instead of a band-aid because it has natural healing qualities? Some of these popular culinary herbs are oregano, thyme and sage and can grow year-round in many parts of the country.”

Read more on Ready Nutrition.

LOY_banner_2

This article has been written by Drew Stratton for Survivopedia.  

2 total views, 1 views today

Rate this article!
[Total: 0    Average: 0/5]


from Survivopedia
Don't forget to visit the store and pick up some gear at The COR Outfitters. How prepared are you for emergencies?
#SurvivalFirestarter #SurvivalBugOutBackpack #PrepperSurvivalPack #SHTFGear #SHTFBag

Friday, February 3, 2017

What did you do to prep this week?

Well, folks, here we are again! Another week of prepping for the coming collapse and it is coming, and sooner than you might think. Just because Donald J Trump is in office doesn’t mean that all our problems and threats just magically disappeared or changed into fairy dust or something.

In all honesty, we are even more likely to see an EOTWAWKI event now after the election of Donald J Trump because the left wants to see him and the country fail and will do everything that they can to see to it that that happens.

They know if president Trump is successful in creating jobs and...

Read the whole entry... »


from TheSurvivalistBlog.net RSS Feed
Don't forget to visit the store and pick up some gear at The COR Outfitters. Are you ready for any situation?
#SurvivalFirestarter #SurvivalBugOutBackpack #PrepperSurvivalPack #SHTFGear #SHTFBag

9+ Essential Items For Your Bedroom Survival Kit

Survivopedia 9+ Essential Items For Your Bedroom Survival Kit

We spend about a third of our lives sleeping, so there is a good chance that you will awake to some sort of emergency at some point, if you haven’t already.

There you are, sound asleep until you are jolted awake by a bump in the night, a deafening siren, the rumbling of an earthquake or the shouts of a loved one. How prepared are you?

The purpose of the gear you have bedside should be to get you oriented and situationally aware and then get you to a safe room (often the master bedroom closet). This will delay attackers and provides hard cover as well as structural support against disaster to keep you safe and give you time to communicate and ready an appropriate response whatever emergency you are facing.

Situational Awareness

As you start awake, the first order of business is whether this is like a thousand other times you have awakened and gone back to sleep or whether this time is different.

Since you may be making that determination in a state of sleep drunkenness, it is to your benefit to make use of tools that can improve your situational awareness.

1. Worn Equipment

I make a habit of wearing an ordinary-looking necklace that has a small LED on it and some restraint escape tools inside it. This way I can always find my way in the dark, start a fire and have a shot at escape should I be unlawfully detained, even if I am hauled out of bed in the middle of the night in my underwear or otherwise caught at a disadvantage.

I started wearing it because I travel to places where the kidnapping of US citizens is a significant threat, but I found it so useful to always have an LED handy that I just kept wearing it. I vary its configuration depending on where I am and what I am doing.

The Survival Necklace

You can purchase a basic necklace pre-tied from Oscar Delta or contact them and ask if they’ll build you a custom model that meets your needs and level of training, which may require that you email them from a DOD or Department email, depending on what you want, since they are in the UK.

I suggest that you learn to tie and build your own so you can customize it as your environment and needs change and because survival is the king of all DIY pursuits. If you need help, just ask.

Survival Necklace

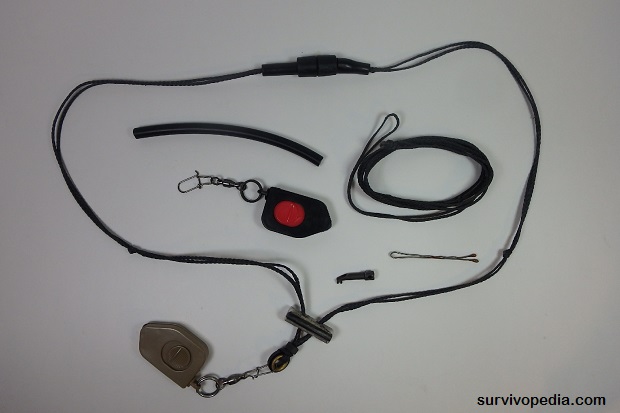
I’ll list the contents of mine as it is today, but I change it as needed and tie new ones as old ones get worn out in life or used in training.

  • Technora 200 Friction Saw – Cut zip ties, flex cuffs, rope.
  • Zirferrotech Zircon Ceramic Microstriker Bead – Great ferro rod striker and breaks tempered glass (side & rear car windows) with surprisingly little force both due to its extreme hardness. Your car door could be jammed in a crash, you could need to exit the rear of a vehicle when the locks have been disabled or you could need to safely break auto glass to rescue someone else. Non-ferrous.
  • Tungsten Carbide Microstriker Bead – Like the wheel on a lighter. Breaks tempered glass.
  • Large Fishing Swivel – I could have used any number of snap hooks but wanted mine to be able to pull double duty as fishing gear if needed. I just smooth any sharp edges.
  • SO LED – Red or White light models made by CountyComm. Availability is spotty but very inexpensive so buy a bunch if you find them. The slide switch is easy to actuate with one hand. Positive on/off. Simple design. MOLLE/snap clip accessory for bags and gear.
  • Silicone Tubing – Fuel line tubing conceals handcuff key and bobby pin.
  • Advanced Handcuff Key 3 – Matches the tooth spacing for TOOOL’s ultimate handcuff key. SnakeDr removed some metal from the barrel on this model so it works with the maximum number of high security handcuff models possible and still opens standard handcuffs.
  • Bobby Pin – “Reach around” tool for the handcuff key in case you get illegally detained in handcuffs with your fingers away from the keyways. Handcuff shim, lock pick, lock tension tool, sharp bit of metal to work knots or duct tape, etc.
  • Ferro/Magnesium Toggle – I use firesteel.com. Availability is hit and miss, but they are the best performing ferro rods I have tested to date and I have tested dozens. The bond between the magnesium and ferro rod is probably as strong as either and this combination gives magnesium to use as tinder which is a big plus in the Rocky Mountains in winter or in 99% humidity in the Brazilian jungle.

2. Light and Footwear

If you are jarred awake by an earthquake or similarly destructive event, your bedroom windows may be all over your bedroom floor, making footwear necessary to prevent injury.

When you wake, your eyes are adjusted to the dark, but you need enough light to orient yourself and grab what you need without making racket.

I prefer an LED with a low red setting work setting to save my night vision while I get my bearings when I wake up in the night. I tried the Streamlight Sidewinder Compact Military IR but it turned out to have a design flaw.

Boots

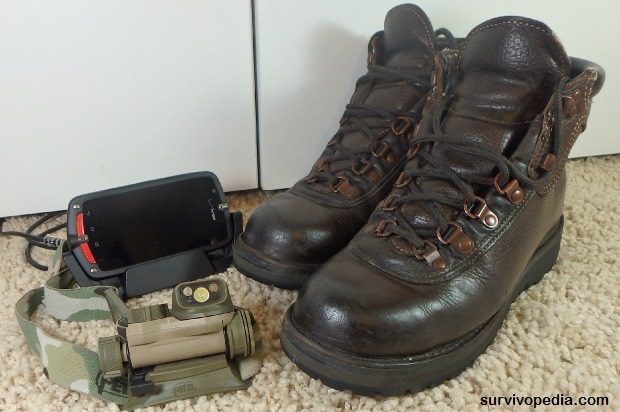
The switch takes a lot of force to turn and is just soldered to the circuit board without any load bearing support to the housing so they end up breaking after a year or so of moderate use.

I replaced it with the Petzl Strix IR, which has been rock solid to date. It has an IR IFF strobe, but lacks a visible strobe. I guess Petzl decided that was outside the scope of use for this type of light.

Dead Simple Trick Brings Any Battery Back To Life (Never Buy Batteries Again)!

3. Cell Phone & Charging Cradle

Your smart phone can be a powerful tool for situational awareness, but the problem is that mobile voice service is often the first thing to stop working in a major emergency, so be sure to choose emergency notification services that notify you via text messaging.

If you haven’t yet, check out the National Weather Service page if you are in the USA or the equivalent in other countries and choose SMS notification services that are the best fit for the risks you face based on your location, climate, employment, etc.

Most of the notification services are free, but you can always pay for more features. Get the FEMA app if you are in the US (I haven’t had any black helicopters come for me yet) and any other notification services that apply to you.

Just keep in mind that these notification services are third party and are no substitute for All Hazards Weather Radio. The technology necessary to run the cellular phone network makes it inherently fragile. Because the All Hazards Weather Radio system is much simpler, it is much less fragile.

4. Public Alert Certified All Hazards Radio

Midland WR-120 Public Alert Certified Radio
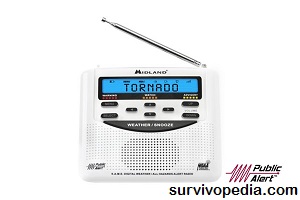
Every survivalist should have one of these radios!

They can notify you of severe weather alerts, large scale disasters alerts such as earthquakes or any event warranting notification of the public and has saved my bacon more than once.

Given that most of us spend a third of our lives sleeping, without something to wake us up in an emergency, we very well may sleep right through the first crucial hours of an emergency. In an emergency where it is necessary to bug out to survive, you very well may miss your window.

As I consult with survivalists, I often find that they have spent thousands of dollars on 4-wheel drive vehicles and bug out bags and made elaborate preparations to bug out, but don’t have a $30-$60 Public Alert Certified radio that close a chink in their armor that leaves them exposed 33% of the time.

It’s good to have that warning the other 67% of the time that you are not sleeping as well.

There are two types of All Hazards Weather Radio:

  • NOAA Certified
  • NOAA Public Alert Certified.

Here, we are focused on the later. Many radios are NOAA certified, but not Public Alert Certified. They will receive NOAA alerts and can listen to weather radio channels but lack many of the features of Public Alert Certified radios, which are programmable with codes for each county to only receive alerts for the counties you specify.

They are programmable by severity, have a “wake up” feature that allows alerts to turn on the radio, display information important about the threat as a banner in their LED display, and have ports to attach external notification devices such as strobe lights, sirens or pillow shakers to help notify the hearing impaired and talk to other equipment.

To clarify, the words “Public Alert Certified” only appear on the programmable radios with external notification and auto wake up. If possible, you want a radio that is not programmable to your county, type of threat and threat level. Otherwise, your radio will constantly alert you to events that will not affect you.

By telling the radio what you are and are not concerned about (programming it) you can eliminate false alarms.

5. Security System Reporting Mechanisms

If you have a home security system, make sure that you have reporting mechanisms at your bedside. Many older alarm panels will tell you which zone was breached, but this will not be of any help unless you have a panel installed beside your bed so you can see it.

Many newer systems can send notifications and even real-time video to your cell phone, but may need Internet access to do so. Make sure that all alarm sensor and reporting has battery backup all the way from every sensor to the panel to your hub, switch or router to your cell phone.

If your system includes Dakota Alert MURS sensors, you will want a MURS radio receiver on your nightstand.

History has many survival lessons to teach on the subject of situational awareness sans electrical grid.

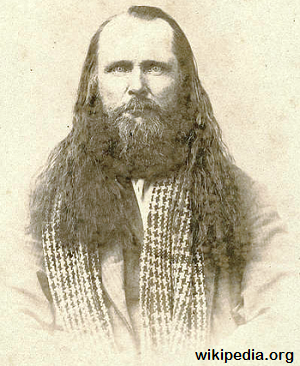
In the 1800’s in Utah Territory, there lived a man named Orrin Porter Rockwell.

Depending on who’s account you read, Porter Rockwell was an outlaw, a lawman, a bodyguard, a tracker and a scout in the Nauvoo Legion that waged a guerrilla campaign of harassment, robbing and burning supply trains, and preventing resupply of the US Army in the Utah War.

Porter was as famous as famous a gunfighter as Wyatt Earp, Doc Holladay, Bat Masterson or Tom Horn in his time and killed more men than all of them combined.

Between the friends and family of those he killed, upstart gunfighters looking to make a name, the men he jailed and those he fought against in the Utah War and other skirmishes, he certainly had to watch his back.

His employment had him on the trail tracking outlaws and guiding parties West to California during the gold rush which had him returning to the Salt Lake Valley alone and sometimes sleeping off a night of drinking on the trail, so Porter developed a strategy to give him some warning.

You might expect a man like Porter to have a large ferocious dog, but as many miles as he made horseback in a day would have killed most domestic breeds. Instead, he chose a little white dog that could ride with him horseback, behind his saddle.

He trained the dog to lick his face to wake him instead of barking when someone approached his camp. Porter’s portable biological alarm system helped him to die of old age instead of a bullet and is easily duplicated today and even easier if you don’t travel on horseback.

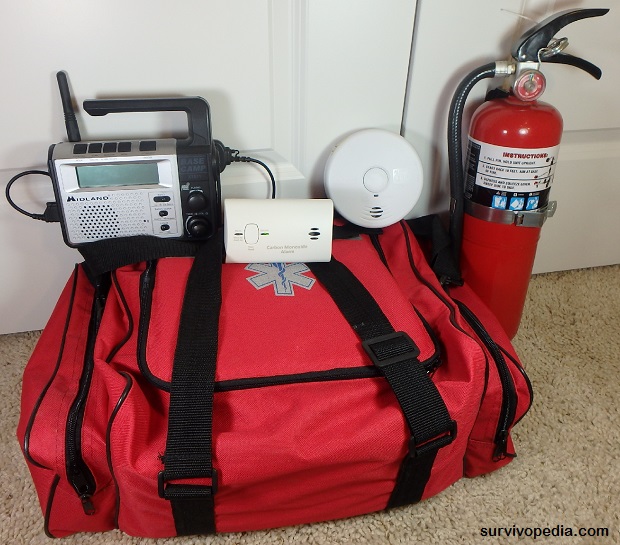
6. Smoke, Flammable Gas and Carbon Monoxide Detectors

It is easy to plan for the spectacular but improbable (based on history) threats and neglect threats that cause a lot of death and suffering. Make sure you have detectors throughout your home and in your bedroom.

Action

Situational Awareness Is Key Gear Can't Help You If You Are Asleep

So, you are now awake at bedside with your headlamp and footwear, have identified a threat or possible threat and it’s time to act. For most threats, you will sound an alarm (if necessary, to alert other members of the household) strap on your home defense waist pack and make for your safe room.

7. Home Defense Pouch

A standard preparation that I recommend is to seek professional self-defense, firearms and legal training and then put together His & Hers’ home defense waist packs as-long-as it is legal for you and your spouse to carry concealed weapons in your home.

If you carry openly, a belt can serve the same purpose. The idea behind this approach is that you can grab a single piece of gear, buckle it on and have the basic tools of self-defense at your disposal. I recommend keeping this in a hidden and locked safe that can be accessed quickly and in the dark.

I am not alone amongst firearms instructors in recommending this approach. Should you come out on top in defending your life, a second battle begins, one that will determine your liberty.

Consider your jurisdiction, the laws and how officers, prosecutors and judges may apply them. Depending on their dispositions, you may have a better chance of not going prison if you use ordinary-looking equipment and firearms than if you sleep with full battle rattle at the side of your bed.

Self Defense Pouch Contents & Training Gear for Drill with Hand to Hand

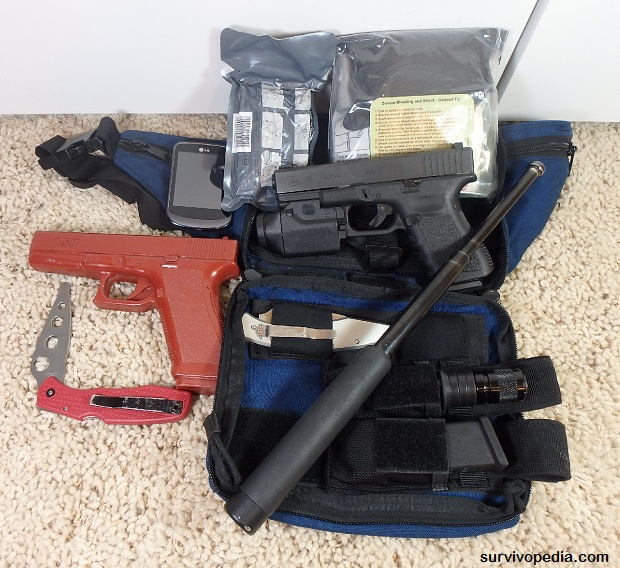
The main purpose of the home defense pouch is to give you the tools you need to fight your way to the cover of a safe room.

8. Home Defense Waist Pack

  • Centerfire Pistol with tritium sights – You need to be able to see your sights. You can keep a sidearm in the waist pack or place your sidearm in the waist pack when you take it off at the end of the day.
  • Spare Magazine or Speed Loader
  • Tactical Flashlight – You need to clearly identify intent, ability and opportunity and see what is behind your attacker.
  • Knife – Will never experience a stoppage and won’t run out of ammunition until you stop swinging.
  • Less-lethal Option – Lethal force is not always the best solution.
  • Compact GSW Kit – Any time you strap on a firearm you should also strap on a trauma kit.
  • Cell Phone – You are not going to want to have to go looking for a cell phone if you need to use this waist pack.

9. Turnout Bag

You may have seen firefighters using turnout bags to get ready quickly without forgetting anything. Under the stress of a life and death emergency, we are more likely than normal to forget things.

Checklists and turnout bags help mitigate this risk. It is important for survivalists to include checklists in turnout bags because we need to include ID, passports and other items that we can often only have one copy of. I keep these items in an EDC valet and check them off as I turnout.

The turnout bag concept lends itself handily to the Modular Survival Kit Model as turnout bags and specific ensembles can be layered on top of turnout gear as needed based on threat, mission, environment, climate, mode of transport and other relevant factors. You can read more about turnout bags and checklists here.

Common Types of Turnout Bags and Ensembles

  • Covert (Everyday) TOB – Normal “gray” concealed carry clothing in earth tones.
  • Overt TOB – Minuteman bag with overt camouflage.
  • First Responder – If you work or volunteer as a first responder (or plan to) you will need a dedicated turnout bag for that.
  • CBRN (Chemical, Biological, Radiological, Nuclear) Ensemble – These threats require specific personal protective equipment and training.
  • Extreme Cold Weather Ensemble, Covert
  • Extreme Cold Weather, Overt

Safe Room

A safe room provides a protected area to shelter in place or to get ready out of your turnout bag before grabbing your bug out bag and proceeding to an assembly area in the event that your home becomes unsafe.

Many families decide to locate safe rooms in master bedroom closets or adjacent to them. Locating it at ground level or above gives heavier-than-air gases someplace else to go, but requires more shielding to protect against radiation if it is planned to also serve as a fallout shelter.

Safe Room Features

  • Turnout Bags
  • Hard Cover – Protection against small arms. If you lack the funds, you can measure between studs and pour steel-reinforced concrete panels to install between them.
  • Structural Reinforcement – Protection against earthquakes, hurricanes, tornadoes.
  • Reinforced Locking Steel Door – To slow down aggressors.
  • Alarm Panel
  • Monitor – For cameras so you can monitor the situation outside. Lacking money for this for my first safe room, I installed a framed one-way mirror which worked well and didn’t require power.
  • Long Guns with Lights – Don’t forget spare ammunition and a PC way to carry. Carrying it in a satchel instead of a plate carrier may avoid the appearance that you were hoping to need it.
  • Fire Extinguishers
  • Escape & Utility Shutoff Tools – The rubble you escape from may not resemble the home you live in today. Windows and doors may jamb or be blocked.
  • First Aid & Trauma Kit – Include gear based on your family medical needs and risks such as Epi-pens, inhalers, insulin or Naloxone which can save lives.
  • Concealed Emergency Exit
  • Water & Food
  • Blankets & Pillows
  • Portable Toilet
  • Bug Out Bags
  • Materials to Flag Your Home – Flagging your own home can save time and may keep Search and Rescue personnel from breaking into your home to search it if you decide to evacuate. I will write an article describing how to do this.

Training

Independent of what preparations you decide to implement, training will help iron out the kinks.

Start the drill in bed, dressed as you normally sleep. Don’t cheat and think you have it down because small details matter here and differentiate your precise situation, equipment and body from everyone else’s.

Note the time and kill the lights. Choose a few different emergency scenarios based on the types of emergencies you believe to be most probable. Run through the most probable. Note the time when you finish.

Debrief afterwards nothing what worked smoothly and effectively and was less effective than you would like and make changes. Running the most probable scenarios in sets of three times each will give the best return on your skill training.

When you are comfortable with the drill, work it in as the first step in a timed bug out drill. There is no substitute for experience, but stressed, timed training is about as close as you can get without responding to real emergencies.

ebr_728x90-3

This article was written by Cache Valley Prepper for Survivopedia.

References:

http://www.weather.gov/subscribe

https://en.wikipedia.org/wiki/Porter_Rockwell

1 total views, 1 views today

Rate this article!
[Total: 0    Average: 0/5]


from Survivopedia
Don't forget to visit the store and pick up some gear at The COR Outfitters. How prepared are you for emergencies?
#SurvivalFirestarter #SurvivalBugOutBackpack #PrepperSurvivalPack #SHTFGear #SHTFBag

For Those of You Waiting on Financial Collapse…

Written by Guest Contributor on The Prepper Journal.

Ladies and gentlemen, I am a banker. That’s right, that evil, fat cat, wall street banker that became such a popular moniker during our last administration and I’m also a prepper.

The post For Those of You Waiting on Financial Collapse… appeared first on The Prepper Journal.


from The Prepper Journal
Don't forget to visit the store and pick up some gear at The COR Outfitters. How prepared are you for emergencies?
#SurvivalFirestarter #SurvivalBugOutBackpack #PrepperSurvivalPack #SHTFGear #SHTFBag

Thursday, February 2, 2017

3 Steps To Start A Fire When Everything Is Wet

Start a fire when everything is wet

Starting a fire in adverse weather, whether is rain or wind or both is a very important survival skill every outdoors aficionado must possess. The ability of igniting a fire when things are less than perfect is a fine art which must be learned and practiced until mastery is achieved.

The thing is, nature doesn’t care much about our best laid plans, mice and men alike and an emergency never comes alone. I mean, when confronted with a survival situation, you’d at least expect fine weather, cool breezes and sunshine.

In reality, your survival in an emergency situation will become much more complicated than initially thought and I would dare to say nine times out of ten, as you’ll end up not only lost in the woods or wherever, but you’ll also have to deal with rain, cold and high winds.

Emergencies almost always bring bad weather with them, it’s almost like a 2 for the price of 1 deal. And that’s fine as long you’re prepared both physically and mentally.

However, in critical times, your survival may depend on your ability to light a fire under rain and/or wind and any hardcore survivalist, even Bear Grylls will tell you that you should always carry at least 2 primary and 2 secondary tools for starting a fire.

The idea is that a regular fire starter may not always provide you with the best results, especially if it’s raining and it gets wet. Also, if it’s windy and rainy, your chances of igniting a fire with just one match are pretty slim. If it’s freezing cold, your BIC lighter (which uses butane) may not work at all.

Basically, starting a fire when it’s windy, cold and rainy is one of the worst situations imaginable, other than starting a fire under water, which is a skill only Chuck Norris masters (he uses phosphorus by the way).

I think I have already told you a dozen times in my previous articles about the holy trinity of survival, which includes fire as a means of providing you with (cooked) food, (safe) water and shelter (warmth, protection from wild animals etc), but also about the importance of location.

But do you know which survival essential is the first most important?

Find out how this little survival stove that fits in your pocket can save your life!

1. Find an Adequate Location for Making the Fire

Everything in life is location, as Van Helsing used to say back in the day, and the same mantra is true when it comes to making a fire.

The first thing to look for is an adequate location for making a fire in harsh weather conditions. The idea is to provide your fire with as much protection possible from both wind and rain if possible. And if you’re not in the middle of a frozen desert with no snow around, that’s not impossible.

Shelter means three basic things:

  • shelter from the wind
  • shelter from the rain
  • shelter from the ground water.

2. Shelter the Fire

Ideally, you should shelter your fire on more than one side (upwind).

Build a Windbreak

You can protect your fire by building a C shaped windbreak with the open side downwind. You can build a windbreak using wood, rocks, snow, dirt, just use your imagination.

To shelter your fire from the rain when outdoors is the hardest job, but it can be achieved.

Make the Fire Under a Tree

But pay attention! The easiest way is to make your fire under a tree, as evergreens can be regarded as a natural tent of sorts. All you have to do is to pick a big one and make your fire under the lowest branches.

Making a fire under a tree may not seem like the best idea, as there are inherent risks attached, like setting the tree on fire, but if you’re paying attention and keeping your fire under control, the chances of such an event happening are minor.

You can minimize the risks further by building a good fire pit with no combustible materials around the fire.

Build a Fire Pit

The third requirement is how to protect the fire from ground earth, with the previous two taken care of by now. The easiest method is to use rocks for building a fire pit on a spot where the ground is raised from the floor.

Or you can do that yourself, i.e. you can build a little mound and on top of the mound you’ll put a layer of rocks, thus preventing your fire from staying directly on the wet ground and also making sure any running water will be drained ASAP.

3. Tinder, Kindling and Fuel

So much for location folks, let’s move on to the next issue and I will start with an axiom: if you don’t have the Bear Grylls flame-thrower with you, starting a fire using wet wood is basically impossible and a no-go under any circumstances. You’ll waste your time and your gear, bet on a dead horse and the whole palaver.

Video first seen on CommonSenseOutdoors

However, there are ways, as Gandalf used to say, but ideally, you should try to find something dry for starting your fire. As a general rule of thumb, a fire gets started in 3 stages: tinder, kindling and fuel.

The tinder is a combustible material which is very easy to ignite, i.e. it will catch fire quick and easy.

The kindling can be improvised using pieces of finger-thick wood that will be lit from the kindle.

The rest is pretty straight forward, as far as your kindle gets ignited you’ll start the main fuel and you’ll have a fire burning in no time.

Two of the best survival-tinder (fire starters actually) which can be used for igniting a fire in adverse conditions (even with wet wood) are cotton balls soaked in petroleum jelly and dryer lint mixed with paraffin. These will burn for at least 2-3 minutes, thus providing you with plenty of time to get your fire started. I’ve already written an article about this issue.

As an interesting factoid, even in the midst of a rainstorm, you can almost surely find dried branches under the bottom of big/old pine trees. Another great place to look for dry combustible is the underside of uprooted (or dead) trees.

Video first seen on IA Woodsman

How to Make the Best Fire Starter for Wet Wood

The best fire-starter for wet wood can be home-made using black powder (gunpowder) and nail polish remover (the one that contains acetone). The acetone will be the solvent for the gunpowder. The idea is to make something that burns slow and as hot as possible and the gunpowder/acetone mix is by far the best in this regard.

Making the mix is fairly easy, as you’ll start with a small quantity of gunpowder the size of a golf ball put inside a ceramic/glass bowl. Start adding nail polish remover so that the mound of gunpowder is totally covered then mix it together slowly and thoroughly (always wear rubber gloves).

Once the stuff inside the ball gets in a putty-state, you can pour off the extra nail polish and then start kneading the putty, just like when making bread. i.e. folding it over time and time again.

The purpose of the kneading is to create layers inside your fire-starter. In this way, the burn rate is more controlled. The more layers, the better your fire-starter will be. The finished putty can be stored in an airtight container, but keep in mind that you’ll want to use your putty when it’s still moist. If dried, it burns too fast.

This fire-starter burns at 3000 degrees Fahrenheit and a golf-ball sized piece will burn for more than 3 minutes. Basically, you can set anything on fire with this baby and even  dry out damp wood in the worst conditions imaginable.

One final thing, it would always be nice to use fire accelerants, like gasoline (or alcohol, paint thinner etc), for starting a fire in rain or wind.

If you have your car around, the better, as you can siphon out some gasoline from the tank and start a fire even with damp wood in a jiffy. Okay, you’ll not receive those extra bonus style points, but that’s okay.

You’ll always have the peace of mind knowing that no matter where you go and no matter how bad the weather is you’ll be able to start a fire and safely cook food and boil some water. Click the banner below to grab this offer!

pocketstove_728x90_1

This article has been written by Chris Black for Survivopedia. 

0 total views, 0 views today

Rate this article!
[Total: 0    Average: 0/5]


from Survivopedia
Don't forget to visit the store and pick up some gear at The COR Outfitters. How prepared are you for emergencies?
#SurvivalFirestarter #SurvivalBugOutBackpack #PrepperSurvivalPack #SHTFGear #SHTFBag

Wednesday, February 1, 2017

Stacking Functions: Increasing Efficiency with Multi-Function Spaces

Written by R. Ann Parris on The Prepper Journal.

Analyzing homestead elements for multi-functionality and redundancy were covered in the first article. This time we’ll look at combining them into multi-function spaces.

The post Stacking Functions: Increasing Efficiency with Multi-Function Spaces appeared first on The Prepper Journal.


from The Prepper Journal
Don't forget to visit the store and pick up some gear at The COR Outfitters. How prepared are you for emergencies?
#SurvivalFirestarter #SurvivalBugOutBackpack #PrepperSurvivalPack #SHTFGear #SHTFBag

The Survival Pyramid

Check out The Survival Pyramid.


from TheSurvivalistBlog.net RSS Feed
Don't forget to visit the store and pick up some gear at The COR Outfitters. Are you ready for any situation?
#SurvivalFirestarter #SurvivalBugOutBackpack #PrepperSurvivalPack #SHTFGear #SHTFBag

EMERGENCY POWER ALTERNATIVES MADE SIMPLE Part I Solar Panels and Charge Controller

by Robert B

Building an off-grid power source for your home or “Bug Out” location is not as difficult as you may think. Having power can drastically improve the quality of life during a long or short term power outage. After losing all of our food during a three-day power outage after a severe storm, we learned quickly that taking the power grid for granted was not a good time.

Please keep in mind that we are not experts and there are always dangers when dealing with electricity.

HQST 100 Watt 12 Volt Monocrystalline Solar Panel

The solar generator constructed at our home is...

Read the whole entry... »


from TheSurvivalistBlog.net RSS Feed
Don't forget to visit the store and pick up some gear at The COR Outfitters. Are you ready for any situation?
#SurvivalFirestarter #SurvivalBugOutBackpack #PrepperSurvivalPack #SHTFGear #SHTFBag

Prepper News Brief 2/01/2017

From now on I will be posting the news (daily) over on my other awesome site the Daily Collapse Report, why you ask? Well there is so much going on right now that I felt that each day’s most fascinating news and my thoughts needed a

Well, there is so much going on in the world right now that I felt that each day’s most fascinating news and my thoughts on each needed a dedicated site that I can post to daily.

So each morning I get up and search over 50 news sources and websites and from that river of information I pick out and post the top ten stories of the day for you –...

Read the whole entry... »


from TheSurvivalistBlog.net RSS Feed
Don't forget to visit the store and pick up some gear at The COR Outfitters. Are you ready for any situation?
#SurvivalFirestarter #SurvivalBugOutBackpack #PrepperSurvivalPack #SHTFGear #SHTFBag

Hypothetical Wednesday January 18, 2017 – Poll

Over the past few years the choice for “prepper books” has exploded to the point that it seems that just about everyone with an interest in prepping has a book. Sometimes I think that there are more prepper books on the market than there are actual preppers.

Below are five of what I consider the best prepper books on the market – but I want to know what you think and why…

Note: There is a poll embedded within this post, please visit the site to participate in this post's poll.

If you need to take a closer look click on the links below…

Read the whole entry... »


from TheSurvivalistBlog.net RSS Feed
Don't forget to visit the store and pick up some gear at The COR Outfitters. Are you ready for any situation?
#SurvivalFirestarter #SurvivalBugOutBackpack #PrepperSurvivalPack #SHTFGear #SHTFBag

Trump’s First Days In Office

Trump's First Days In Office

When Donald Trump said he was anxious to get to work in his new job, few people took him seriously. Even amongst those who voted for him, there was doubt how quickly he’d actually get to work on the items in his first 100 days agenda.

After all, we’re talking Washington, DC; nothing happens quickly there. The town is filled with a huge spring, called bureaucracy, which reverberates to its own inefficient frequency.

But Washington apparently doesn’t know how to deal with a businessman, only bureaucrats and politicians. So they weren’t ready on the afternoon of January 20th, when Trump returned from the inauguration and hit the ground running.

Before the day was out, he had signed four executive orders, which had been prepared by his transition team.

Things have continued hard and fast since then, with Trump making a start on his “Contract with America.” A few of the more noteworthy moves have been:

  • Pulling the United States out of Trans-Pacific Partnership (TPP). If you remember, that’s the trade deal that Obama’s administration negotiated in secret and expected Congress to vote on, without giving the members copies to read. If they wanted to read it, they had to do so in a secure room and return the copy they were reading when they got done.
  • Putting a stop to U.S. taxpayer funding of foreign abortions. This one has gone back and forth every time there’s a change of president. Democrats order funding of those abortions, and Republicans stop it every time they are in office. Well, Trump signed that one in quickly.
  • Signing an executive order on Obamacare. While President Trump didn’t repeal Obamacare, he did sign an executive order, directing the various departments of the executive branch to use as lenient an interpretation of the law as possible, when dealing with the American public. Specifically, this deals with the financial burden of Obamacare, or the individual mandate. Quite literally, it tells bureaucrats to decide in favor of the citizens, rather than in favor of the government.
  • Called for a renegotiation of North-american Free Trade Agrement (NAFTA). Like the TPP, NAFTA has cost American jobs. Since jobs are a major issue for the American people, Trump is responding. Unfortunately, for Mexico, that left their president looking bad and caused a dip in the value of the already struggling peso.
  • Ordered the building of the wall. This was a big campaign promise of Trump’s, and he’s lost no time in ordering it started. Relying on a law passed by Democrats in 2006, Trump has ordered that the wall be started post-haste. He’s also ordered the hiring of 5,000 more Border Patrol Agents.
  • Established a freeze on federal workforce hiring. This is part of Trump’s plan to reduce the federal workforce by 20% and discretionary spending by 10%.
  • Authorized the building of the Keystone XL pipeline and the Dakota pipeline. Obama wavered on these all through his presidency, ultimately succumbing to the pressure of environmentalists. Trump, ever the businessman, authorized the continuation of these projects.
  • Rescinded Obama’s “catch and release” instructions to the Border Patrol, where illegal aliens, even illegal alien criminals, were released into society, with nothing more than a court date (that most didn’t bother to attend) and a work permit.
  • He’s also given the EPA a gag order, stopping posting of information and issuance of new regulations, until they can be reviewed. During Obama’s presidency, the EPA was used as a bludgeon against business, reaching the point where regulatory compliance with the EPA’s mandates, equals half of all regulatory compliance costs that businesses must bear.
  • Signing an executive order temporarily suspending all travel from seven Muslim controlled countries, which are the most known for supporting and exporting terrorists.

Video first seen on: Fox News.

As anyone can see, looking at this list, Trump is holding to a hard conservative line in his early actions. He’s actually doing what he said he’d do.

According to information from the transition team, there are about 200 executive orders and actions ready for Trump to sign. While we don’t know how quickly those will be rolled out, it’s clear that the transition team put an effort in getting things ready for the new president.

Liberals have already been screaming about Trump’s actions, as they don’t follow the liberal ideology. But they’re also screaming for another reason; trying to throw the high number of executive orders in Republican’s faces, citing how those of us on the right complained about Obama’s executive orders.

A Difference We Should Be Aware Of

But most of these actions don’t really qualify as executive orders. In the first week, only four of them did. The rest are what are known as “Executive Memorandum.” The difference between those and executive orders may seem small, but it is significant. Calling them executive orders is misleading, even though Trump himself is making that mistake.

An executive order does something new, carrying with it the weight of law. As such, they are numbered and entered into the federal registry, just like any other law. But executive memorandum aren’t treated in the same way. While they may ultimately carry as much weight as a law does, they aren’t a law.

What they are is guidance to the various departments of the federal government, directing them in how to apply specific laws that are on the books.

In fact, President Obama actually issued fewer executive orders than many of his predecessors, preferring to use executive memorandum instead. But in his case, it was so that Congress would have a hard time finding his orders.

Since executive memorandum aren’t numbered, they are easily “lost” in the halls of power, so that when members of Congress ask for a copy, it’s hard to provide it to them.

While just about everything that Trump is doing has the liberals up in arms, the supposed “Muslim Ban” seems to top the list. According to the liberal narrative, Trump is discriminating against Muslims based upon their religion. But to take that stand, they have to purposely misunderstand the order that Trump signed.

Trump’s order isn’t based on the individual’s religion, but in fact bans travel to the United States by all people who are citizens of those seven countries. While the countries in question are Muslim controlled, with a majority Muslim population, they are not the only such countries around.

There are many other countries that he did not ban travel from, which are also Muslim controlled, with a majority Muslim population. But those countries are not known for exporting terrorism. The seven countries on the list were actually picked by Obama’s Administration, as they were the ones who created the list of the seven countries which exported the most terrorism. So, in a sense, all Trump was doing was something that Obama wouldn’t.

Nor is this the first time that such a ban has been put in place. Obama himself did a six month ban on travel from Syria during his first term in office. However, nobody was demonstrating against it or even talking about it, because Obama was the liberal media’s poster boy. They wouldn’t dream of saying anything so negative about him.

15_620x110

Changes in the White House

Trump hasn’t just been changing things in the law, through executive orders and executive memorandum, he’s also made some serious changes in the organization and operation of the White House.

Even before taking the oath of office, he changed the name of the Office of the First Lady to the “Office of the First Family,” demonstrating that his family, especially his daughter Ivanka, will have a part to play in his administration.

That’s not too surprising, considering that they have all worked as his executives in Trump Tower. But it’s disconcerting to those on the left nevertheless. They’re responding strongly to that, citing laws about nepotism and conflict of interest. But those laws don’t actually apply, as none of his family members are filling cabinet posts.

Then there’s the décor of the White House. Yes, Trump has had something to say about that as well, telling the staff to remove all Muslim signs and symbols, even from the chapel. This country was founded as a Christian country.

But the biggest change in the White House has been in the Press Briefing Room. We’ve all watched Trump’s ongoing war with the press with some humor. The mainstream media acted as shills for Hillary Clinton during the campaign, and Trump’s not likely to forget.

Worse than that, the mainstream media is still acting as Clinton’s shills, even though it’s clear that she lost and Trump is now the president. Like the rest of the liberals in the country, they can’t seem to accept the idea that their candidate could possibly have lost. So they’re doing everything in their power to make Trump look bad.

That’s not all that surprising, as the liberal press does that with every Republican president, while working to hide the mistakes of the Democrats. Nowhere was this clearer than during Obama’s presidency and Hillary’s candidacy. In both cases, they held back information that the American people had every right to know.

The war between Trump and the media is far from over. The day after the inauguration, he was taking shots at them for their misrepresentation of the crowd at his inauguration ceremony. While that might seem petty, it demonstrates how low the liberal press is willing to go. Trump won’t put up with it.

So, Trump’s staff started out with the idea of moving the press to the Old Executive Office Building, so that they could give them a bigger room. But that idea didn’t go over too well with the press. They saw it as Trump pushing them away, something that would be understandable, if not necessarily wise.

So the press are in the same little briefing room they’ve been in for years. The difference is, there’s a whole lot more of them who are receiving credentials from the White House. Now it isn’t just the mainstream media, but many conservative news sites who are receiving their credentials.

That’s making that little briefing room seem tiny; and it’s going to get worse. It’s also giving Trump’s Press Secretary, Sean Spicer, a chance to rub the mainstream media’s nose in the dirt. Rather than following longstanding tradition and allowing the AP wire service and the major networks to ask the questions, Spicer is calling on conservative news outlets.

The leftist media has managed to control the narrative in Washington, simply by the questions that they ask. Even if the briefing was about one subject, they’d turn the question period to what they wanted. But now, the people who are asking the questions aren’t asking what the liberals want to know, but what conservatives care about. That means that the narrative is being controlled by conservatives, rather than liberals.

Where Will Trump Go From Here?

There’s really no way of knowing for sure exactly what Donald Trump is going to do as president; but I think we can draw a few early conclusions. First of all, we have to take into account the fact that he put forth the most conservative platform that the Republican Party has floated in 20 years.

That’s a bit surprising, coming from a man who was a Democrat most of his adult life. But it’s not, if you consider how he ran his campaign. He wasn’t following any real political ideology, right or left, per se; but rather, asking what the American people, all those millions of people in flyover country, cared about. Those are the issues that he campaigned on and those are the issues that he has covered in his Contract with America.

It looks like Trump wants to be the president for the working man and woman. Those are the people who voted him into office, and those are the people he’s committed to serve. He’s willing to be the president for all Americans, but those who voted for him come first.

Some of those who voted for him are a bit surprising. Trump is the first Republican President in I don’t know how long who earned the support of labor unions. That’s a biggie, because the labor unions have traditionally backed and funded Democrats.

But when it all comes down to it, Trump is trying to create jobs, while the Democrats are trying to create a socialist utopia. For the unions, jobs are more important.

While it’s too soon to tell for sure, based on some of the things he’s said in the last week, it appears that Trump understands where the limits of his authority are and wants to work together with Congress on the rest.

That will be a nice change. Obama’s idea of working with Congress was to give them orders and expect them to carry them out. There were countless times when he said that Congress wasn’t doing their job, adding that if they didn’t, he would do it by executive order. But in each of those cases, it was clear that he thought that Congress doing anything but his will, wasn’t doing their jobs.

And Finally, the Democrats

The Democrat Party now finds itself with the shoe on the other foot. Their populist president has finished out his term, trying to rule by the force of his own personality and will, lying to the American people constantly and using a bludgeon on the collective heads of Congress.

Obama started out with control of both Houses of Congress and now Trump has that. But in the eight years of Obama’s presidency, the Democrats lost more and more power, until they lost control of both houses. They still acted like they had control, but they didn’t have the numbers. They had to rely on the president’s pen to thwart the Republicans’ will.

The question to be seen is how they Trump uses that same advantage and whether he’ll be able to keep it. A lot is hanging in the balance.

Sixty-eight Congressmen and Congresswomen boycotted Trump’s inauguration, with many stating that they didn’t consider his presidency legitimate. Of course, they wouldn’t think any Republican presidency legitimate, but in the process, they’ve shown their true colors, picking partisanship over patriotism.

That “boycott” sent a loud and clear message to Trump, the Republicans in Congress and the American people. It went something like this: “If we can’t have our way, then we’ll take out bat and ball and go home.” Sigh; it’s sad to see supposed adults acting so childish.

But this is the stance that the Democrats have decided to take for the next four to eight years. If they can’t have their way, they’ll just have a collective temper-tantrum. We can expect more of the same, expressed in a myriad of ways, as liberals and other Democrats continue to “demonstrate” against the duly elected president.

Apparently, those on the left feel that Trump is a threat to their freedom. Yet he hasn’t said one single word about taking away women’s rights, taking away LGBT rights or any of their other hot buttons.

The closest you can say that he came to that, was to say he was going to keep potential terrorists and criminals out of the country. I guess they think that’s stealing their rights.

Actually, the reason for the collective outrage of the left is quite simple; they’re listening to the lies of the mainstream media. The “fake news” machine is out in force, and it’s aimed its cannon on a target called Trump. They’re going to blast him with every malicious epitaph they can, and their blind sheeple and going to believe it.

We can expect more of the same, eight more years of the same. So stock up on pampers and pacifiers, we’ve got a lot of crybabies to take care of.

This article has been written by Bill White for Survivopedia. 

References:

http://townhall.com/tipsheet/mattvespa/2017/01/29/news-bulletin-the-list-of-muslim-nations-in-trumps-socalled-muslim-ban-are-ones-obama-choose-n2278021

http://www.americanthinker.com/blog/2017/01/remember_the_crowds_protesting_when_obama_banned_immigrants.html

0 total views, 0 views today

Rate this article!
[Total: 0    Average: 0/5]


from Survivopedia
Don't forget to visit the store and pick up some gear at The COR Outfitters. How prepared are you for emergencies?
#SurvivalFirestarter #SurvivalBugOutBackpack #PrepperSurvivalPack #SHTFGear #SHTFBag

Tuesday, January 31, 2017

B.O.S.S. Survival Fishing and Hunting Kit (Bug out Bag)

B.O.S.S. Survival Fishing and Hunting Kit (Bug out Bag)

via YouTube Video Don't forget to visit the store and pick up some gear at The COR Outfitters. How prepared are you for emergencies?
#SurvivalFirestarter #SurvivalBugOutBackpack #PrepperSurvivalPack #SHTFGear #SHTFBag

Urban Bug Out Bag (Part 2) by TheUrbanPrepper

Urban Bug Out Bag (Part 2) by TheUrbanPrepper

via YouTube Video Don't forget to visit the store and pick up some gear at The COR Outfitters. How prepared are you for emergencies?
#SurvivalFirestarter #SurvivalBugOutBackpack #PrepperSurvivalPack #SHTFGear #SHTFBag

Urban Bug Out Bag (Part 1) by TheUrbanPrepper

Urban Bug Out Bag (Part 1) by TheUrbanPrepper

via YouTube Video Don't forget to visit the store and pick up some gear at The COR Outfitters. How prepared are you for emergencies?
#SurvivalFirestarter #SurvivalBugOutBackpack #PrepperSurvivalPack #SHTFGear #SHTFBag

H2 GO Bag by TheUrbanPrepper

H2 GO Bag by TheUrbanPrepper

via YouTube Video Don't forget to visit the store and pick up some gear at The COR Outfitters. How prepared are you for emergencies?
#SurvivalFirestarter #SurvivalBugOutBackpack #PrepperSurvivalPack #SHTFGear #SHTFBag

How To Make Soap On A Rope For Survival

How To Make Soap On A Rope For Survival

I can remember as a kid, my dad would get soap on a rope as a gift and it never made much sense to me. I thought, hmm, what a weird thing to do to soap. That’s life as a modern kid in a civilized world.

Soap on a rope was a novelty item, and now it’s practically unheard of. So, what was its purpose, and why do you need it as a survival item?

Originally, soap on a rope was invented by the English Leather Company in 1969 to keep their soap from getting soggy and dissolving. Yep, tricked me, too; I would have guessed that it’s much older than that, but apparently not. Still, I’d be amazed if at least one enterprising pioneer didn’t think to make this novelty, because it’s truly ingenious if you think about it.

Since soap can be made mostly with ingredients that you already have around the house, let’s make some soap on a rope.

Why would you want your soap on a rope?

Think about it. Many good soaps take months to cure properly, so wasting even one bar is foolish in a survival scenario because good hygiene is going to be what saves you from disease. Since it’s also going to be a huge trade commodity, you’ve literally lost what will equate to money if you lose a bar or soap or let it sit in a puddle and dissolve.

Enter soap on a rope. You can take it to the river with you and hang it around your neck or your wrist – a wrist rope seems more functional to me – so that you don’t lose it in the stream or drop it in the dirt. You can also hang it up to dry so that it’s not sitting in dirt or a puddle of water that will cause it to dissolve.

Soap on a rope is one of the most simply frugal ideas I can think of.

But, how do you make it?

The short answer: just like you make any other soap, except you put a rope in it.

The long answer? Well, OK. Let’s have a quick soap-making tutorial.

Can I make soap without lye?

In order to make a solid soap, you’re going to need wood ash, because of the lye (sodium hydroxide) in it. Of course, right now you can just buy lye, or buy melt-and-pour soap that’s already been saponified (the process that lye instigates that causes the liquids and fats to mix and gives soap it’s cleansing properties), but that won’t be the case if SHTF, so it’s good to know how to make it yourself. You’ll be surprised how simple the process is.

And think about our ancestors. They didn’t have the luxury of the modern industry but they were able to create their own hygiene products from simple, readily available ingredients.

These survival lessons from our ancestors will teach you how to take care of your hygiene when there isn’t anything to buy. 

The number one thing that you need to know about soap making is that you need to follow the number one rule in chemistry class – use safety equipment and precautions. Lye is extremely caustic, but if that worries you, just remember that fire is lethal too, but that doesn’t stop you from cooking and camping. Just be careful.

And no. You can’t make soap without lye. If you try to, you’ll just have a bucket full of fat and water. The lye causes the saponification process that allows them to mix and gives soap its cleansing properties.

If made correctly, there is not unreacted lye in the soap, but it’s important to use the right ratio of lye to water in order to make sure that this is the case. There are many soap calculators that you can find to help you with this process until you have it down.

A couple of safety tricks to remember – always add the lye to the water, not the water to the lye. As soon as you add the lye, the chemical reaction will start and the mixture will heat up ad steam for 30 seconds or so. Keep a bottle of white vinegar on hand to neutralize the lye if it splashes on something. It will eat a hole in cloth or burn your skin.

Stir immediately so that the lye doesn’t settle in the bottom and possibly cause an explosion (don’t be a baby – you can do this. Granny Clampett did and look how long she lived). Seriously, though, don’t worry about it overly much; just be careful and do it right and you’ll be fine.

Making the Soap

The only ingredients you actually NEED to make soap are water, lye, and fat. That’s it. Of course, smell-good agents, essential oils, and colors make it smell nice, add therapeutic properties, and make it look pretty, but they’re not necessary to make soap that will get you clean.

Now, to make soap on a rope, you obviously need the soap to be solid, so if you’re making your own lye, use wood ash from hardwoods. Otherwise, your soap will be soft.

There are a variety of fats that you can use, including tallow, lard, olive oil, coconut oil, jojoba oil, avocado oil, or any of the “butters” – cocoa, shea, or mango butter. You’ll want to use a combination of fats and oils in order to have the right consistency.

There are two ways to make soap: hot processing and cold processing. As the names suggest, one method requires heat and the other doesn’t.

The main difference is that the heat in hot pressing speeds up the saponification process so that your soap is ready in days instead of weeks, like it would be with cold-processing.

Here’s a cold processing recipe from DIYNatural.com. She’s been a soap maker for many years, and actually teaches university classes on the subject.

Ingredients

The notes after the ingredients are hers, not mine, and I’m paraphrasing her directions. I’ve also added in the rope, and the rope instructions.

Soap on a rope ingredients

Process

First is the chemical reaction, so use gloves and goggles if you so choose. Measure out the water into a quart-sized canning jar and slowly add in the exact amount of lye, stirring as you add it. Stand back a bit so that you’re not breathing the fumes caused by the chemical reaction. Stir until the water starts to clear, then move to the next step.

In a smaller container, combine the oils. You should have almost exactly a pint. Heat them up for just a minute either in the microwave or by placing them in a glass jar and placing them in hot water. You want the temperature of the oils to be about 120 degrees.

By now, the lye mixture should have cooled to about the same temperature. Let the oils and the lye cool until they’re between 95 and 105 degrees F. This is an important stage because if it cools too much it’ll combine quickly but it’ll be crumbly.

When they’re both at the right temperature, pour the oils into a glass mixing bowl and slowly stir in the lye until it’s all mixed, and keep stirring for 5 minutes. The soap mixture will thicken and become lighter in color. Keep stirring either with by hand or with an immersion blender until it looks like vanilla pudding. When it does, add your colors, oils, or herbs.

Pour your soap into 4 molds, or one loaf pan or cardboard box lined with parchment paper that will make 1 solid piece that you can cut into smaller bars. Pour the soap into the molds or pan. Double the rope over into a loop and press the ends down into what will be the center of each bar of soap that will extend from one end of the bar to the other.

Wrap the mold in plastic wrap and then in a towel so that the saponification process can start.

Check it after 24 hours and if it’s still warm or soft, let it sit for an addition 12-24 hours. When it’s finally cold and firm, turn it out onto a piece of parchment paper.

If you made one solid piece, cut it into bars now, making sure to cut it so that the rope runs down the center of each bar.

Since this was a cold process, the soap will need to cure for 4 weeks or so. Turn it every week or so to expose all sides to air. You can also cure it on a rack and won’t have to turn it. Once your soap is completely dry, wrap it in wax paper or store in an airtight container because homemade soap makes its own glycerin, which attracts water.

Now you know how to make quick and easy soap on a rope!

Do you wonder how our forefathers took care of their personal hygiene when they traveled for months?

Click the banner below and uncover their secrets!

TLW_banner2

This article has been written by Theresa Crouse for Survivopedia.

References:

http://soapcalc.net/calc/soapcalcwp.asp

2 total views, 2 views today

Rate this article!
[Total: 0    Average: 0/5]


from Survivopedia
Don't forget to visit the store and pick up some gear at The COR Outfitters. How prepared are you for emergencies?
#SurvivalFirestarter #SurvivalBugOutBackpack #PrepperSurvivalPack #SHTFGear #SHTFBag