Saturday, July 29, 2017

Prep Blog Review: Let’s Go Wild And Test Our Skills

Did you take any advantage of the summer days and tested your wilderness survival skills? Hunting, hiking, reading nature’s signs, building shelters and learning how to start a fire – they are all perfect to prepare you and sharpen your survival skills and senses.

These guys did the same, and came back from the wild to share their stories.

We checked their survival blogs or websites and found some interesting stuff you might like. Keep reading to see what’s all about!

Safety in the Wild: The Ultimate Survival Shelter Guide

Shelter isn’t just a matter of comfort, exposure can be just as dangerous as dehydration if you’re lost away from civilization. In extreme climates, your life expectancy can become hours to minutes, even if things were going fine before a sudden turn in the weather.

Of course, there’s less serious reasons to learn to build a decent shelter as well. Even if you’re just on a day hike it might be convenient to hunker down for a couple of hours if a storm blows in, or if you’re hunting in the desert you might just need some shade to rest for a while.”

Read more on Deer Hunting Field.

Finding your way home; will you make it?

“Hello my friend and welcome back!  Many people have to travel out-of-town for work, and with modern-day electronic gadgets, it’s pretty easy.

But what if those gadgets suddenly didn’t work, would you know how to get home in a SHTF situation?  This is the subject of today’s post, so grab a cup of coffee and have a seat while we visit.”

Read more on American Preppers Online.

How to Stay Sane When You’re All Alone in a Survival Situation

“When most people imagine various survival scenarios that they could find themselves in, many of those scenarios include isolation.

That’s not surprising, considering that many of the survival stories we hear about in the media, involve people who escaped the hazards of the wilderness all by themselves. Those stories are often the most harrowing and interesting.

Read more on Ready Nutrition.

A Tenderfoot’s Guide to Chopping Firewood at Camp

“Not much has more appeal to a young camper than having the opportunity to use an ax. The lure is irresistible. Yet, ax lore is rarely passed down to our younger generation.

The following is a common sense guide which will help a tenderfoot, young or old, learn to safely use an ax for the most basic camp chore – chopping firewood.

Keep in mind that “safe” is a relative term. There are risks inherit when an ax is moving, or, even when idle.”

Read more on The Survival Sherpa.

About the Bugging Out to the Forest Scenario…

How many times have you heard someone say, “When the SHTF I am just going to bugout to the woods,” and think that such a “plan” is a simple and feasible idea? I have shaken my head in disbelief copious amounts of time when hearing a “kinda” prepper, utter such a phrase.”.

Read more on Survival Sullivan.

This article has been written by John Gilmore for Survivopedia.


from Survivopedia
Don't forget to visit the store and pick up some gear at The COR Outfitters. How prepared are you for emergencies?
#SurvivalFirestarter #SurvivalBugOutBackpack #PrepperSurvivalPack #SHTFGear #SHTFBag

What Did You Do to Prep This Week?

Friday, July 28, 2017

The EMP Bucket Project

By JP in MT

As we continue our “prepper” journey the one thing I find that would be the most devastating to us is EMP.  As a country, we are so dependent upon electricity and electronic items that we don’t think about it unless we do so deliberately.  I have a metal wall locker that will get sealed up with larger items I’m not sure will be affected, and a have a large steel gun safe and a smaller one.  What I was looking for was something along the line of “grab and go”; smaller items protected in smaller quantities so I could seal them up with less chance of losing them all,...

Read the whole entry... »


from TheSurvivalistBlog.net RSS Feed
Don't forget to visit the store and pick up some gear at The COR Outfitters. Are you ready for any situation?
#SurvivalFirestarter #SurvivalBugOutBackpack #PrepperSurvivalPack #SHTFGear #SHTFBag

How to Use an Analog Watch as A Compass?

Written by Guest Contributor on The Prepper Journal.

A compass is an essential orienting tool that helps us understand the position we are in. However, during a trip to the mountains, for example, it can easily happen to find ourselves lost and without a compass at hand.

In the technological world we live in, this wouldn’t even be a problem if we could rely on the use of our mobile’s GPS to get out of the situation. The only problem is that in the most remote areas mobile operators rarely provide coverage, therefore relying on technology is not always the best solution.

On the other hand, the phone’s battery can easily drain out and you might just find yourself in the middle of nowhere, having to use the traditional methods to survive.

For this reason, it is essential to learn how to use the cardinal points for guidance, and it is even more important to learn how to find North and South without a compass.

Fortunately, a simple analog watch can help you find true North, or South as a matter of fact, in just a few moments. Thanks to this convenient and efficient method, you will be able to find your direction without hassle, therefore this certainly is an important survival skill you should know.


How to Use an Analog Watch as a Compass in The Northern Hemisphere?


There are two methods you can use to determine the cardinal points and the direction. Pick your favorite and learn it before heading on your next adventure. And just as a note, if you don’t have an analog watch, you can still use a digital watch as a compass by simply estimating the position of the hour hand and markings on the dial.

Both methods require:

  • An analog watch
  • Basic mathematics knowledge
  • The determination of the position of the sun

First Method:

  1. Read the time in the standard military time (24-hours format).
  2. Divide by two the hours marked by your watch. For example, if the time is 8 o’clock in the morning, you get number 4; if it’s 8 in the evening, the hour that corresponds to 20 in the standard military time, you get number 10.
  3. Draw an imaginary line corresponding to the hour you got from the previous calculation, just like an imaginary hand of the watch is indicating that hour, for instance, 4 or 10 o’clock according to our example.
  4. Holding the watch in the palm of your hand and parallel to the ground, point the imaginary line in the direction of the sun, to the point of the horizon where the sun projects its light vertically.
  5. With the watch in this position, the 12 o’clock marking of your watch will point North, therefore 6 will correspond to the South, while 3 and 9 will correspond to East and respectively West.

Second Method:

This method is probably the simplest to remember and easiest to use, but you will have to remember to subtract an hour during the Daylight Saving Time if you want to make an accurate determination.

  1. Read the current time, remembering to subtract one hour during Daylight Saving Time period.
  2. Holding the watch in the palm of your hand, horizontally and parallel to the ground, point the hour hand to the point of the horizon where the sun projects its light vertically. If you are unsure where this point is, place a straight stick above the center of the watch to create a shadow and align the hour hand to the shadow, pointing towards the sun.
  3. Bisect the angle between 12 o’clock and the hour hand. The imaginary bisector line will point towards South, therefore North is in the opposite direction.

The angle between the hour hand and the 12 o’clock should be measured clockwise before noon and counterclockwise in the afternoon.

Of course, if you are in the Southern Hemisphere, you will have to adopt a different approach.

How to Use an Analog Watch as a Compass in The Southern Hemisphere?

The sun has a different orientation in the two hemispheres, and for this reason, you will not be able to use the same method everywhere in the world. But don’t worry, there is only one essential difference you will have to take into account.

The difference is that in the Southern Hemisphere you will have to use the 12 o’clock marking to point in the direction of the sun instead of the hour hand. Therefore:

  1. Point the 12 o’clock hour marking towards the sun. If you have problems in finding the exact position of the sun, you can use the same trick of the shadow described previously.
  2. Just as if you were in the Northern Hemisphere, bisect the angle between 12 o’clock and the hour hand. This imaginary line indicates North, therefore the opposite direction indicates South.

This method also requires you to subtract an hour when your watch is set to the Daylight Saving Time period, and in this case, you can use the 1 o’clock marking instead of 12 o’clock.

How to Determine in Which Hemisphere You Are in?

It might seem odd having to determine the hemisphere you’re in, but in some cases, it is impossible to know the geographic location in which one is lost. The simplest way to determine the hemisphere is with a map.

Nevertheless, in extreme survival situations, for instance, if your boat is lost in the middle of the ocean, a map is not always useful.

The easy way to determine the hemisphere is by trying to find the North Star, officially named Polaris, on the sky.

To find Polaris, the first step is to find Ursa Major constellation. This constellation is one of the most popular and it is more commonly known under the name the Big Dipper. Once you found it, draw an imaginary line between the two front stars of the constellation and continue it upwards to the next bright star. This star is Polaris.

To check if you found the right star, remember that Polaris is part of the Ursa Minor or Little Dipper and it is the last of the three stars that form the tail (or handle) of the constellation. Ursa Minor and subsequently Polaris are visible in the Northern Hemisphere all year long but they are not visible from the Southern Hemisphere. Therefore, if you can find Polaris you are in the Northern Hemisphere.

As a consequence, you are in the Southern Hemisphere if you are unable to see Ursa Minor constellation. In fact, you will probably not be able to see Ursa Major either, as it is only partially visible.

Nevertheless, if you are looking for a confirmation, you can try to find the Southern Cross constellation instead. Present on the flags of New Zealand and Australia, this constellation indicates the Southern Celestial Pole and it is visible in the Southern Hemisphere all year round.

However, unlike the Ursa Minor, the Southern Cross is also visible from the Northern Hemisphere for a few months a year, therefore always try to find Polaris first and use the Southern Cross constellation only as confirmation.

How Accurate Is This Method?

Although using an analog watch as a compass will give you a good understanding of the directions, the method is not entirely accurate.

The reason is simple. The day is made of 24 hours, time in which the sun moves on the horizon. However, the dial of a watch has only 12-hours marks instead of 24, therefore the hour hand must make two full quadrant turns in the time in which the sun completes an entire circle. This causes the alteration of the measurement when the cosmic horizon and cosmic equator are not the same.

The equator and the horizon only coincide at the Poles of the Earth, therefore it is easy to understand that in all the other points the direction indicated by your watch will be slightly different than the real North or South.

Correcting this error is possible but it is rather complicated and in most of the cases, especially when you’re struggling to arrive at a source of water, it’s just not worth it. If you really want to try to find the real North, you will need to know the co-latitude of the place where you are.

In the Northern Hemisphere, after finding North as described in the second method, turn the watch so that the 12 o’clock mark is pointing towards it. Draw a virtual line between the hours three and nine and use this line to lower the 12 o’clock mark to the co-latitude of the place.

Now, rotate the 3-9 line on a horizontal plane, pointing it in the direction of the sun. The 12 o’clock mark will now point towards the real geographic North.

In the Southern Hemisphere, the method is the same but remember to use the hour hand as an indicator instead of 12 o’clock marking.

Whether you wish to correct the orienting error or not, remember that knowing how to use an analog watch as a compass can certainly save your life.

The post How to Use an Analog Watch as A Compass? appeared first on The Prepper Journal.


from The Prepper Journal
Don't forget to visit the store and pick up some gear at The COR Outfitters. How prepared are you for emergencies?
#SurvivalFirestarter #SurvivalBugOutBackpack #PrepperSurvivalPack #SHTFGear #SHTFBag

7 Ways We’ve Lost Control Of What We Eat

My great-grandfather lived to be ninety-nine years old and he grew up on a farm. He was born on a farm, and that’s what he did his entire life.

He ate wholesome foods and his family was completely self-sufficient. They had protein, dairy, eggs, vegetables, even fruit trees, and there wasn’t an artificial drop in it. There were no pesticides or preservatives. So what happened? How did we lose control of what we eat?

It didn’t happen overnight literally, but when you look at it historically, it kind of did. For thousands of years, we ate basically the same. Sure, we learned some things about hygiene and sea trade made it possible to transport herbs and spices, but it was all done the natural way.

Then BAM! The industrial revolution hit. We had electric refrigerators and freezers, and machinery that could process food on a commercial level. Farmland was covered in asphalt and most of us learned to survive in a city but forgot how to obtain the basic necessities on our own.

Suddenly, we were being fed instead of eating.

And it isn’t getting any better.

Now the food industry has learned to manipulate us to make us buy their foods, and we buy right into it. Well today, I’m gonna share some of the ways that they get  in our heads, and show you exactly how much we’ve lost control over what we eat.

Placement

Everybody knows that location is everything. And so it is with food, too. Have you ever noticed that the aisles in the grocery store – the place where all of the processed stuff resides, is situated literally front and center, while fresh produce and meat are at the far reaches – the outside perimeter. They make you work for the good stuff.

Then when you wade into the aisles, the most expensive foods are typically easy to reach. How often do you have to bend over or stretch when you’re at the grocery store? Hardly ever, unless you’re going to bend down for the least expensive stuff, which isn’t any better for you than the brand names.

Commercials

Then of course there’s all of the TV that we watch. Another example of prime real estate – right in front of your face. They use words such as fresh, delicious ingredients to describe foods that are packaged and packed with preservatives and artificial additives and preservatives.

How many times have you seen a commercial for a pizza or a burger that looks absolutely amazing – the pizza is steaming and has a crispy crust and stringy, mouthwatering cheese, and the burger is fat with fresh toppings and melted cheese.

And does it look like that when you buy it, bring it home, and cook it? Not usually, no.

Playing on Emotions

The food industry knows who their target audience is and how to play to them.

Moms want family time, or alone time, or just any kind of time, so if moms are the target audience, that’s what the company is going to focus on. They’ll use clever advertising that portrays families together having a great time, or sitting down together for a meal that brings family time back to front and center.

In reality, our live are hectic. Everybody works or goes to school, then comes home and tries to catch up on housework, homework, yardwork, and all of the other little details. There doesn’t seem to be time for family, no matter how badly we want it. And they know that. Buy their food, and you’ll be sitting around the table.

And what about the weight loss foods? Eat or drink this ridiculously expensive, pre-made food and you’ll be skinny, young, and beautiful. It doesn’t matter that some of the ingredients come with warning labels that sound a whole lot more dangerous than those extra ten pounds will ever be. You won’t see a single one of them telling you to eat fresh foods and exercise.

Kids

Ah, there are two things that a parent loves – making their kids happy, and making them quiet. If you notice, kids’ programs are packed with commercials for cold cereal, mini pizza dishes, and junk food. That’s not an accident.

Kids are a tremendous part of the consumer pool, especially when you combine convenience with putting a smile on that grubby little face as they dig that five-cent toy out of the five-dollar box of sugary cereal.

Confusing Advertising

There are so many confusing terms that food corporations use to make their food sound delicious, nutritious, and healthy, but when it comes right down to it, many of them are snake-oil salesmen. They can’t outright lie to you, but that doesn’t mean that they can’t use the truth to their advantage and downplay the disadvantages.

For instance, they can say “made from natural ingredients”. That makes it sound nutritious doesn’t it?

Well, sure the fruit bar is about ten percent REAL fruit juice (reconstituted from concentrate), but it’s also packed full of sugar, artificial flavors and colors, and chemical preservatives. But it is made from natural ingredients. Strawberries and raspberries are natural.

Conveniently Placed Fast Food

How many fast food restaurants are there at the end of highway exits, along major streets, and near schools and universities? Ever seen a grocery store at the end of an exit, front and center, inviting you to come in and buy some fruit? Yeah. Enough said.

This is possibly the easiest trick to fall for, because it’s a huge struggle living up to the impossible standards placed upon parents to work full time jobs, keep the house, go to PTA meetings, and get the kids to at least three different sports and clubs per week ON TIME.

McDonalds is sooo much easier than being that mom who walks in ten minutes after the PTA meeting has started.

The thing is, you can shave off a lot of that time if you just take back a bit of control. Even if it’s just making a huge pot of spaghetti sauce and canning or freezing the extra so that you don’t have to buy store-bought that’s expensive and full of chemicals.

Last-Minute Impulse Buys

Ever stood in a grocery store or convenience store checkout line that wasn’t a cornucopia of soda, gum, mints, candy bars and packs of crackers and cookies? That’s because last-minute impulse buys are a huge percentage of sales for those products. Admit it – you’ve grabbed a candy bar or a Coke while you were waiting, haven’t you? See? They gotcha hook, line, and sinker.

Be Aware

When was the last time you saw a commercial for green peppers or apples? Or organic steak? For that matter, have you seen a single one that encourages you to actually GROW your own food? Yeah, I can’t remember ever seeing one either. That’s because healthy, wholesome foods already hold the stage; it’s the processed food companies that have to convince you that their food is better. And they’re doing an amazing job of it. After all, what’s in YOUR pantry and freezer?

Now that you know some of the tricks, you can play closer attention to what you buy. Hopefully, I’ve given you something to think about; it’s time to take back our lives and our kitchens.

If you’re looking for ways to do that, I’ve written a guide to help you get started. It’s called Forgotten Lessons of Yesterday, and I share a diverse collection of my experiences that range from canning vegetables to butchering your own meat.

I even threw in some great recipes, and it comes with five free guides that expand even further on topics that we all need to know in order to take our lives back.

Check it out!

This article has been written by Theresa Crouse for Survivopedia.


from Survivopedia
Don't forget to visit the store and pick up some gear at The COR Outfitters. How prepared are you for emergencies?
#SurvivalFirestarter #SurvivalBugOutBackpack #PrepperSurvivalPack #SHTFGear #SHTFBag

Thursday, July 27, 2017

What is Your Prepper Resume?

Written by Guest Contributor on The Prepper Journal.

Editor’s Note: Another contribution from Xavier, much appreciated. 


After the SHTF and it stops falling from the sky and you’re alone, where will you go? Will you be a lone wolf or a member of a community of friends? What is your backup plan if you need to join a community of strangers? What will you bring to the table? How can you convince a group to take you on as a member? How do you sell yourself? Most preppers think about hoarding supplies, bugging in, and riding out the storm in their basement; but the fact is, accumulated skills are more important than what you can carry with you in a backpack. Not to mention, the chance of survival in groups can be multitudes higher than trying to go solo. There are a myriad of skills that are helpful in our current world, but if we’re in a world WROL, certain skills stand out, presenting value in a long-term survival situation.

Let’s discuss an obvious one first: marksmanship. Proficiency with a rifle, pistol or shotgun are important for community defense and hunting. This is a cornerstone of most preppers’ repertoire, and while definitely a skill to not ignore, it simply doesn’t stand out when petitioning to join a community. More likely than not, this role is already filled by some of the existing members. However, if you contain a high aptitude such as long range shooting, or you’re carrying a rare weapon such as an automatic machine gun, you carry more value. This isn’t to say you shouldn’t develop your marksmanship, but you’d better bring your A-game if you want to impress the survivalist community. If you don’t have any experience in this area, here’s how to start: go buy a .22LR rifle and get to the range in your area. .22 is cheap to shoot and won’t bruise your shoulder with recoil. I’m partial to the Ruger 10/22, it was my first gun. Practice progressively from 10 meters up to 100 meters. Focus on your breathing and trigger pulls. Be in control. Next, grab a .22lr pistol, it’ll use the same ammo from your rifle making logistics simpler. Practice from 3 meters out to about 10 meters. Again, focus on your breathing and trigger control. Now buy a 12 or 20-gauge shotgun along with a bunch of bird shot (#7 – #9) and go to a range and shoot a trap course. If you’ve done these three things and consider yourself proficient, I won’t have to tell you what to do next, you’ll know.

If you’re particularly adept at harvesting and gardening, you have more value than the average Joe. The majority of American’s experience gardening is an herb set they keep in their windowsill. The clear majority are clueless when it comes to growing a backyard tomato garden. Knowing when to plant, when to harvest, and which plants complement each other is of great value for a long-term survival situation. I’d estimate that more often than not, preppers have at least dabbled in this area and therefore you’d really have to set yourself apart to showcase value. One way to do so is to show an ability to handle livestock or even raise chickens. Fewer preppers have had the opportunity to raise live animals. This is an excellent way to demonstrate worth. If you’re green in this area, start small and work up progressively. Grow some potted basil, mint, or other herbs in your windowsill. If you’ve got the space, plant a few low maintenance vegetables. You’ll maybe have more success buying pre-planted pots and transferring them, but you can be successful on your first try with seed, I was. Easy varieties could include cucumbers or tomatoes. Learn about the climate in your area, frost dates, and soil mixtures for your chosen veggie. Find out the do’s and dont’s of watering plants, if and how you should prune your plants, and how to harvest. Find out which plants go well together, and which can’t be planted in the same place in subsequent years. What kind of fertilizer should you be using, Epsom salt or egg shells? If you don’t have space at your apartment, find a community garden, or grow indoors with an aquaponic system. Learn now, or be hungry later.

Household skills such as cooking, cleaning, mending, etc. aren’t particularly flashy skills to have, but they are the lifeblood of a camp, second only to perimeter security. It’s the monotonous day to day tasks that keep things running, and it’s a task that often rotated among members of a group, perhaps taking them away from a skill they’re more adept at. Peeling potatoes or replacing buttons on a jacket won’t make you stand out, but having minimal skills in this area demonstrate that you won’t be a complete burden to the community and can contribute a warm body to the day to day mundane tasks. If you’re an adult and don’t have basic skills in this area, re-evaluate your entire lifestyle, now! Enroll in a cooking class, join a sewing club, and practice at home. Understand that while you may do all of these tasks now, after the crash there will be additional challenges and inconveniences. There will be no washer and dryer to just throw your clothes in and select a spin cycle, and likely no running water at all. You’ll be cooking over an open flame, and it’ll be orange, not blue. How will you spice up a dish that you and your family have eaten for the past four days in a row to make it more palpable, especially with kids?

Can you re-purpose torn jeans into something useful? How about curing meats or canning food for less prosperous months? Do you know how to make candles and soap? Get these skills under your belt sooner rather than later.

Medical skills don’t even need to be presented here as an encouragement to augment your skill set. Skills encompassing first aid such as CPR, basic wound care, trauma wound care, emergency pharmaceutical treatment should be within the capability of any long-term survival camp. Knowing how to place emergency sutures or inserting an airway on an unconscious patient are lifesaving techniques. The knowledge of how to place a tourniquet, control a fever or reduce inflammation are essential skills. Even something as simple as a bug bite or small cut can become deadly or debilitating if not treated properly. Start at the local Red-Cross, they offer many free classes. CPR and first aid being first in your arsenal of medical skills. See if there is a CERT program active in your area, as they offer additional skills relating to disaster relief such as trauma care and triaging procedures. Find a pharmacy technician course, a phlebotomy course; enroll in a nursing program. They’re not cheap, but often value can’t be accurately measured in fiat currency. You’ll hopefully learn the difference between many common painkillers, some drug interactions to avoid, how to start an IV, and how to place sutures, among other awesome skills. If you can find an EMT level 1 course in your area, take it! Being highly proficient with medical skills would almost guarantee you a place in the ranks.

Being good with your hands with mechanical or handyman skills will serve you well in long term survival situations. Keeping small machinery running such as generators, motorcycles, quads, and larger diesel tractors should be an easy sell for a community lacking in such a person, but two is one and one is none. Knowing how to construct or repair buildings, build solar generators or properly put up a fence can make all the difference in not only comfort, but survival. Don’t kid yourself about your own abilities when it hits the fan, but putting up picture frames on the wall or putting together Ikea furniture isn’t going to cut it. This is a broad subject to jump into, so find something that interests you. Build a small solar farm at your house and use it to power your entertainment system and charge your electronics, or as a backup on your fridge in case your grid power is lost. Build a custom frame for your solar panels out of wood. Construct raised beds for a garden in your backyard. Run plumbing for that new garden you’re building, and a rain collection and water filtration system while you’re at it.

Change the oil in your car, and rotate the tires yourself. Brakes squealing? Change your pads and perhaps the rotors. Get your hands dirty. You’ll appreciate the callouses later.

Those practiced at communications hold an often undervalued position in a WROL situation. Communications include both those with skills around radio communication such as HAM, CB, and GMRS, but also those who have proficiency in a foreign language. This latter skill, is often overlooked and can prove extremely valuable for processing information discovered via the former. Those listening to shortwave or HAM radio months after a collapse may receive broadcasts in a language other than English. Encountering other groups after the fall can lead to potential conflict if there isn’t a mutual understanding between the two groups. This is particularly important if the camp is proximate to a border. Examples would be those groups near the southern border of the United States having a Spanish speaker among them, and those near the northern border having a French speaker. If you studied some Spanish or French in high school, start brushing up on it now. If not, enroll in a class at your local community college, or there are even free online courses. Pick a language that will be likely to have value in your area or that are likely to be encountered. Spanish, French, Chinese(Mandarin), Arabic, and Russian are common additional languages to adopt that can be put into play when listening to international radio; all of them (plus English), being the official languages adopted by the United Nations. For radio communications, grab a CB radio and take it with you in the car and practice. See how far the waves travel on the open road vs in a city, and what antenna positions give you a better signal. Grab FRS radios and learn the limitations of these types of radios as you play in the park with your kids. Getting your Amateur Radio technician class and general class will open up a whole world for you. Learn Morse code. Information is power. Redundancy in all skill sets is mandatory for survival of a community. Any downtime of members in an organization should be spent cross-training in other areas to make the group more well-rounded and resilient in case of a catastrophe. While the Internet and YouTube are still around, soak in as much information as you can, as this resource won’t be around when you need it after the crash.

More important than passively learning, is applying it in practice. Learn from mistakes now while you have a safety net. Consider building yourself a prepper library, with books on these skills mentioned, and more. They’ll survive an EMP, can help fill in the gaps in knowledge and make passing on skills to new members simpler. Never stop improving yourself in case you find yourself sitting for an interview to survive.

The post What is Your Prepper Resume? appeared first on The Prepper Journal.


from The Prepper Journal
Don't forget to visit the store and pick up some gear at The COR Outfitters. How prepared are you for emergencies?
#SurvivalFirestarter #SurvivalBugOutBackpack #PrepperSurvivalPack #SHTFGear #SHTFBag

Prepper’s Guide To Cleaning The Glock 27 Subcompact

Some would say that Glock is America’s handgun, since you can find almost everywhere, from Police forces to Hollywood movie makers (do you remember Die Hard?) It’s small, potent and effective, which makes it perfect for a concealed carry.

But only if you clean and maintain it.

This short guide will show you how to do it, if your Glock is a 27 Subcompact.

The Glock 27 is a backup subcompact pistol that was specifically designed for concealed carry, and delivers the same safety and reliability as any full size Glock. As with any other pistol, it must be cleaned and lubricated on a routine basis in order to keep it in good working condition.

Cleaning and lubricating removes bullet and powder residue from the action, slide and barrel, and rails. This process also gives you a chance to spot and Gage mechanical wear as well as make replacements for worn parts in a timely manner.

Click here to get your Green Beret’s Guide to combat shooting mastery & active shooter defense!

Simple Wipe Down

It is to your advantage to clean your firearms immediately after firing them. Wiping down all exterior metal parts of the pistol removes oils deposited by your fingers, as well as powder residue that can cause the metal to start rusting.

Ideally, you should do a simple wipe down before you leave the range, and as soon as you are done firing the gun.

Standard Cleaning for the Glock 27

As with cleaning any other gun, make sure you have all your cleaning supplies on hand. Work in an area where you have good ventilation, and where you will not be disturbed.

WARNING: Make sure the gun is unloaded before you start cleaning!!!

Start by pointing the pistol in a direction where you will not hit a living thing or something of value if the gun fires. Next, remove the magazine and rack the slide back, and look carefully to see if there is a round in the chamber. If you see a round, remove it.

You must always remove the magazine before checking the chamber, otherwise racking the slide will cause a round to go into the chamber.

With the magazine still out of the well, lock the slide back and look to see if the gun is cleared of ammo and safe to work on. Insert your little finger into the chamber to check the bolt face, chamber and the magazine well to make sure the pistol has been cleared and made safe.

To complete this process, dry fire the Glock 27 while pointing in a safe direction. Once again, rack the slide to return it into battery and to close the action. Give one final check to make sure the chamber is clear.

While the slide is still in battery, pull the trigger while pointing the gun in a safe direction. You will feel and hear a click as the firing pin moves forward. To remove the slide, the trigger must be in its rearward position.

How to Disassemble the Pistol

The Glock 27 has 4 main components: the guide rod/recoil spring assembly, barrel, slide, and frame/receiver. The disassembly process will break the gun down into these main units.

After you have determined that the pistol is unloaded and safe, grasp the pistol in your right hand with your thumb under the slide and your fingers over the top of the rear part of the slide.

Pull back approximately 1/4”. Pull down on the slide lock by grasping it on both sides with your thumb and finger.

Pull down on the slide lock while releasing the slide forward. Be careful not to let the slide fall off onto a hard surface that could damage the guide ring.

Remove the slide and take the recoil spring assembly out, then remove the barrel. You now have the Glock 27 pistol in the field stripped condition.

How to Clean the Barrel

  1. Wet a clean cleaning patch with gun cleaner or solvent. Thread this patch through the slotted tip of the cleaning rod. Insert the cleaning rod (patch end first) into the breech end of the barrel to clean the chamber and bore. Keep pushing the cleaning rod down the barrel until the patch exits the muzzle. Next, pull the cleaning rod back through the barrel until it comes out of the chamber and breech. Work the wet patch 5 or 6 times through the entire barrel.
  2. Remove the patch from the cleaning rod and attach a brass bore brush. Insert the rod into the barrel, brush end first. Go from the breech or chamber side and scrub the entire bore. Keep scrubbing vigorously until the bore looks clean and appears bright under a strong light.
  3. Use some more solvent to dampen the larger side of a two ended cleaning brush. Scrub off any carbon deposits that may have built up on the feed ramp and barrel hood.
  4. Take a rag dampened with solvent and wipe down the outside of the barrel.
  5. Use some dry patches to dry out the bore. Keep swabbing the bore with dry patches until they come out clean and dry.
  6. Finish cleaning the barrel by taking an additional dry patch and wipe down the outside of the barrel with it.

How to Clean the Slide

WARNING!! Work carefully and do not allow lubricants or solvents into the firing pin channel. Any lubricant or solvent in this area can cause the weapon to malfunction.

  1. With the muzzle facing downward, hold the slide vertically. Clean the extractor, the area round the extractor, and breach face with a two sided brush.
  2. Use a fresh cotton swab clean inside the slide and the slide rail cuts. Keep doing this until a fresh cotton swab comes out clean.
  3. Use a damp rag, or a patch slightly dampened with solvent to clean the inside and underside of the slide. The wide end of a scrubbing brush will also work for scrubbing inside the slide.
  4. For the slide rail cuts, use the smaller end of the two sided brush. Be sure it is dampened with solvent. Continue scrubbing until the slide rail cuts are clean.
  5. Take a clean, dry patch and wipe down the inside of the slide rails and slide.

Cleaning the Receiver

Remove carbon deposits from the locking block on the receiver and metal contact points with the wide end of the cleaning brush. You may or may not need to use solvent, but if you do, remember to wipe off excess solvent with a dry rag.

Brush out any debris or remaining unburned gunpowder that may still be left in the receiver with the wide end of the cleaning brush. Wipe the trigger bar, locking block, cruciform, connector, and the ejector until they are clean.

Inspect the Glock’s main components and function check. With every standard cleaning it is a good idea to take the time to inspect and function check the Glock’s main components. This is best done with the Glock disassembled in its 4 main component parts.

WARNING: If your Glock does not pass the following tests, do not try to put it back together again or fire it. At this point, you need to send it back to Glock, or have it inspected and possibly repaired by a certified Glock armorer.

Here are the components that should be inspected.

Barrel: look for lead deposits, dirt, obstructions, bulges, or cracks.

Firing pin and firing pin safety: (test has 4 parts.)

  1. Start off by removing the barrel and recoil spring assembly. Hold the slide so that the inside is facing up. Pull the firing pin lug to the rear and ease forward until it stops. Don’t allow the firing pin to snap forward as it hits the firing pin safety. Next, move the firing pin lug forward toward the muzzle. The firing pin lug should not go past the firing pin safety. As you look at the breech face of the slide, the firing pin lug should not extend through the firing pin hole.
  2. Hold the slide with the muzzle facing down. Press in on the firing pin safety button in the slide’s interior. The firing pin should move down, with the tip slipping through the firing pin hole in the breech face.
  3. Retract the firing pin so that it is back in the slide. While the muzzle is facing downard, vigorously rack the slide. The firing pin should be stopped from going through the breech face by the firing pin safety.
  4. Use your fingertips to depress the firing pin safety button while shaking the slide from one end to the other. You should be able to hear the firing pin as it moves freely within the firing pin channel. If you do not feel or hear the firing pin move, it may mean that the firing pin might be broken, or the firing pin and its channel may be blocked or caked with debris. Both these situations require inspection by a certified Glock armorer.

Extractor: Look a the extractor on the breech face of the slide to make sure it is clean. You should also make sure there are no chips or breaks on the extractor claw.

Ejector: You will find the ejector protruding forward from the left rear of the frame or the receiver. The ejector must be clean and free of cracks, breaks, or other signs of damage.

Slide stop and lever test: Start by gripping the receiver with your dominant hand. Pull up on the slide stop lever with the thumb and index finger of your other hand. The slide should snap sharply down into the frame. If it doesn’t, have the pistol check over by a Glock armorer.

How to Lubricate the Pistol

Lubricate the Glock using a good quality rust protective oil or lubricant. To do the job right it should only take six drops of oil. Any more than this will be to much and can cause dirt and other contamination problems.

Slide: Hold the slide so that the slide rail cuts are facing up, and the end of the muzzle is facing a bit down. Take a lubricant applicator and drag one drop of lubricant down the whole length of each rail cut. Use another for the front inside of the slide where it rubs against the upper part of the barrel.

Barrel: Wipe down the exterior of the barrel with an oiled cleaning patch. Put another drop of oil on the outside of the barrel, and the rear side of the barrel lug with a lubricant applicator.

Receiver/Frame: Hold the receiver in your dominant hand so that the left side is facing down. Put one drop of oil on the curved, upper extension of the connector, and another at the right rear corner of the receiver/frame. Look for the area on the connector where it touches the back of the trigger bar.

How to Reassemble the Glock 27 and Do a Function Test

There are a few steps to follow in order to reassemble and test your pistol:

  1. Reverse the steps you used to disassemble the pistol.
  2. To function test the pistol, start off by making sure the pistol is unloaded and pointed in a safe direction.
  3. Slide cycling: Rack the slide back several times. It should move smoothly and freely.
  4. Trigger function: Pull the trigger to the rear to make sure it works. Don’t forget to keep the gun aimed in a safe direction.
  5. Trigger reset: Rack the slide, which will return the pistol to battery and also reset the trigger. The trigger should be in its cocked, forward position. Pull the trigger and listen for the sound of the firing pin falling. Pull the slide back as far as it can go and release it. Release the trigger after the slide snaps forward into battery. At this point, the trigger should be cocked forward.
  6. Trigger Safety: You will find the safety partly within and to the front of the trigger. Make sure the pistol is pointed in a safe direction, and grasp the sides of the trigger. Do not depress or touch the trigger safety. If the trigger safety is working correctly, the trigger will not move to the rear and release the firing pin; and the safety will remain engaged.
  7. Pistol inspection: The outer parts of the Glock 27 should be free of corrosion, dirt, rust, and any signs of damage. Don’t forget to make sure the sights are aligned properly, clean, and free of damage. https://www.youtube.com/watch?v=oV0wDDFV0NY
  8. Check over all the magazines to make sure they are working properly. Use the slide open test for this. While the pistol is in battery, insert an empty magazine. Pull the slide back until it locks open. Remove the magazine and repeat with all other magazines that you have. If a magazine is broken or defective, the slide will not lock open.
  9. After all cleaning, lubricating, and function testing is completed. Wipe down all of the Glock’s exterior surfaces to remove excess lubricant.

Deep Cleaning the Glock 27

Any firearm that is fired a lot will require deep cleaning (total disassembly, thorough cleaning, and lubrication). If you are not sure how to do it, contact a qualified gunsmith to help you out with this and inspecting the parts.

Since the Glock 27 has looser tolerances than several other weapons on the market, it does not require deep cleaning as often. But you should still do a deep cleaning:

  1. After shooting 1000 plus rounds of cheap dirty ammunition.
  2. If the pistol has fallen into salt or dirty fresh water.
  3. If the pistol has not been fired or not given a standard cleaning for over two years.

In addition, if your Glock 27 does any of the following, then it needs a deep cleaning:

  1. Misfires when trigger is pulled.
  2. Failure to feed ammunition.
  3. Failure to eject fired brass.
  4. Pistol very dirty inside and out.

Insofar as cost, a local gunsmith might charge you from $75.00 and up plus the cost of parts and hand fitting to deep clean and inspect the Glock 27. At this time, Glock customer service is mainly for warranty issues only.

Before starting on any deep cleaning and inspections, always be sure that the Glock 27 pistol is unloaded and safe to be handled.

Disassemble the pistol into its four main component parts: slide, barrel, guide rod/recoil spring assembly, and frame/receiver. The instructions are in the Glock standard cleaning section above. You now have your Glock in the field stripped condition.

Disassembing the Upper

  1. You will need a Glock armorer’s tool to remove the slide cover plate by pushing the firing pin spacer sleeve down. This will put the spacer sleeve in the unlocked position on the slide cover. Now you can push the slide cover plate off with your thumb.
  2. Remove the firing pin assembly and extractor depressor plunger.
  3. Remove the extractor last. The extractor will drop out when you push down on the firing pin safety.
  4. Now remove the firing pin safety.

Disassembling the Receiver

  1. Start off by removing the locking pin. You can remove the pin in either direction. Just remember, when you reassemble the pistol, this pin must be reinstalled first.
  2. Remove the the trigger pin. Move the slide stop lever or jiggle it to the front and rear of the receiver while pushing on the trigger pin with the armorer’s tool from the left to the right.
  3. After removing the trigger pin, remove the slide stop lever from the receiver.
  4. Remove the locking block. Place the armorer’s tool under the locking block and pry upward. Upon reassembly, the locking block will only fit back in one way.
  5. After you push out the trigger mechanism housing pin, which is located on the backstrap, pull the ejector assembly up and lift out the trigger group.
  6. To remove the slide lock lever. Turn the receiver on its side. Push downward on the slide lock lever spring to release the slide lock lever. The slide lock lever will drop out of the receiver.

Deep Cleaning and Inspection of All Parts of the Glock

  1. Now that the Glock is totally disassembled, go ahead and clean all the parts of the pistol. The goal of this cleaning is to remove all the dirt and grime, old lubricants, and anything else that does not belong there.
  2. While you are cleaning the parts, make sure they are all in good condition and within set standard for each part. If a part is worn, broken, or damaged, it should be replaced at this time.
  3. After the deep cleaning and inspecting, go ahead and reassemble your Glock.

Reassembling Your Glock Upper

To reassemble your Glock upper, reverse the disassembly steps, and be sure not to over lubricate the Glock upper. Follow the testing procedure in the Glock standard cleaning section above dealing with which parts need testing and how to test them properly. When finished set the upper aside.

Reassembling the Receiver

To reassemble your Glock receiver, reverse the disassembly steps, with the exception of the order installing the locking block pin. Remember, the spring on the slide stop lever must always be under the locking block pin. If you get this part confused, the gun will only fire a single shot, and then the slide will lock back after each shot.

The next pin to be installed is the trigger pin, and then, finally, the trigger housing mechanism housing pin located in the backstrap.

Video first seen on Humans4Targets.

 How to Reassemble Your Glock

  1. Lubricate as directed in lubrication points in the standard cleaning section above.
  2. Set the upper on the receiver, pull the upper backwards all the way back, and release. This locks the upper and the receiver together.
  3. Function test the Glock, also as noted above in the standard cleaning section.
  4. After the Glock has passed all of the function tests, it can be fired again.

Keep your Glock 27 pistol clean and functioning correctly. While this handgun does not require quite as much cleaning a some other pistols, it must still be cleaned and lubricated on a routine basis.

If you cannot do this job yourself, do not hesitate to work with a local gunsmith. Your guns will keep you safe when nobody else will. Keep them close and ready, and practice your shooting skills, learning from the best in the branch! Click the banner below for more!


This article has been written by Fred Tyrell for Survivopedia.

Further Reading

https://www.pewpewtactical.com/glock-disassembly-cleaning-assembly (for standard cleaning)


from Survivopedia
Don't forget to visit the store and pick up some gear at The COR Outfitters. How prepared are you for emergencies?
#SurvivalFirestarter #SurvivalBugOutBackpack #PrepperSurvivalPack #SHTFGear #SHTFBag

Wednesday, July 26, 2017

Selecting Crops for Survival Gardens

Written by R. Ann Parris on The Prepper Journal.

 Editor’s Note: Another outstanding entry from one of our regular and trusted contributors to The Prepper Journal. And, as always, if you have information for Preppers that you would like to share and possibly win a $300 Amazon Gift Card to purchase your own prepping supplies, enter today.

Whether it’s a survival garden or a small-space hobby plot and pots, the concept of producing “high value” crops periodically comes up. That term can be a little bit of a moving target, with a number of variables factoring in. Our growing season, desire for calories or balancing our stored staples with vitamin-rich foods, the amount of space we have in our plots or pots, the neediness of various plants, and other aspects all come into consideration. In an entirely different vein, we might highly value crops like teff (Williams’ lovegrass), yams, amaranth, and some of the perennials and wild edibles because they look less like a food item to most of the country, regardless of effort or yield-per-acre, or because they’re extremely drought or cold tolerant. However, we define value, we want to get the most for our efforts.

Most Common Factors in “Value”


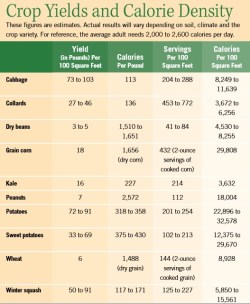
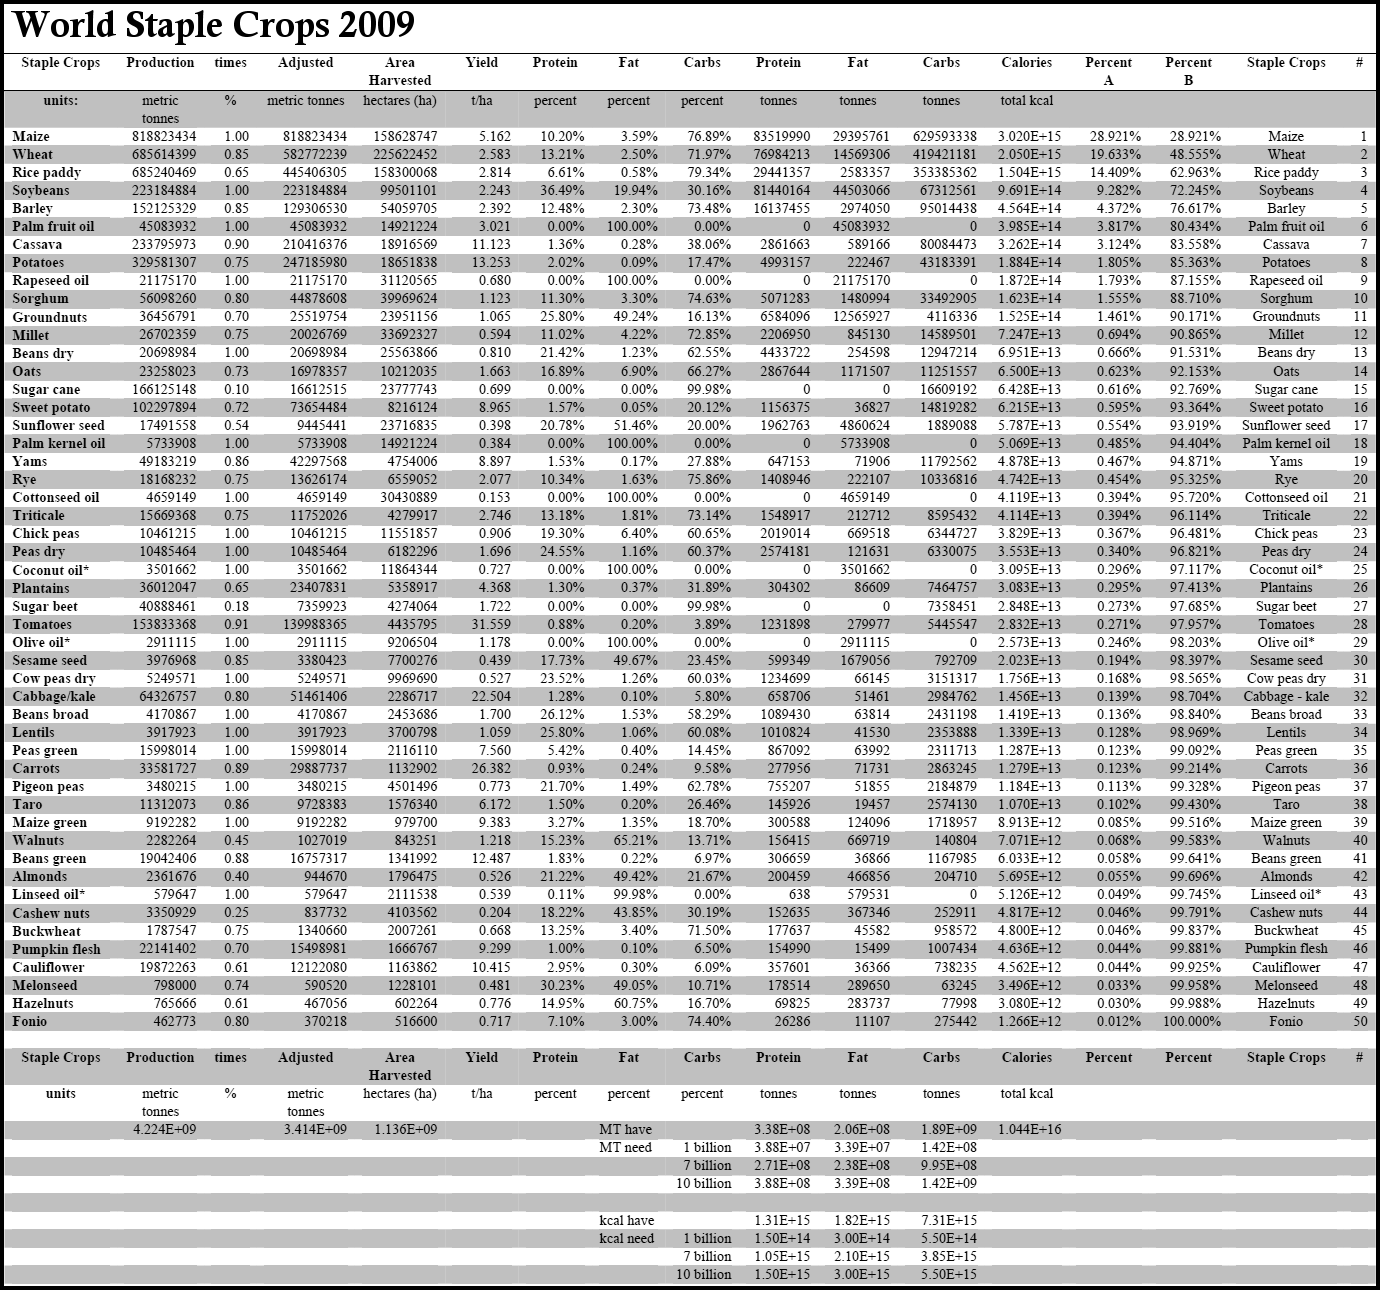
One of the primary factors in value for survival growers is the calorie density – per plant or per space or per week http://www.gardeningplaces.com/articles/charts/World-Staple-Crops-2009.png. Value is also seen as the total bulk for filling bellies by square foot or week, with calories only a secondary or tertiary concern. There’s also a current-cash-value or equivalent-to-cash-value that might come into play.

Staples like wheat, corn or potatoes all have significant calories per square foot or acre, and in the case of potatoes, per plant. Protein from crops versus livestock – and livestock’s feed needs – also merits consideration, large scale or backyard or condo/apartment dweller. Rabbits are quiet, cheap to feed, and need little space, but if we have the land, the protein and calorie boosts from eating closer to the bottom of the food chain may be more attractive.

Yellow squash and tomatoes can yield incredible amounts per plant. Cut-and-come-again salads can also yield enormous bulk over their cool seasons. However, they contribute little in the way of calories, and their value as a belly filler is limited by the fact that they really don’t keep you feeling full long the way high-fiber whole grains and proteins do.

Cash value might be split along the exact same lines – what can fill our bellies, for the price of seed or starts, or can eliminate buying the calorie staples in our diets. However, cash value is usually looking more at the price the crops can be purchased for or sold for instead of their nutrient or calorie yields.

Our calorie staples are some of the cheapest things in the supermarket. There’s a reason beans, rice and wheat are staples in low-budget diets, and why we see so much oatmeal, rice, and noodles in prepared storage foods.

If we’re augmenting calorie-dense foods that are stocked wide and deep in our pantries, our choices will be different than if we were truly trying to become self-sufficient and produce our staple beans and grains.


Space & Season Constraints

Our land space also affects just how reasonable an effort it would be to devote portions to those beans and grains, compared to storing the staples and growing vitamins and minerals to go along with them. The value we place on different crops changes the less we have, as well as where our soil is located.

Even a small suburban or urban gardener might be able to plant a 10 x 100’ stretch of wheat or barley that will yield 40-50 pounds off 6-8 pounds of seed.

With only windows and balconies or patios, a lot of the staple grains and even the dry beans for storage come off the table due to both the soil footprint they occupy and the amount of time they’ll need that soil. They’d do better to focus on storing the staples and growing either fast crops that can be quickly rotated and yield reasonable amounts even in a small space, or indeterminate tomatoes and summer squashes that offer the same regular, constant yields over a long period.

To get the same amount of staple crops as I do in my USDA Zone 7 with its seven frost-free months, a cold-climate grower needs to put more land into production than I do.

I can rotate even two long-growing crops into the same fields, pots and beds over the season, after and before additional cool-season crops. Somebody with 3-5 frost-free (or freeze-free) months has only the potential of greens, beets, radishes and turnips ahead of and behind their single main “warm” crop.

If that cold-climate grower doesn’t have the ability to start peppers and tomatoes indoors and has limited cold frames or greenhouse space, they might skip them entirely, or go for a much smaller, determinate variety and prune it to a single stalk very early in the season. They’d also potentially skip sweet potatoes and corn in favor of a Russian potato, barley or rye.

Because of our seasons, and the amount of space we have or would need to impact our food supply, the crops we value most – for their reliability and for their impact to calories, nutrients and “treats” – change.

Likewise, a small-space grower may eschew a long-growing plant like broccoli with one primary head and some smaller shoots or a ball cabbage in favor of the half-a-dozen or more Oriental cabbages they can produce in the same space and half to two-thirds the time.

Knowing the yields we can expect – tracked from our own properties and methods, not just the averages some put together http://www.ufseeds.com/Crop-Calculators.html — can help us significantly in deciding what crops hold the most value, and where we want to focus our storage versus our production.


Image: Neediness like cold sensitivity, high water & nutrient needs, and pest and disease inclined plants such as tomatoes, squash and sweet potatoes can affect how “valuable” a crop is compared to hardier veggies, grains or beans.

Other Factors – Health & Inputs

The effort we’re going to have to put into our crops can also change the value, and what we consider valuable for now and us, or for others and “after”.

Crops that are nutrient hungry, water intensive, and-or labor intensive might not be a great idea for our hand-cultivated garden in a busy life. The reverse is that those crops already or will have a higher trade or “treat” value than easy basics.

For some areas, potatoes and sweet potatoes are relatively easy to carry over through the winter, then start for “slips” that will be transferred to the garden or “calloused” into seed potatoes that are planted. For some areas, however, cellars are out of the question and it’s tougher to get those tubers and roots through the winter. Their value as an easy-handling staple or as a special treat vary by location.

Similarly, crops like tomatoes that need specific processes to collect their seeds and then tend to be potted inside and transplanted up, then out, could be considered high-labor. Carrots and cabbages that need a two-year cycle to produce seed would be considered needy in regards to the space they’re going to occupy so we can collect seeds to re-plant again.

Crops that are susceptible to pests and diseases, or that need regular weekly pruning would be considered either high labor or high input, especially if we have to stock the cures because we don’t have any natural production methods or plants that can prevent or cure the diseases. Tomatoes fall into that category, too, as do many of the most common North American tree fruits like plums, peaches and even some of the apple species.

In some definitions, the effort increases their value. However, on a survival level, they’d drop in value due to all the effort they require during a period we’re presumably already pretty tapped out.


Storage Considerations

Given our busy lives now and the labor we can expect in a disaster, we might also assign a high value to crops that go right from field to rack or bin or cellar instead of needing to be processed for storage or consumed quickly.

This can be seen in the difference in counter top/shed and fridge/cellar shelf lives of cut leaf lettuce, a melon or soft-skinned pattypan squash or zucchini, and cabbage or thick-skinned autumn squashes.

Softer, early-season, sweet-fleshed apples that will store for a few weeks or so straight off a tree have value in immediate foods and nice “to go” food value. They’ll sit somewhere – anywhere – a lot longer than peaches, berries or plums.

However, we will be processing them for drying, cider, or canning relatively soon, and typically during a very busy agricultural season that is racing our needs to replenish winter heating and cooking fuels, and the need to take advantage of summer and early autumn fishing, hunting and livestock harvesting.

With that kind of rush, we might place a great deal of value on one of the hard cider, baking or heirloom apples specifically meant to sit somewhere for months that we can harvest, inspect, crate, and stack in underground pits or our crawlspace or cellar, then come back to for additional processing after frosts, ice or snow have killed off some of their time competitors.


Image: Crops that need minimal processing for storage may gain in value. 

It can also be seen in the different processing effort and time needed for the calorie-base beans and grains.

Starchy flour and popcorn corns take some work to husk. It’s a different type of labor than threshing wheat or oats. Hull-less and beardless grains, pseudo-grains like amaranth and quinoa that either rinse or only need winnowed, and beans or field peas that are readily separated from dry hulls all take far less work than heirloom North American grains.

Those in turn take a lot less labor and-or inputs like water for processing than some of the African grains like millet and teff, although other factors may make the more labor-intensive processing more attractive, since there’s a flood-resistant millet for pretty much every single soil and teff is one of the fastest grains, grows well even on played-out soils, and also makes good hay.

Teff is also one of the few grains that will handle a fast-pass graze that leaves 4-8” of stalk without any impact to its grain yield later. If we have livestock, especially birds, those hard round grains won’t be getting milled at all, or will only need cracked or to be sprouted, so the labor we’re going to put in post-harvest becomes partly or entirely nullified.


Image: The inclusion of small livestock in our survival garden can change the labor and input needs of crops, while creating a different set of needs and yields.

Factoring Value

There is no one be-all list of high-value crops, because we’re all different. There is only one constant, one-size-fits-all rule when it comes to producing food – get started.

Space, time, effort, season length, and plant neediness all affect which crops have the most value for us. Our growing style(s) impact how much work we can get done and how densely we can plant, as well as how many “outside” inputs our veggies and staples need.

The term “value” itself changes. There is value in being able to produce our base calorie staples, but there is also value in having those rainbow “diet food” veggies that are packed with nutrients. If we’re in “thrive” with a community around us, there is a great deal of value in producing sugar crops like stevia or beets, or tobacco, tea camellia, and caffeine-loaded yaupon.

There is enormous value to self-sufficiency in learning to produce and stocking extra seed for oil crops such as peanuts or canola/rape http://www.thekitchn.com/whats-the-difference-between-canola-and-rapeseed-206047. Sunflowers for animal feed and for oil http://www.survivopedia.com/how-to-make-vegetable-oil/ are another that might have incredible value both for today’s self-sufficiency and after a disaster – even a “lower” major disaster on the scale of the Great Depression or Venezuela’s recent issues.

The presence of livestock may alleviate one need or input, lower some labor, and allow us to value a different crop, or focus on staples and veggies over oil crops.

There’s nothing wrong with going ahead and stocking seeds we don’t plan to use “unless”, but we can apply the factors in value there, too.

We might as well stock seeds for things that have one high value or another for those times when we can trade them out, take over curbside grass swatches and neighboring fields, and uproot city parks and stadiums. Knowing what a crop requires to go from seed to seed lets us stock wisely.

In the end, we each have to decide for ourselves which crops to focus on, from our storage totes on fire escapes and bottle towers in windows, to our triple-digit acreage in the Redoubt or South Texas. Knowing the factors that apply can help us make those decisions.


The post Selecting Crops for Survival Gardens appeared first on The Prepper Journal.


from The Prepper Journal
Don't forget to visit the store and pick up some gear at The COR Outfitters. How prepared are you for emergencies?
#SurvivalFirestarter #SurvivalBugOutBackpack #PrepperSurvivalPack #SHTFGear #SHTFBag