Saturday, August 18, 2018

Prepper Gardens – Vertical Expansion

Written by R. Ann Parris on The Prepper Journal.


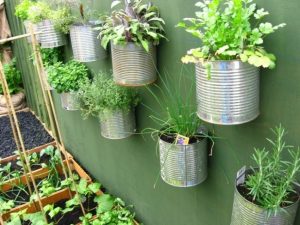
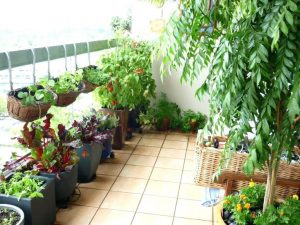
There are lots of ways to produce food, herbs, and medicines, whether we have small properties with just a patio or deck, or large acreage. Our growing options increase all over again with some simple things like freebie pickup shipping pallets, bottles, old furniture, totes, and bricks.

The ability to make use of vertical space can not only increase our productivity per square foot, but in some cases also make gardening easier on the back and knees.

Pro’s & Con’s

With a few notable exceptions, most vertical growing options share drawbacks and benefits. You have to build something, and you have to supply dirt. You also typically have to water more often and provide more fertilizer.  However, it eliminates the need for a tiller. It also allows us to make use of limited space with narrow footprints.

In some cases they also provide mobility. Instead of working and amending lousy, compacted yards, and then leaving them behind when we move, we can stack our containers inside lawn bags and take them with us. We don’t have to truly start from scratch at our new home.

That mobility also applies to the learning curve of gardens. It’s a whole lot easier to move some boards and jugs, gutters, buckets or totes of dirt than it is to fill wheelbarrows with a shovel and then shovel again to refill elsewhere if we discover the spot that seemed perfect ahead of spring planting is far too shady come summertime leaf-out. (To say nothing of moving CMU or timbers after a season or two.)

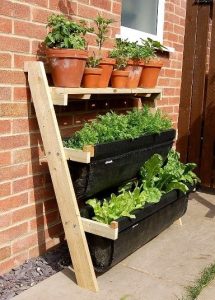
Mobility applies to us as humans, too, although differently. As we age or collect injuries, caring for conventional and even low ground-level beds can become problematic. Bending, lifting, and kneeling can turn even favored pastimes into painful chores. Being able to sit and reach out at hip and rib level or work standing up braced on a cane, crutch, or walker allows us to remain productive even when we can’t handle the heavy lifting of even a dooryard garden.

Big Lifts

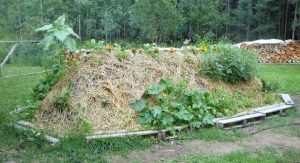
Even a “mini” hugelkulture bed can triple growing space in a footprint full-sized hugel beds that stand 4-6’ tall can quadruple grow space. They also have some benefits over the shallow containers we commonly see in vertical gardens. They hold moisture well, and as the internal wood cores and lighter branches, leaves, and straw used in construction break down, they essentially generate both moisture and their own fertilizer.

However, they are pretty much permanent structures. They’ll break down over time, shrinking, and we can absolutely take them apart and transport that fertile compost and soil elsewhere when we’re done, but it’s not as easy as dumping some of the soil from a bucket or tote, or even as easy as bailing a stock tank into heavy-duty bags and moving it.

We can replicate the self-feeding and moisture retention of hugel beds using some commonly available, inexpensive elements. With or without log cores or heavy branches, they have similar lowered daily/weekly maintenance needs. They also still offer the ablity to work upwards of the ground and greatly increase our planting area per square foot.

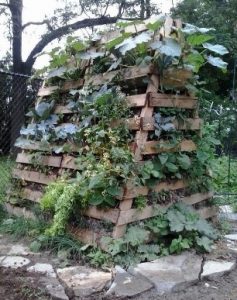
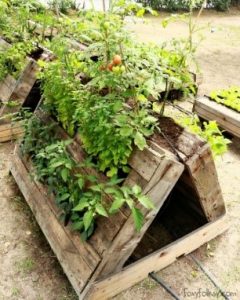
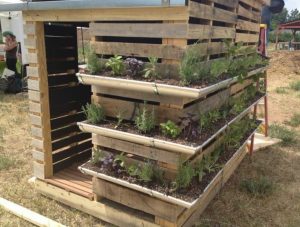
Using scrap lumber or wooden pallets, we can form squares or slope-sided pyramids filled with lawn and tree cuttings, household composting material, and some soil and compost plugs or layers. We can add in tubes and hoses for water, and wire, basket weave, PVC or ABS tubes with holes similar to African keyhole gardens that we’ll add household composting materials to as the season passes.

The downside to wooden materials is that they have a limited lifespan. With treated and thick lumber it can be years in cooler climates, but a single pallet that’s inundated constantly is only going to last a couple years in Deep South or tropical humidity.

That means we need to plot our yards for enough space to rebuild them every few years, or we need to plan to continually reinforce them from the outside year by year – which means they’re going to “grow” outward as we go, but by inches at a time.

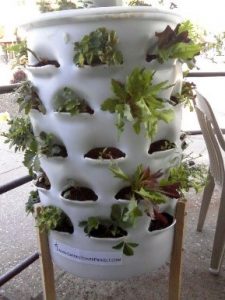
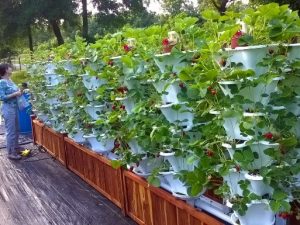
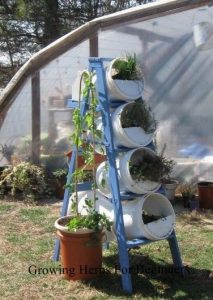
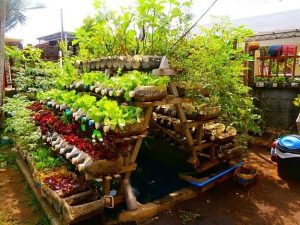
Another option are the wide variety of grow towers. They can be purchased or DIY builds as stackable units or single-drum units with planting holes. We can set those up for in-situ composting tubes as well. The steel and plastic or – if we choose – clay or ceramic pots will last longer than lumber and have the potential to be moved around a property or to a new property if we need to.

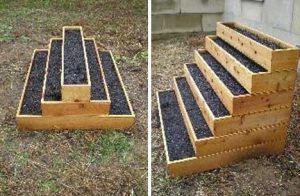
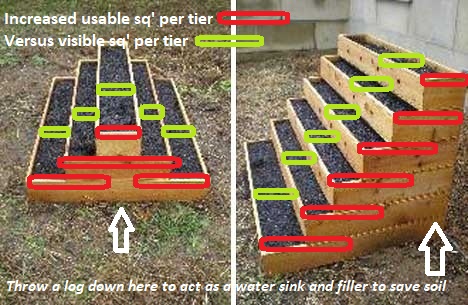
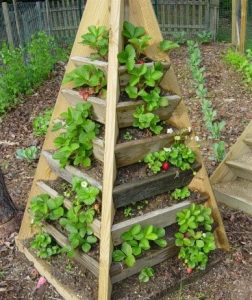
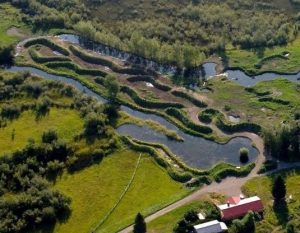
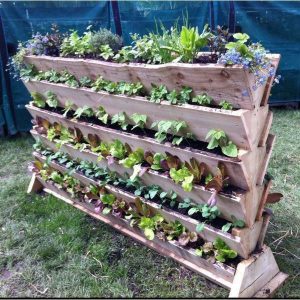
Pyramid beds, pyramid towers, stair-step beds, and spiral beds are also examples of ways we can increase our square footage in small-scale gardening by working upwards in tiers, the square footage of VISIBLE dirt is the same, but the square footage that plants on each tier are using actually extends UNDER the tier above as well due to shape/depth. By using sturdy construction materials like brick, metal, plastic, or block, they’ll last nearly forever and being smaller, we can relocate them if we need to. Even using untreated wood timbers, they’ll last longer than the hugel facsimiles just because there’s not as much weight pressing outward on them.

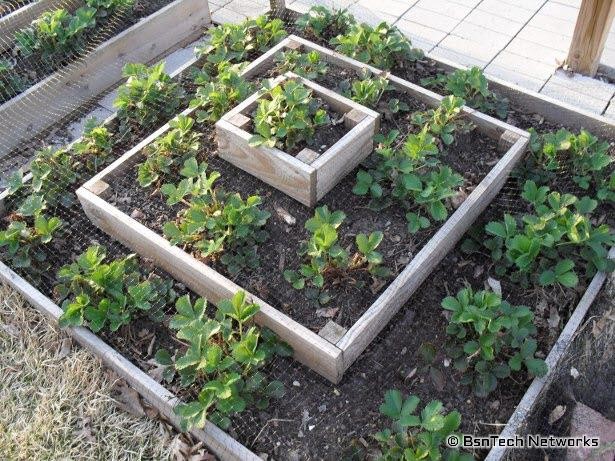
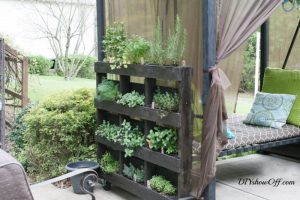
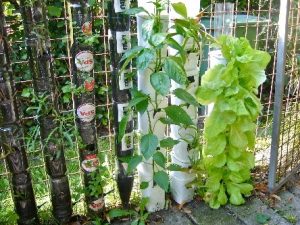
We can get equal or greater pyramid tower effects – increased planting space in a decreased footprint of our property – from steepled and angled shipping pallet beds. A salvaged picnic table and collected juice and water jugs can also be arranged into a very productive pyramid.

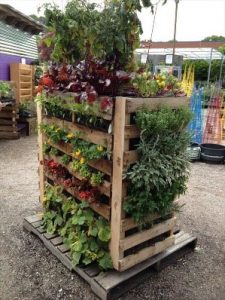
Using the smaller containers, we do go back to the original drawback of many vertical garden expansions: They’ll likely need fertilized more than a ground-plane bed, and they lack capacity to hold much water, especially in relation to the biomass they’re going to support. With vertical pallets especially, we also have to plan ahead with watering, just like barrel planters or grow towers.

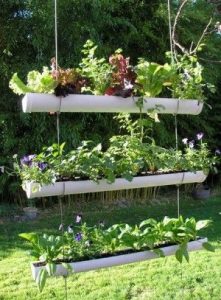
If they’re only a couple of tiers high we may be able to soak them as we would any pots, containers, or shallow conventional beds. In most cases we’re going to have to lay in hose or something to act as a funnel or olla irrigation on each tier to ensure that the bottom doesn’t dry out while the top ends up soaked.

Even so, it’s a handy way to get 2-8 times the growing space out of the square footage they occupy, and in many cases they can travel with us to continue easing the back strain of growing some groceries.

Production Capability

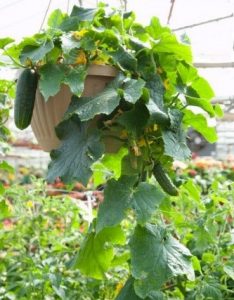
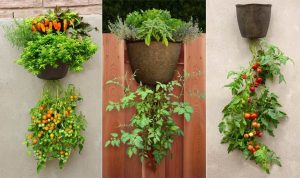
There is one caveat to the containers and small pocket or trench spaces most usually associated with vertical gardens: They’re for veggies, not staples.

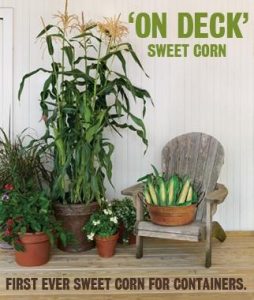
There are peppers, cherry and grape tomatoes, and others that are adapted or adaptable to hanging pots and relatively small planters, and we have some larger options like shipping pallets, buckets, and hanging bags that can handle them. There are the cube and pyramid types and the hugel beds and approximations that can handle larger melons. We also now have several dwarf sweet corn with full-sized cobs specifically for container gardens, although they’re less applicable to small-container vertical garden methods.

Wheat, griding corn, barley, peas, and dry beans in enough quantity to affect our meals really just don’t work well in most container garden setups and it’s hard to get them enough root and growing space to make them viable for vertical methods.

Even so, there’s value there, and the low footprint required of vertical growing methods is actually a major bonus. We can use very little square footage to produce our nutrient-rich and flavorful veggies, very efficiently many times, saving our horizontal planes for livestock, play/training space, orchards, or crops that do work better by plot, not plant.

Integrating Livestock

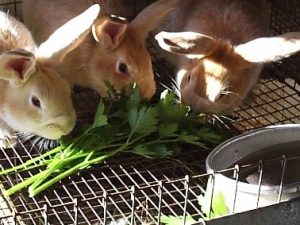
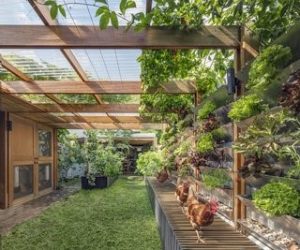
Vertical methods can be used in conjunction with livestock, especially small livestock. The benefits include more than just finding enough space for both a small veg garden and compact livestock. Those benefits scale and apply to people with elbow room and acreage as well.

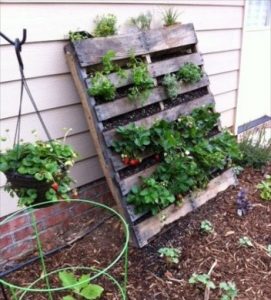
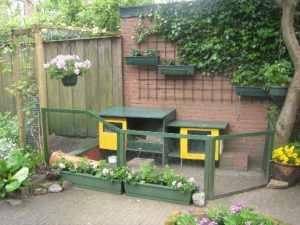
Even more than green roofs, vertical gardens can also offer shading for those rabbits or hens – especially helpful in hot climates to keep rabbits breeding productively and lower heat stress. We might also arrange planters to help guard the lower edges of coops and hutches from predators that would dig or reach through them, or where they’ll increase the insulation and buffer winter winds. One easy way to accomplish that, is to line our existing fencing with vertical pallet gardens.

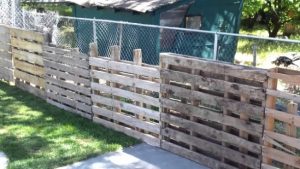
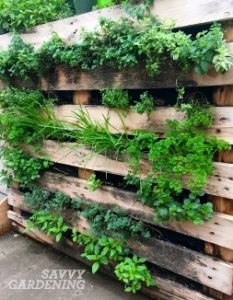
We can source pallets and leave them as-is for as long as we like, and when we have time and supplies, turn those predator and weather barriers into veggie and herb production. While some contortionists and taller livestock will be able to reach around the tops of fences, losses are limited for most and we can simply tailor our pallet gardens so the tops are water catchment or for them.

While pallets have the most applications, we can use any of the tower or hanging-container methods in conjunction with our livestock fences. If they’re spaced tight or boards are arranged between them, it’ll limit “predation” by our adorable stock. Chickens, especially, will be able to reach their necks well past chain link and cattle wire.

Those gardens can be done inside the coop, hutch or run, too, protected by mesh that allows free feeding but prevents livestock from eating plants all the way to the roots. Essentially, it’s just creating graze boxes, although in this case we don’t have to worry about making sure the plants can tolerate the “heat” of raw manure.

In the case of waterfowl and smaller goats, we can hang crops for us over their reach, but chickens will hop and reach, and by the time it’s out of a standard goat’s reach, we’d have to hook hanging baskets down for harvest and maintenance. However, we can add more productive space to our fence lines with any livestock by turning to shrubs, trees, and vines.

Depending on the type fencing we have, they’ll munch one side until it’s out of reach and we may need to put a barrier up to protect tender starts and smaller vines they can reach through and over the tops of fences. It’s silvopasture – most commonly timber and fodder trees in acres of pasture, but easily manageable even in very small yards and totally applicable for everything in between.

Growing Up, Not Out

Expanding our growing methods to the vertical plane has a lot of advantages not only for preppers in limited space, but also those looking for ease. In some cases, it can also be incredibly helpful for those just starting out, figuring out new properties, and trying to save money. Even for those with acreage, using vertical methods for veggies or greens can help keep those close at hand for harvest and care, as well as create less exposure to predators or livestock.

The narrow footprint also makes vertical gardens valuable for those trying to maintain a lower profile with their survival crops. The efficient use of floorplan means they can be stashed very close to the house, tucked into nooks and crannies, and even used inside, keeping them out of future potential thieves.

There’s a vertical garden method that can help just about any prepper, beginner or old hand, tiny apartment to six-digit acreage. Many can be done inexpensively and with minimal labor, tools, or soil and amendment purchases. With all the options, pretty much all of us can start increasing our food production or make at least some of that production a little easier from the labor aspect.

Follow The Prepper Journal on Facebook!


The post Prepper Gardens – Vertical Expansion appeared first on The Prepper Journal.


from The Prepper Journal
Don't forget to visit the store and pick up some gear at The COR Outfitters. How prepared are you for emergencies?
#SurvivalFirestarter #SurvivalBugOutBackpack #PrepperSurvivalPack #SHTFGear #SHTFBag

Friday, August 17, 2018

Gun Storage 101: How To Choose the Right Gun Safe (Cost, Capacity, & Features)

Written by Guest Contributor on The Prepper Journal.

Editors Note: An article from Sam to The Prepper Journal. As always, if you have information for Preppers that you would like to share and be entered into the Prepper Writing Contest with a chance to win one of three Amazon Gift Cards with the top prize being a $300 card to purchase your own prepping supplies, then submit your article today!

If we could boil down the various reasons to own a gun safe down to just two, it would be to protect your firearms and other valuables from a house fire and against unauthorized access (burglars, kids, anyone else, etc.).

Regardless of how many guns you personally own, owning a gun safe to store your guns is a good idea. As a gun owner as it not only protects the investment and/or the sentiment you’ve put into those guns, it again also helps prevent your firearms from falling into the wrong hands, and thereby at least mitigates some of your possible liabilities. That being said, not all gun safes are created equally, and some are much better (or worse) than others. In this article, we will outline and discuss the various qualities that your gun safe must have so you can select the very best gun safe for your needs.

Storage Capacity

The first thing your safe needs is enough storage capacity to actually hold all of your guns.

Take note that the marketed storage capacity of gun safes is often not what they can actually hold. For instance, if a safe claims it can hold 20 long guns on the marketing label, chances are good it will only hold fewer than that (similar to how tents will rarely be able to comfortably sleep their advertised sleeping capacity as well). The manufactures don’t take into account bolt actions, scopes, lights mounted on Picatinny rails, and other things that increase the footprint of a long gun, or scopes and lights on handguns. Their estimates are a marketing tool.

Therefore, as a rule, buy a safe that claims it can fit more guns that you actually own. If you own ten (10) long guns, for instance, a gun safe marketed as holding twenty (20) long guns would be a good choice.

10 Gauge Steel


The type of steel that your gun safe is constructed of is of critical importance.  Steel thickness is measured in ‘gauges,’ and as a rule, you’ll want to go with a safe that has at least ten (10) gauge steel (which comes out to about .1345 inches).

Why?  If a safe has less thick steel than ten gauge it’s not as likely to do a decent job of protecting the interior of the safe from a house fire or against being broken down with an ax or sledgehammer or whatever.

1 Hour Fire Protection Rating


The fire protection rating is another very important factor to take into consideration when looking for a gun safe. As with the type of steel you need, there’s a rule to follow with your fire protection rating as well: one hour of fire protection at the very minimum.

Many gun safes will have a fire protection rating of thirty to forty five minutes.  You may think that’s sufficient, but the truth is that it can take first responders up to fifteen to twenty minutes to arrive on the scene AFTER they’ve been alerted. All in all, it typically takes about one hour before a house fire is put down, and this is why you’ll want to have a fire protection rating of one hour at least (more than that, obviously, would be preferable). If you can buy a gun safe that has at least a one hour fire protection rating with an internal temperature of three hundred and fifty degrees, you’ll be in good shape.

Multiple Locking System

While there are different types of gun safes available, they also come with a wide variety of different types of locking mechanisms.

vs

After narrowing down your selection of gun safes based on the fire protection rating and thickness of the steel, the type of lock is the next most important thing to pay attention to. These days, the four most popular types of single locks are, in alphabetical order:

Out of these, the combination and the key lock are the most traditional option.  They cost the lease and have been available for decades. All you need to do is spin the dial repeatedly left to right until you get the proper code for the combination lock, whereas key locks obviously just require the key. Opening either of these in an emergency is something that should be considered as they take presence of mind and precious time to either find the key or to spin the dial correctly. And the emergency doesn’t have to be getting to a gun to save your life, it could be an emergency evacuation where valuable insurances papers are better taken with you than left to the results of the impending emergency, no matter the steel or fire protection levels. In the case of a flood, earthquake or severe weather who knows where the safe could end up.


The electronic lock is faster than the combination lock and allows you to just punch in a code. The main drawback, of course, is that they are reliant on electric power, usually a 9-volt battery. I have changed my battery once in the past 5 years, and the lock indicates a battery-low condition. Something to consider, the more digits required, mine requires six (6), the more secure the more time it takes to operate.

Finally, the biometric lock requires you to scan your fingerprint in order to access the safe. This manufacturer of a gun lock claims it takes .3 seconds to operate. Make your own judgement about, again, as to operating it in an emergency.

So, which of these locks is the best option?

The answer is possibly none of them, at least not individually.  Rather, you’ll want to go with a gun safe that has a multiple lock combination, meaning it has at least two different locking systems.

For instance, one popular type of safe is to have an electronic lock with a secret key lock beneath the keypad so you can also open the safe with a key.  Many people like this type of safe because it means you can still open the safe and access the guns inside in the event of an EMP attack or solar flare that would knock out all electronics within a particular vicinity.  Another popular option is for the gun safe to have both an electronic lock and a biometric lock.

Cost 

Last but not least, this is another factor that you will need to consider. The more money a safe costs, the ‘better’ it’s going to be, meaning it’s going to have thicker steel and a better fire protection rating.

But on the flip side of things, safes aren’t cheap, and the absolute best safes on the market will cost you two to three thousand dollars.  What if you don’t have that kind of money to spend?  What if you don’t even have a thousand dollars to spend on a safe?

The good news is that there are a number of budget minded safes on the market that will be serviceable. These safes will cost around $500 or less, and while that may seem like a very reasonable price, it’s also going to mean you’ll need to make sacrifices.

For example, a $500 or lesser priced gun safe is probably going to be of a smaller size and have less thick steel and a shorter fire protection rating (maybe around thirty to forty minutes). The best solution here is to simply buy the highest quality safe within your budget.  If you only have $500 to spend, and that’s totally fine, buy the absolute best safe that you can find for that price range (meaning find the safe with the most amount of room and the thickest steel and longest fire protection rating for that price).

Conclusion

In summary, the best gun safe for your needs will need to meet each of the following qualities:

  • Have enough room to store more than just your current guns
  • Be constructed of at least ten gauge steel
  • Have a one hour fire protection rating
  • Have multiple locking systems
  • Be within your budget

If you can find a safe with each of these qualities, you can rest assured that your guns and whatever else you choose to put in your safe are well protected against fires and unauthorized access.

Follow The Prepper Journal on Facebook!

The post Gun Storage 101: How To Choose the Right Gun Safe (Cost, Capacity, & Features) appeared first on The Prepper Journal.


from The Prepper Journal
Don't forget to visit the store and pick up some gear at The COR Outfitters. How prepared are you for emergencies?
#SurvivalFirestarter #SurvivalBugOutBackpack #PrepperSurvivalPack #SHTFGear #SHTFBag

How To Heal Wounds With Spider’s Silk

When using spider web to treat wounds, insert the cobweb-made ball onto the wound, and make sure that all edges of the wound are covered by spider web. Also, make sure the spider web actually touches the surface of the wound.

from Survivopedia
Don't forget to visit the store and pick up some gear at The COR Outfitters. How prepared are you for emergencies?
#SurvivalFirestarter #SurvivalBugOutBackpack #PrepperSurvivalPack #SHTFGear #SHTFBag

Thursday, August 16, 2018

When Staying Awake Really Counts

Written by Wild Bill on The Prepper Journal.

There are some people that we all depend upon to stay awake as others lives depend on it.

And anyone who has served in the military has pulled guard duty. Caution! I may be about to give away some very guarded military secrets here.

My first real guard duty was during Army basic training at a place that no longer exists, Ft. Ord, California. Now a part of the Monterrey Bay seaside communities, it was an interesting place to do basic training. The lovely sand beaches made for a great place to run in combat boots, with full packs, and the rifle ranges with the small cove on the bay as the backdrop always had recruits looking for seabirds as opposed to the targets. Like a smaller version of Camp Pendleton, as a California native I always wondered why the government didn’t close and sell off these two bases and use the proceeds to pay off the national debt. Prime real estate for sure, I just didn’t understand politicians at the time, laboring under the foolishness that our best interests were their best interests. Silly me. I have since learned.

So, one night I got to “guard” one of the ammo bunkers while carrying an empty M-14 with not even a clip, no radio and just an occasional “drive by” from the unlucky lieutenant who was the “officer of the guard” that night.  It was a four-hour shift and I was to continue to march around the bunker, so staying awake was not a challenge as I was to be constantly moving at a reasonable pace. Of course this was a training exercise, no one expected an enemies Seal Team 6 to be assaulting the base anytime soon and the surplus M-14’s were heavier and more abundant at the time than the M-16, making them a better weapon for basic training use, like bayonet training on an asphalt parade field in 95 degree temperatures.

I did get to do a similar task a few weeks later in a fire-watch tower in the Sierra National Forest. This had two of us trainees in a tower, with a radio, canteen full of water and binoculars looking at trees in every direction for a 6-hour shift. More training BUT I had company and the tower was really spacious. Again, easy to move around, and no real threats.

The next time it was too real for all involved and it was then I got the real mission, staying awake and alert meant saving lives, my own included. A base just south of the one I was at in the Mekong Delta had a sapper drop a charge in what was the command bunker on that bases perimeter, manned by a group of four (4) soldiers who were apparently more interested in smoking joints than looking out the openings. Like those at Fire Support Base Mary Ann, they had become complacent.

So as preppers in a SHTF situation or TEOTWAWKI some of us will be called upon to pull guard duty, to stay alert and awake and ready. To make a life or death call and to be responsible for not only our safety and survival but that of our family and friends with us. A given to those in the military, or police or security people, but a whole different animal to those of us now making our living in other ways, years removed from our military service.

Fast forward to life today where a news broadcast can put us to sleep in seconds, where media content has become so rote it is instantly mind-numbing, the remote not working fast enough to switch channels, were daily commutes are more like glacier movements than the Indy 500. What are some things we can do to stay awake when it really counts?

First, Test Yourself

After a normal day try staying up for just one night while looking out one of your windows. No smartphone, no TV, nothing that makes noise or gives off light and exposes your position. Boredom is the enemy here. Try a 2 hour shift first and if you succeed try 4 hours. This will bring home the reality of being on guard duty in as safe an environment as possible. Don’t think you have it figured out after twenty minutes, do the full 2-hours the first time, it may save lives someday. If you proceed to try a full 4-hours on another day your have gotten the message that this could be important. PLUS you have gained some compassion for those that do this and perhaps some sense of judging people who will succeed at this and who will fail.

Prepare Ahead of Time

Of course it would be great if you were able to sleep ahead of time. Being tired or sleep deprived when the threats are real is the worst case scenario. There are some steps that can make this somewhat more tolerable, depending on your situation.

Make the guard shifts as short as possible and if you have the manpower, two per shift to keep each other awake. Stagger their relief times so one will always be fresher. The downside is that every 60 minutes there is movement at your guard position. Consider that in your planning.


If you do have to pull longer shifts alone try liquids – coffee, soda, energy drinks, just water, the colder the better. Sip to make them last and to keep a thirst which will help you stay awake. Remember mixing coffee with energy drinks will keep you awake but your body is not going to forgive you later when you do try to get some needed sleep.

Snack on some stimulants – anything with a high caffeine or sugar content which, as bad as it sounds, could be instant coffee granules, sugar cubes, small pieces of candy not chewed but allowed to dissolve in your mouth. Your dentist will either love you or hate you, depending on the barter he agreed to, but they work. A lot of long-haul truck drivers use this method. Some will recommend dried fruits or nuts – they don’t dissolve and don’t provide the stimulant, and if you chew like a cow that produces noise.

Mind Games – do math in your head – multiply a three digit number by a two digit number, in your head. This is how actors are taught to look like they are thinking and it works because your mind is engaged. Force yourself to complete the problems. This mental exercise is very useful. Count from 1,000 backwards. It makes time pass and it is a method professional speakers or debaters use to keep from over-reacting to a dissenting reply immediately as opposed to processing the information first. I am talking about real debate as opposed to the mock stupidity that the media passes off as debate.

Sing, in your head, a favorite song and do your best to get the lyrics right. If you get one stuck in your head think of another to replace it. Anyone who has ever ridden on the Small World Attraction at a Disney theme part gets this one.

Make your self less than comfortable, too warm or too cold are good while too relaxed is bad – avoid the things we seek when we are trying to get to sleep. If you can move, then do move. Do a few calisthenics in place, but only if your position will not be compromised. Closed kinetic exercises can be done quietly and are beneficial to boot!

Create a routine – one that you can work through night after night, one that challenges your mind – pick a song to sing where you don’t know all of the lyrics and then fill in the missing parts with things you create; set aside a period of time to do the mind/math mental exercises and stay on that schedule. Do a complete scan of the area you are responsible for covering and then pick some landmarks – places where people approaching might gather and hide. A large tree, a gully, a small hedge roll, and do a scan periodically of just those, concentrating on their shape and contours and looking for any changes.

Complacency is the enemy and it gets people killed.

Of course, when not on guard duty catch as much sleep as you can.

I have read that rubbing a small bit of hot sauce in your eyes will help. It was, after all on the internet. I am mystified that this would even be attempted. After all being there wide awake with your eyes blinded makes you, well, useless. People also suggest kneeling on small rocks or pebbles, or placing some in your shoes to keep you uncomfortable. I am against anything that produces pain, and possible injury. You may instantly need to run from your location, on sore knees with sore feet.

Long-haul drivers have some tricks they use but most involve sounds and motion, enemies to concealment.

One other thing to consider is how to NOT give away your position:

Smoke from a cigarette can be seen at night from distances of 250 to 500 yards , smoke from a campfire for miles.

A flashlight, or light from a smartphone flashlight app can be seen up to 500 yards, even the glow of its screen, all well within sniper range.

Any illumination of you position and you are compromised, and this includes sounds. Noise is a sure giveaway. We all have that friend who taps his or her foot constantly, or the people who like to crack their knuckles. Laser sights work both ways, as do tracer rounds. As to muzzle flash, once you produce that you already know your position is compromised. Plan on having alternate locations after you fire at a threat because you have exposed your position by firing.

Other things that give away your position even at night – light reflected off things like binoculars, weapons, and personal items such as those drink cans. The reality is that if you sit perfectly still, make no noise and stay wide awake you may still be exposed with the layers upon layers of technology that have been fielded to search for, acquire and destroy targets. In a SHTF world these should be limited, hopefully still in the hands of law enforcement and the military, and depending on the condition they may or may not be the people you want to avoid.

Now, as to that buzzing sound….

Follow The Prepper Journal on Facebook!


The post When Staying Awake Really Counts appeared first on The Prepper Journal.


from The Prepper Journal
Don't forget to visit the store and pick up some gear at The COR Outfitters. How prepared are you for emergencies?
#SurvivalFirestarter #SurvivalBugOutBackpack #PrepperSurvivalPack #SHTFGear #SHTFBag

6 Ways Our Ancestors Made Dangerous Food Safe

100% artificial foods: What can we eat that will not lead to serious illness now as well as in a time of major crisis?

from Survivopedia
Don't forget to visit the store and pick up some gear at The COR Outfitters. How prepared are you for emergencies?
#SurvivalFirestarter #SurvivalBugOutBackpack #PrepperSurvivalPack #SHTFGear #SHTFBag

Wednesday, August 15, 2018

Tips for Defending Your Bug Out Location

Written by Cody on The Prepper Journal.

A guest post from Megan Ray Nichols.

When things go down, you’ll need to be ready to defend your bug out site, whether it is someplace off your normal beaten path or your home or the home of a relative that has been selected and stocked by your extended family. Whether you also have family or vital supplies stored there, standing your ground becomes critical to keeping your attackers at bay. And the key to this is to know your force multipliers to turn yourself into a fighter with the force of a group. This alone will help you to defend your location and keep those within it safe.

Choose Your Bug Out Location Carefully

The first step in defending your bug out location is making sure it’s justifiable to hole up there. You will need adequate space for yourself, your family and your survival supplies. It should have access to fresh water and fresh sources of food. Food can be from hunting, from growing it or from both. Locations in valleys or low spots are hard to defend. Choose high ground for easier defense.

From experience during Bosnia’s occupation, survival expert Selco noted that the best locations during disasters changed. Immediately after the event, you want to stay away from places people loot, like gas stations and stores. Later, the best places were homes in densely packed neighborhoods. This gave people more places to escape to if one home was destroyed. It also allowed a hideout to blend into the background, making it less noticeable to others.

If you have trusted friends, they can hole up in the nearby houses to provide extra security to the area, to cover your 6.

Know Multiple Ways to Defend Yourself

You will need a variety of weapons to keep marauders away. At a minimum, your arsenal should include a long-range rifle, semi-automatic shotgun, a handgun per person and a semi-automatic defensive rifle. To arm these weapons, plan on 1,000 rounds per weapon. Each semi-automatic rifle should have at least ten (10) magazines in stock. And handguns require a minimum of five (5) magazines per weapon.

Depending on where you live, you may need more ammunition than the minimum. Some states have a higher percentage of gun owners. In 2014, Wyoming had the highest number of guns per 1,000 people, at 195.7. Other states with a high number of guns per 1,000 people include the District of Columbia (not really a state but it says volumes about Washington D.C. politics), Arkansas, New Mexico and Virginia.

In these places, when things go down, you’re more likely to encounter another gun owner and get into a firefight. Be prepared with enough ammo.

While guns are useful in survival situations, you’ll also need to know about hand-to-hand fighting. A gun does not help a lot if you end up in close combat.

But fighting with your hands or a knife will do you no good if you have someone sniping at you from a distance. Having handguns, shot guns and knives in your arsenal in addition to non-lethal options like mace will help keep your location safe.

Create Barriers to Your Property


You want to keep invaders off your property and as far from your location as possible. Surround the perimeter with thick, thorn-covered plants. Cacti or holly bushes can deter people and wildlife from entering the area.

In lieu of plants, create a perimeter of barbed wire fencing. Nail boards and pit traps will also stop enemies from closing in on your bug out location.

Inside this perimeter, clear the space to your hideout. This gives you a clear line of sight to see who’s coming. Anyone who makes it past your first line of defenses will then have to pass right in front of you. If they pose an immediate threat, you may need to use your firearms. But assess the situation before shooting on-sight. Those coming could become trusted allies. If they’re looters, shooting will alert them to your location. It might be best to lay low if you have a bunker and it seems they will pass by.

Defending Your Bunker

While creating a perimeter works for both houses and bunkers, underground bunkers have other unique defense requirements. You will need to create positions in the area to defend your bunker from. Since you won’t have above-ground windows to watch the area or snipe from, you’ll need defense pits. A simple hole for a pair of defenders dug four to five feet deep and surrounded with 12 to 18 inches of dirt provides protection and cover for those inside.

If you’re concerned about vehicular traffic reaching your bunker, install heavy concrete bollards around your perimeter. These are the same types of barriers retail stores use at their entrances to prevent cars from accidentally driving through the front doors.

Defending a Home

Freestanding homes, cabins or RVs on a property have different defense requirements than bunkers. You can keep someone in an upper story window as a lookout the entire time. For optimal protection, your home should be built on the highest ground possible. This makes it easier to defend. It also makes seeing invaders from a distance easier.

If you have access to cameras and the means to power them, use these to create a visible perimeter around your property. Flying drones can help you pinpoint the location of invaders hiding nearby.

Have an Escape Route

Sometimes, even the best-laid plans fail. Have an escape route planned before you need it. If you have a bunker, consider installing an escape tunnel from it when you build the bunker itself. Heavy-duty culvert pipes can create this tunnel to a safer location. Just be certain to block off the end of the tunnel. Even a concealed trench can allow you and your family to leave the property unnoticed. Just remember that tunnels and trenches, like tracer rounds, work both ways,

From a house, it will be more difficult to construct a tunnel. But a trench could still give you a way out. If you have your vehicle on your property, a back road leading away from the house can give you a fast way to get out. Make sure to keep the gas tank filled to be ready for a quick egress from your property.

Surviving Bugging Out

When it’s time to bug out, you need to be ready for anything. Defending your bug out location is critical. You’re not only protecting yourself and your family, but also your important survival supplies and land. The land around your bug out location is just as important to your survival as the bunker or home itself. Be ready to keep invaders off your property to set yourself up for surviving the worst.

Follow The Prepper Journal on Facebook!

SOURCES:

https://www.wingtactical.com/blog/needbased-gun-ownership/

https://www.theorganicprepper.com/selco-defend-your-home-shtf/

https://urbansurvivalsite.com/tips-defending-bug-out-location-marauders/

http://undergroundbombshelter.com/new-articles/defending-the-shelter-ways-to-protect-what-youve-built.htm

The post Tips for Defending Your Bug Out Location appeared first on The Prepper Journal.


from The Prepper Journal
Don't forget to visit the store and pick up some gear at The COR Outfitters. How prepared are you for emergencies?
#SurvivalFirestarter #SurvivalBugOutBackpack #PrepperSurvivalPack #SHTFGear #SHTFBag